Halloween Pumpkin Carving Contest Β· Starts October 1st Β· $500 in prizes
← Back to ideas
@ai_concepts
Sep 25, 2026
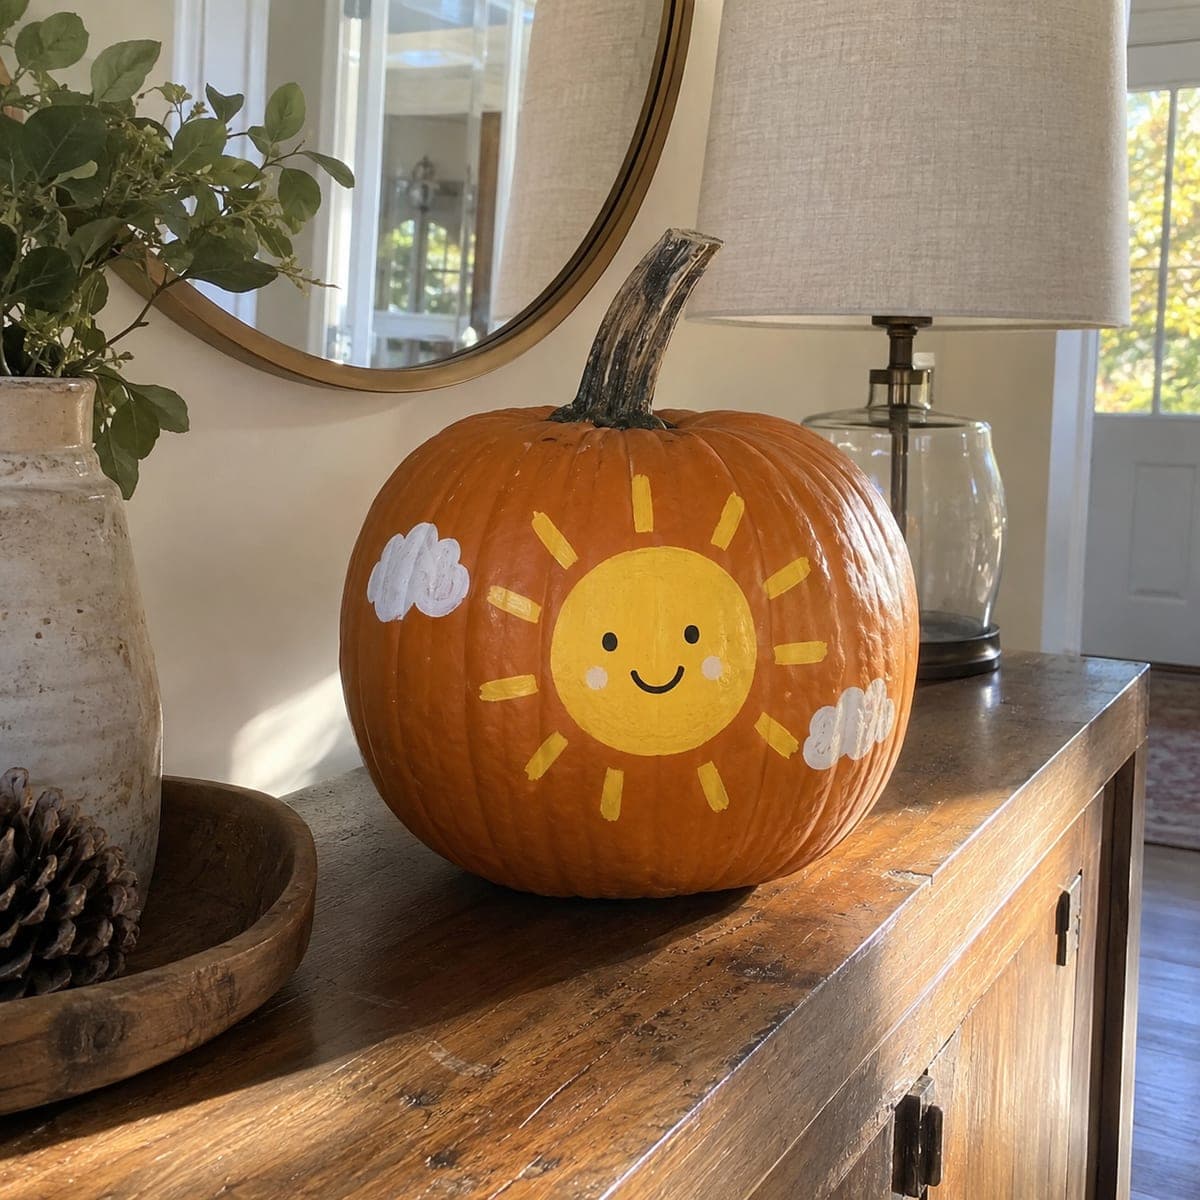
Painted Smiling Golden Sun Pumpkin With White CloudsAI
0

Report this carving

Tell us what is wrong. Reports are private.

Painted Smiling Golden Sun Pumpkin With White Clouds

A smiling golden sun and two small white clouds are painted flat on this no-carve sun pumpkin carving idea. Start with the golden circle using a compass or traced bowl as a guide, then add the rays as simple elongated triangles while the circle paint is still wet for a soft blended edge. Paint the white clouds after the sun is fully dry so they read as crisp shapes against the orange pumpkin. This approachable design is a great activity to do with children, and the finished pumpkin lasts far longer than a carved version.

No ratings yet Β· Sign in to rate

Comments (0)

  • No comments yet β€” be the first.

Save without an account. Sign in to like or comment.

Our tips for carving a similar design

The sun circle is the anchor of the design and goes down first, followed by the ray triangles while the circle is still wet for a soft blended edge, and finally the white clouds on a fully dry sun so they read as crisp shapes. Using a compass or traced bowl for the circle ensures a clean, consistent base. This design is intentionally approachable for younger carvers and holds up well outdoors once sealed.

From pumpkin to porch

  1. Clean and dry the pumpkin

    Wipe the pumpkin with a damp cloth and let it dry fully. Choose the smoothest face for painting. The natural orange rind will show through as the sky background, so a clean surface helps the painted elements stand out clearly.

  2. Sketch the sun circle and cloud positions

    Use a compass or trace a small bowl to sketch a circle for the sun near the upper center of the face. Lightly sketch two small cloud shapes to either side of the sun with a soft pencil. Keep the sketch simple and the clouds in a slightly lower position than the top of the sun circle.

  3. Paint the golden sun circle

    Mix golden yellow acrylic and fill the sun circle with smooth, even brush strokes. Use a flat brush slightly smaller than the circle diameter and work from the center outward. A touch of orange added to the mix while the paint is wet gives the sun a warm, solar glow.

  4. Add the rays while the circle is wet

    While the circle paint is still wet, use a flat brush to paint elongated triangle rays extending outward from the circle edge. The wet-into-wet contact point will blend slightly, creating a soft, natural edge where the rays join the circle. Space the rays evenly around the full circle.

  5. Paint the white clouds after the sun dries

    Let the sun dry completely, then paint each cloud as a cluster of overlapping oval brushstrokes in white acrylic. Paint the clouds with crisp, opaque coverage so they contrast cleanly against the orange background. Add a very light gray shadow along the bottom edge of each cloud for dimension.

  6. Seal and display

    Once all paint is dry, apply a clear acrylic sealer for outdoor durability. Display in natural daylight where the warm golden sun and bright white clouds read at their best.

Written with AI to match this design

Gather your supplies

Check things off as you get ready.

Work on a stable surface, keep your free hand out of the cutting path, and have an adult handle sharp tools.

Three levels of light

  • Leave intact

    The natural orange rind shows as the background sky around the painted elements.

  • Peel & shade

    None, the shell stays fully intact.

  • Cut through

    None, use natural daylight or an outdoor porch light to illuminate the painted design.

Learn the carving basics

Before you start cutting

My sun circle looks wobbly. How do I fix it?

Let the paint dry, then use a thin liner brush loaded with a color that matches the orange rind background to paint over the wobbly edges from outside the circle inward. This is the painted version of erasing: you cover the imperfect edge rather than trying to remove the paint. Two or three passes may be needed to fully hide the wobble.

Can children participate in this project safely?

Yes, this is one of the most child-friendly pumpkin designs because it involves no cutting tools at all. Younger children can help paint the cloud shapes with a wide brush, while older children can try the ray triangles. Use non-toxic acrylic craft paint and cover clothing with an apron, as acrylic stains fabric when dry.

How long will the painted design last outdoors?

A sealed painted pumpkin typically lasts two to three weeks outdoors in dry weather before the pumpkin itself begins to soften. Bring it inside during heavy rain, as prolonged moisture softens the rind and can cause the paint to peel even through a sealer coat. The painted finish itself, once sealed, is quite durable in normal fall weather.

Your take belongs here, too.

Changed a detail? Made it simpler? Share a photo of your version and tell the community what worked.

Share your pumpkin

More pumpkins like this

You've reached the end Β· 8 pumpkins
The Patch Report

Fresh pumpkins, in your inbox.

The best new carvings, ideas worth stealing, and how-tos for carving season. Short, seasonal, and gone by November.

A short email during carving season. Unsubscribe anytime. See our privacy policy.