Halloween Pumpkin Carving Contest · Starts October 1st · $500 in prizes
← Back to ideas
@ai_concepts
Aug 8, 2026
Phoenix Rising Painted No-Carve PumpkinAI
0

Phoenix Rising Painted No-Carve Pumpkin

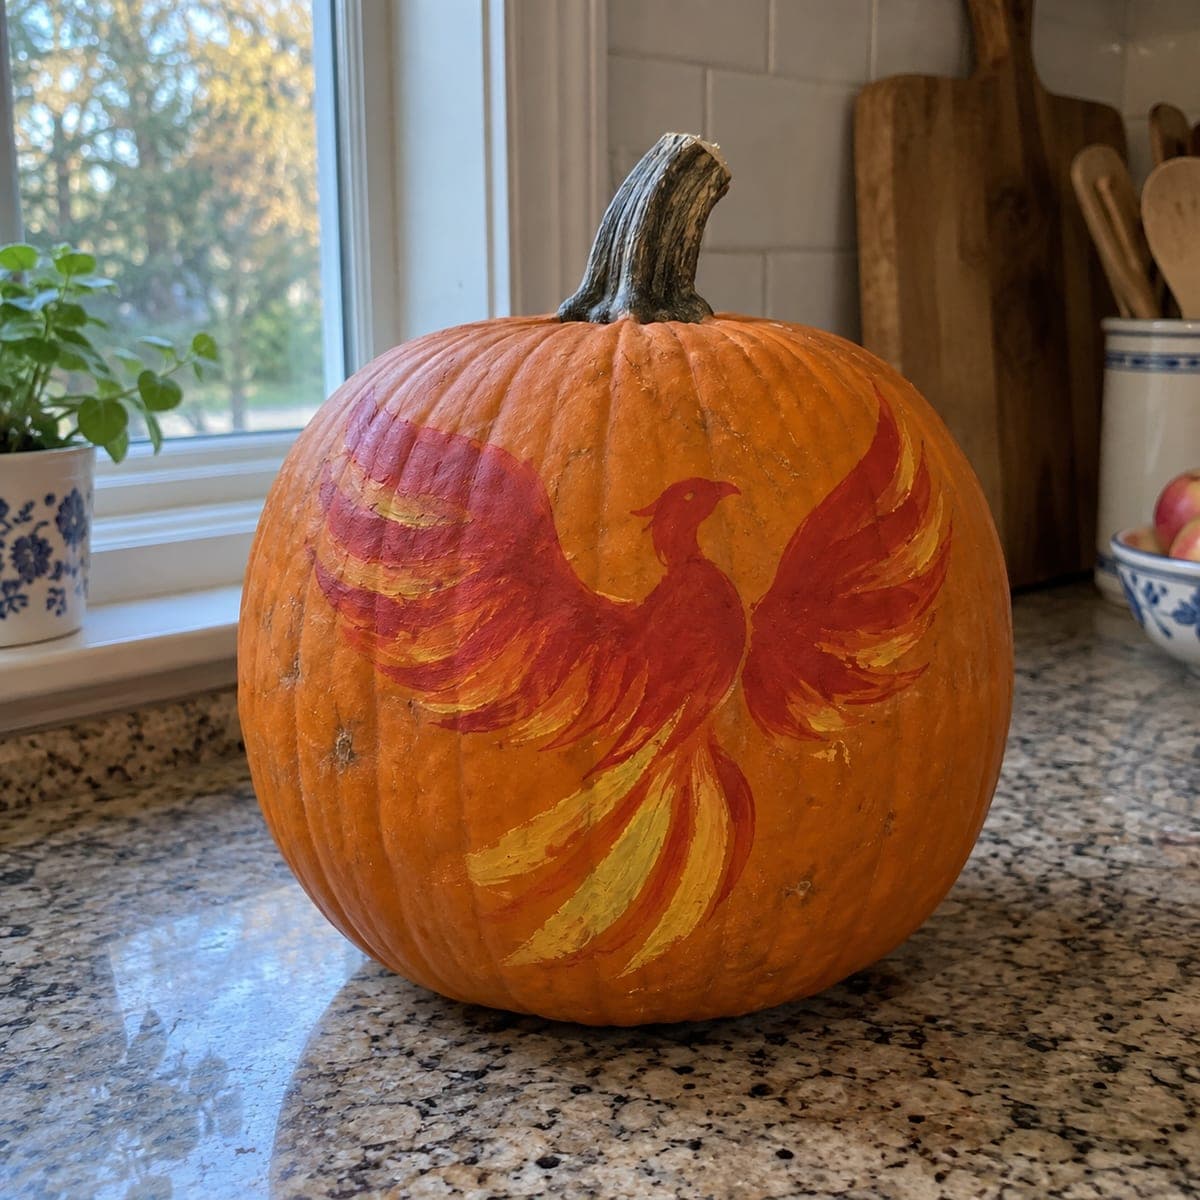
A bold red and gold phoenix spreads its wings across the face of this uncut pumpkin, painted in sweeping brushstrokes that echo the bird's fiery nature. The no-carve approach means no mess and a longer-lasting display, making it a great option when you want a showpiece that holds up past Halloween. Use a medium flat brush for the wing feathers, layering yellow at the base before adding red strokes on top while the paint is still slightly tacky to blend the fire gradient naturally.

This is an AI-generated concept image: a realistic, carvable design idea rather than a photo of a finished carve. AI concepts are always labeled and sit out the leaderboard and the contest.

No ratings yet · Sign in to rate

Comments (0)

  • No comments yet — be the first.

Save without an account. Sign in to like or comment.

Our tips for carving a similar design

The core trick here is a wet-on-tacky paint gradient: yellow goes down first at the base of each feather, then red strokes are pulled over it while the underlayer is still slightly tacky so the two colors blend into flame. Because nothing is cut, the pumpkin stays clean and lasts well past Halloween. Plan the pose first, block in the dark red body, then build the sweeping wing and tail feathers outward.

Written by PumpkinCarvingIdeas.com, inspired by the image above. These are our suggestions, not instructions from the uploader. This approach to the AI concept has not been tested on a real pumpkin.

From pumpkin to porch

  1. Clean and dry the surface

    Wipe the whole pumpkin with a damp cloth and let it dry fully so paint grips well. Pick the smoothest, flattest face as your canvas and set the stem side up. Avoid soft spots or blemishes in the main design area. A dry surface keeps your first strokes crisp instead of beading up.

  2. Sketch the phoenix lightly

    Use a pencil or a washable marker to draw the body, the head with its small beak, and the two arcing wings. Keep the tail flowing down and to one side so it fills the lower face. Work loosely, since brushstrokes will cover these guide lines. Step back often to check that the wingspan is balanced left to right.

  3. Block in the body and dark reds

    Load a medium flat brush with deep red and fill the body, head, and the inner spine of each wing first. These solid darker shapes anchor the whole design. Let this layer set for a few minutes before you move outward. Keep the beak and head shape clean since they read as the focal point.

  4. Build the fire gradient in the feathers

    Paint yellow along the base of each wing and tail feather, then pull red strokes over it while the yellow is still slightly tacky so the colors melt together. Follow the natural sweep of each feather, flicking the brush outward to a point. Layer a few strokes at a time rather than overworking one spot. This is where the flame effect comes alive, so take your time feather by feather.

  5. Add highlights and clean the edges

    Once the gradient is dry, add bright yellow and orange tips to a few leading feathers to catch the eye. Tidy the outer silhouette with a small round brush so the wing edges stay sharp. Fix any wobbly guide lines that peek through. A thin clear acrylic sealer over the finished paint helps it shrug off weather.

  6. Style and photograph it

    Set the pumpkin near a window or on a counter with soft daylight, as in a bright kitchen scene. Angle the painted face toward the light so the red and gold pop. Shoot slightly above center to catch the full wingspan. Since there is no interior light, natural light or a nearby lamp shows the colors best.

Gather your supplies

Check things off as you get ready.

Work on a stable surface, keep your free hand out of the cutting path, and have an adult handle sharp tools.

Three levels of light

  • Leave intact

    The bare orange pumpkin skin around the bird stays untouched as a warm background.

  • Peel & shade

    If you want a subtle shimmer, lightly scuff a thin halo behind the wings before painting so highlights sit slightly brighter.

  • Cut through

    Nothing is cut on this no-carve design, which is what lets it last for weeks.

Learn the carving basics

Before you start cutting

Do I really not carve anything?

Correct, this is a fully painted design with no openings. That means no scooping, no light inside, and a pumpkin that holds up far longer than a carved one. It is a great choice if you want a display that survives past Halloween.

How do I get the fire gradient to blend?

Lay down yellow first at the base of each feather, then stroke red over it while the yellow is still slightly tacky, not fully dry. The two colors will feather into each other for a natural flame look. Work a few feathers at a time so the underlayer stays workable.

Will it show up at night without a light inside?

Since it is not carved, plan to display it where a porch light, lamp, or string lights can hit the painted face. Bright colors like red and yellow read well under warm outdoor lighting. A coat of sealer also adds a little sheen that catches the light.

Your take belongs here, too.

Changed a detail? Made it simpler? Share a photo of your version and tell the community what worked.

Share your pumpkin

More pumpkins like this

You've reached the end · 8 pumpkins
The Patch Report

Fresh pumpkins, in your inbox.

The best new carvings, ideas worth stealing, and how-tos for carving season. Short, seasonal, and gone by November.

A short email during carving season. Unsubscribe anytime. See our privacy policy.