@toothpick_tessa
Sep 5, 2026
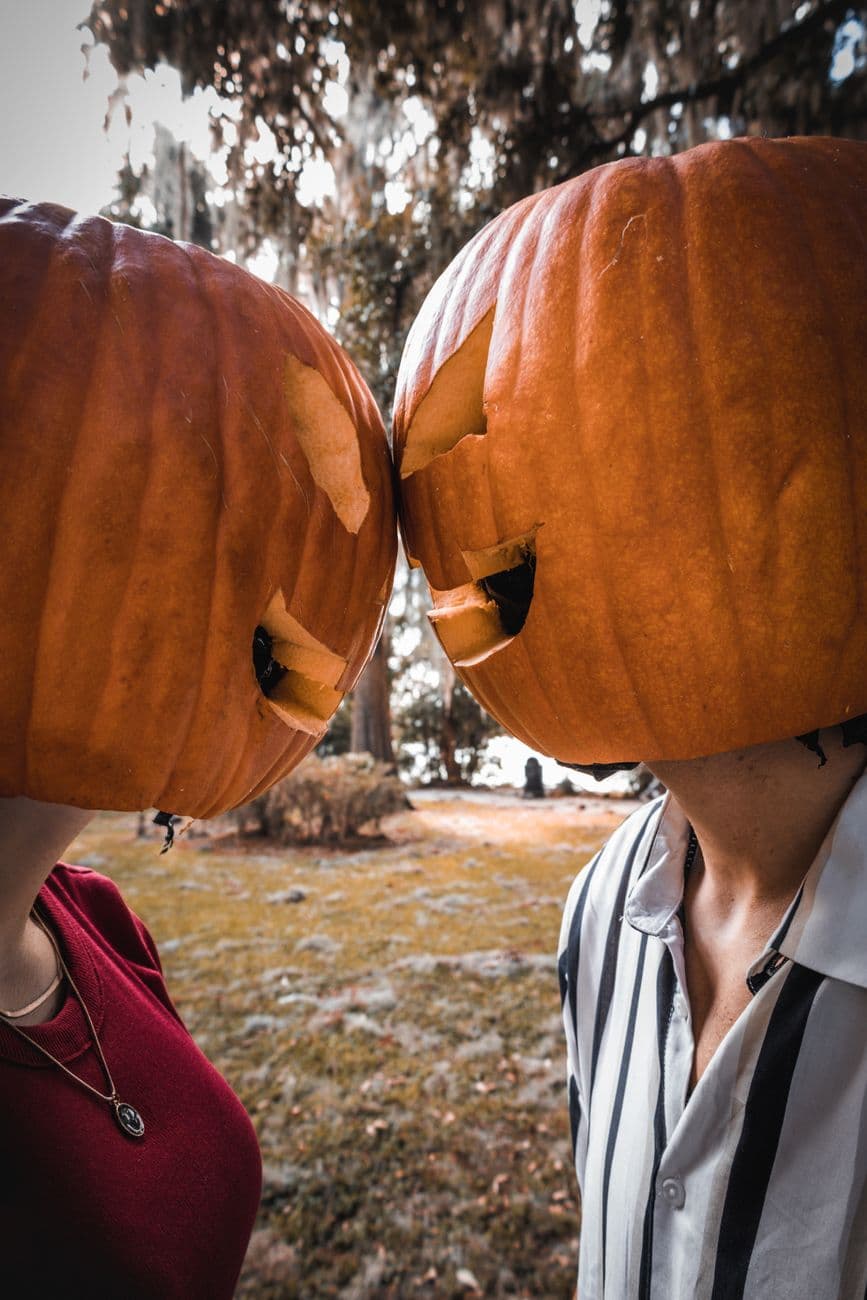
Pumpkin sweethearts
Two carved helmets, forehead to forehead under the Spanish moss. The pumpkin-head photo trend done right.
No ratings yet · Sign in to rate
Two carved helmets, forehead to forehead under the Spanish moss. The pumpkin-head photo trend done right.
The trick here is scale and comfort: each pumpkin is hollowed out large enough to slip over a head, then given a minimal face so the light and grin read from a distance. Keep the features simple, angled eyes and a small mouth, so the shell stays strong enough to lift and wear. Plan the neck opening on the bottom and the face on the front before you cut anything.
Written by PumpkinCarvingIdeas.com, inspired by @toothpick_tessa's photo above. These are our suggestions, not instructions from the uploader, and this approach hasn't been tested on their exact carve.
Choose tall, wide pumpkins that clear your shoulders when held up to your face. Before carving, hold each one against your head to mark roughly where your eyes will sit. Look for pumpkins with a flat-ish front so the face has a clean canvas. Matching sizes help the forehead-to-forehead pose line up.
Instead of a lid on top, cut a large circular opening in the base big enough for your head to pass through. Angle the cut so the shoulders can take the weight. Test the opening on your head early and widen it slowly, since you cannot un-cut. An adult should handle the saw for this deep cut.
Pull out the seeds and scrape the inside wall down to about an inch thick, thinner near the face. A lighter shell is far more comfortable to wear and easier to see through. Scrape the front wall smooth so your eye cutouts line up with your real eyes. Dry the inside with paper towels before carving the face.
Sketch two angled almond eyes and a small crooked mouth in marker first. Position at least one eye where you can actually see out, even if the design eye sits slightly higher. Cut the eyes and mouth with a small serrated carving saw, going slow on the angled corners. Keep the openings modest so the shell stays rigid enough to lift on and off.
For the daytime forehead-to-forehead shot, no light is needed, the carved features read on their own. For an evening version, clip a small battery LED puck inside near the top, never a candle you would be wearing. Keep the LED away from your face and hair. Do a quick wear test to be sure you can breathe and see clearly.
Stand close and lean the two pumpkins gently forehead to forehead, letting the stems or tops touch. Shoot in open shade or under trees so the orange glows without harsh glare. Take breaks, since the shells get warm and the view is limited. Snap a few frames quickly so no one has to hold the pose too long.
Check things off as you get ready.
Work on a stable surface, keep your free hand out of the cutting path, and have an adult handle sharp tools.
The broad orange face and sides stay untouched so the carve reads as a warm solid mask.
Optional skin-peeling around the eyes or brow gives a soft halo if you light it at night.
The angled eyes, small mouth, and neck hole are cut fully through for airflow, sight lines, and any glow.
Cut it just large enough for your head to slide through with a little wiggle room, then test and widen gradually. Too tight and it will not go on, too loose and it wobbles on your shoulders. Angle the rim so it rests on your shoulders comfortably rather than pinching.
Yes, if you place at least one eye cutout at your real eye level before carving. Mark your eye height while holding the pumpkin against your face. You can enlarge an eye slightly for a wider view, just keep the shell strong around it.
A big fresh pumpkin is heavy, so scrape the inside wall thin to cut the weight. Take the helmet off between shots and keep the photo session short. Lift and lower it with two hands to protect the neck opening from cracking.
Changed a detail? Made it simpler? Share a photo of your version and tell the community what worked.
The best new carvings, ideas worth stealing, and how-tos for carving season. Short, seasonal, and gone by November.





Comments (0)