Halloween Pumpkin Carving Contest · Starts October 1st · $500 in prizes
← Back to ideas
@ai_concepts
Jul 7, 2026
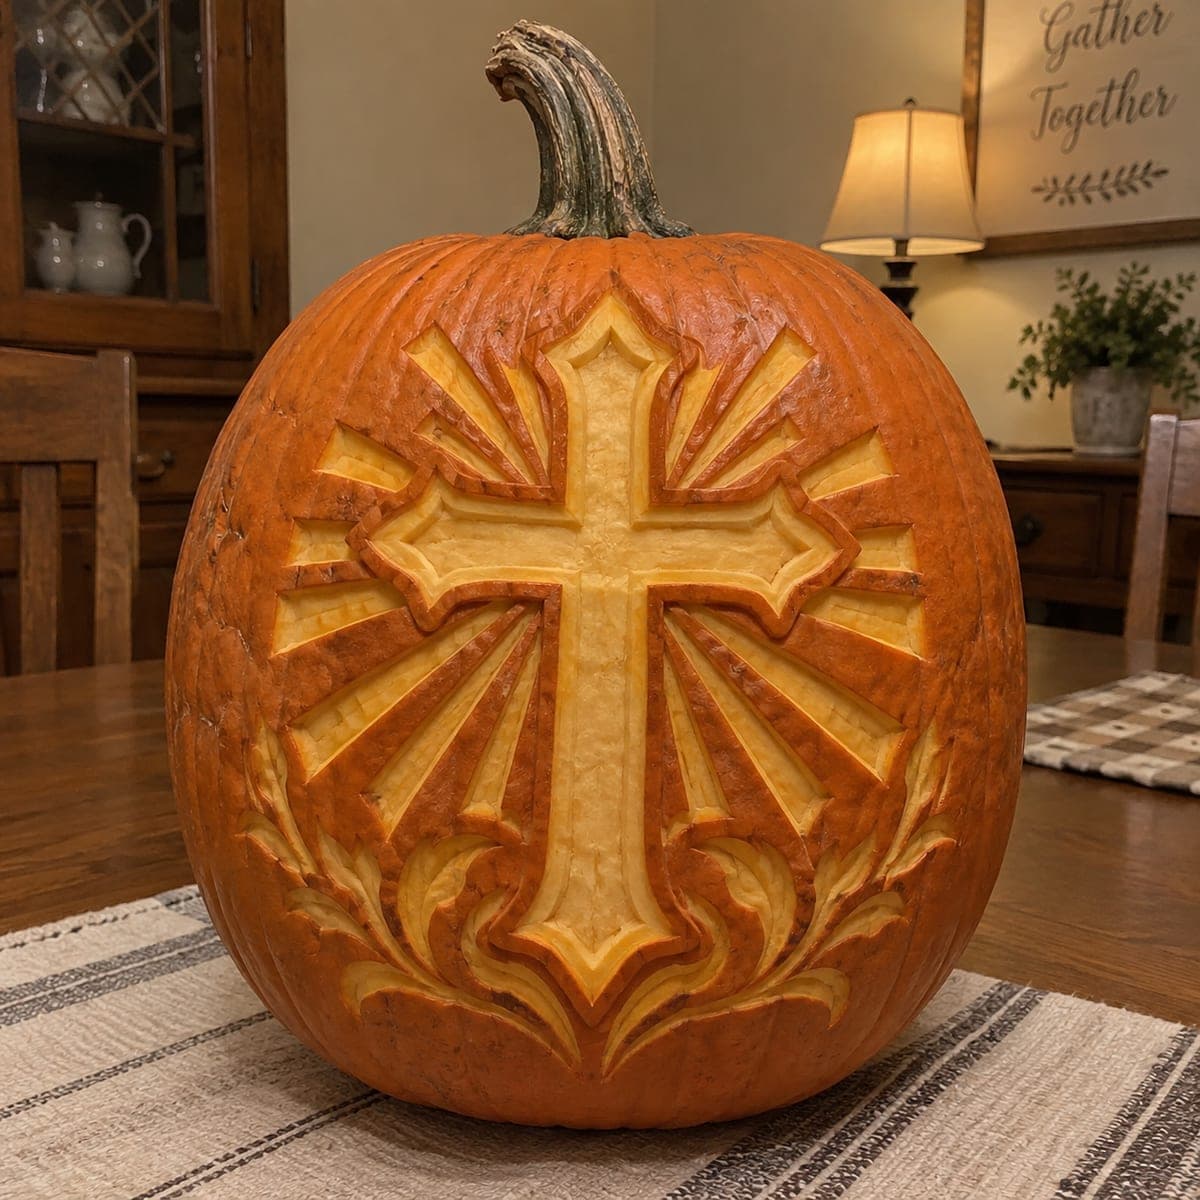
Radiant Cross With Sun Ray Cutout PumpkinAI
0

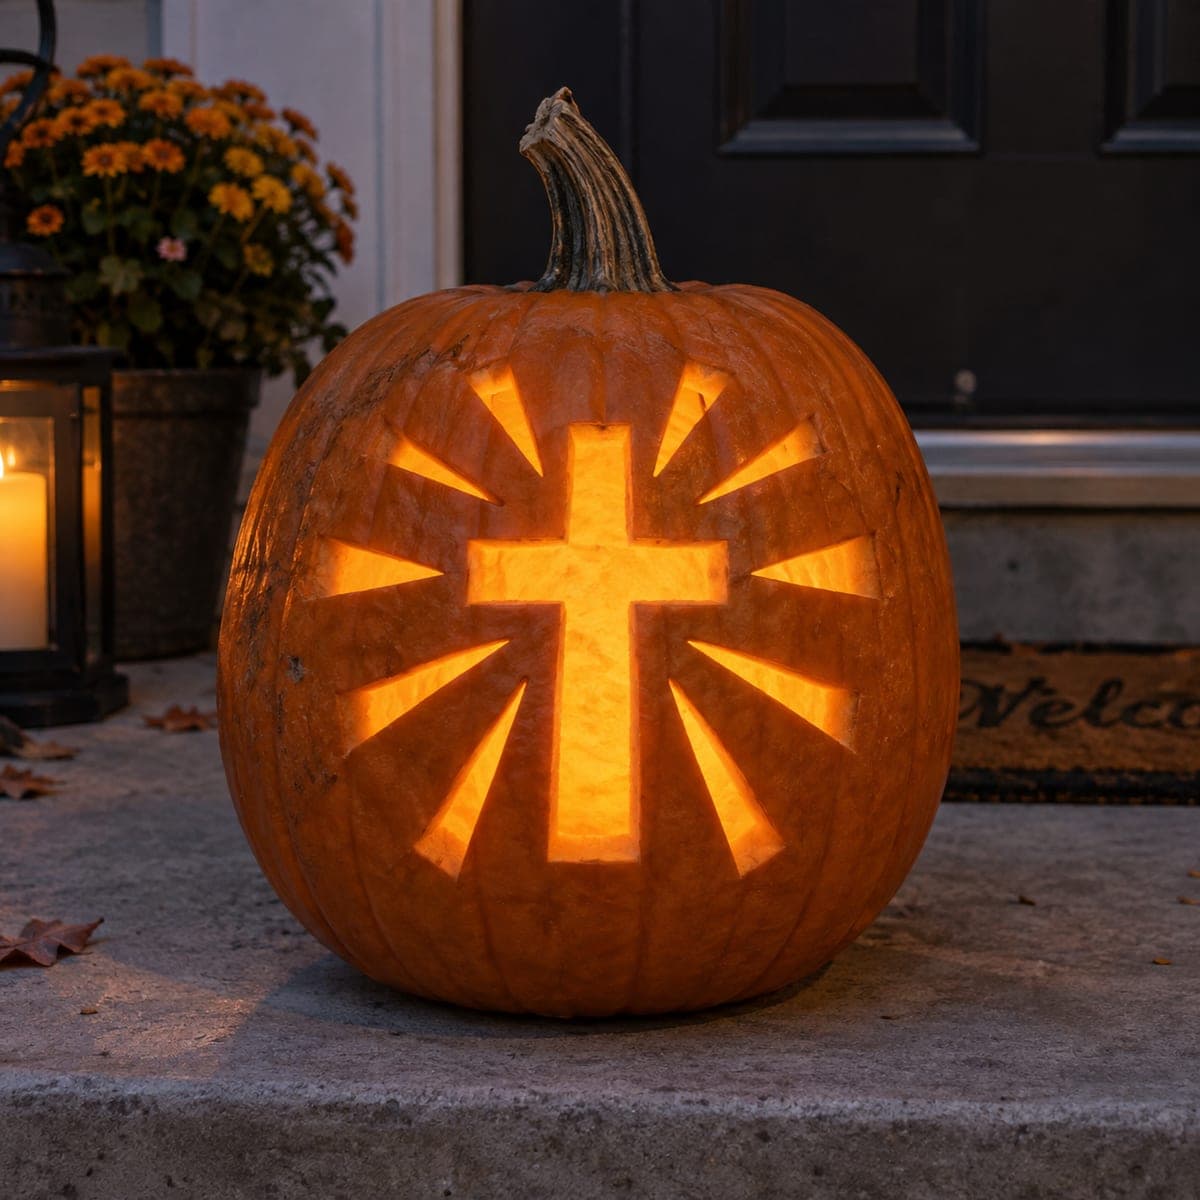
Radiant Cross With Sun Ray Cutout Pumpkin

A bold Christian cross sits at the center of a starburst of radiating cut rays, all glowing brightly from a candle inside the pumpkin. The design uses simple straight cuts fanning outward from a central block, making it one of the more accessible religious pumpkin carving ideas for beginners. Carve the rays first to establish spacing, then carefully remove the cross interior last. Displayed on a front stoop, the warm light gives it a welcoming, devotional quality.

This is an AI-generated concept image: a realistic, carvable design idea rather than a photo of a finished carve. AI concepts are always labeled and sit out the leaderboard and the contest.

No ratings yet · Sign in to rate
Comments (0)

  • No comments yet — be the first.

Save without an account. Sign in to like or comment.

Our tips for carving a similar design

The core trick here is a bold cross sitting inside a fan of straight ray cutouts, so nearly all the light comes from clean full-through openings rather than fussy shading. The plan is to cut the thin rays first to lock in even spacing around the center, then remove the larger cross interior last so the pumpkin wall stays strong while you work. Because this is a concept image, treat it as a pattern you could build on any round pumpkin at home.

Written by PumpkinCarvingIdeas.com, inspired by the image above. These are our suggestions, not instructions from the uploader. This approach to the AI concept has not been tested on a real pumpkin.

From pumpkin to porch

  1. Pick a pumpkin and plan the layout

    Choose a tall, round pumpkin with a broad, smooth front face and few deep ribs so the rays read cleanly. Wipe the surface dry and print or draw a cross centered on the face with straight rays fanning out evenly around it. Tape the pattern flat and poke the outlines with a pin or a transfer tool. Step back and check that the rays are spaced evenly before you cut anything.

  2. Open the pumpkin and clean it out

    Have an adult cut a lid from the top around the stem, angling the knife inward so the lid rests on a ledge and does not fall in. Scoop out the seeds and pulp, then scrape the inside of the front wall until it is about one inch thick. A thinner wall makes the straight cuts easier and lets more light through. Save the seeds for roasting if you like.

  3. Cut the rays first to set spacing

    Start with the thin ray wedges around the outside of the design, cutting the small ones nearest the tips first. Use a fine carving saw with slow, straight strokes and let the tool do the work instead of forcing it. Keep a little uncut pumpkin between each ray so the front stays sturdy while you carve. Push each cut piece out from the inside with your thumb for a clean edge.

  4. Save the cross interior for last

    The cross is the largest opening, so remove it only after every ray is finished and the wall is still supported around it. Cut the four arms in sections rather than one long slice, working from the center outward. Take your time on the inside corners where the arms meet so the edges stay crisp. Because this is the biggest hole, doing it last keeps the face from sagging.

  5. Optional soft halo

    For extra depth you can peel a thin band of skin just around the cross or between the ray tips using a shallow gouge or a metal spoon. Removing only the outer skin lets that area glow a soft dim orange without cutting all the way through. Keep these peeled zones subtle so the bright cutouts stay the star. Wipe away any loose shavings when you finish.

  6. Light it and set it out

    Drop in one or two battery LED lights instead of a candle so nothing overheats near a door. Position the lights low and slightly forward so the beams reach the cross and every ray evenly. Set the pumpkin on a flat stoop or step, then dim your porch lights and take a photo while the glow is strongest. Rub a little petroleum jelly on the cut edges to slow drying.

Gather your supplies

Check things off as you get ready.

Work on a stable surface, keep your free hand out of the cutting path, and have an adult handle sharp tools.

Three levels of light

  • Leave intact

    The broad areas of skin between the rays and around the outside stay untouched and dark, framing the design.

  • Peel & shade

    An optional thin band skimmed just around the cross or between the ray tips glows a soft dim orange.

  • Cut through

    The cross and all the radiating ray wedges are cut fully through for the brightest light.

Learn the carving basics

Before you start cutting

Should I really cut the cross last?

Yes. The cross is the biggest opening, and removing it early would weaken the whole front while you still have rays to carve. Cutting the small rays first sets your spacing and keeps the wall rigid. Save the cross for the end so the face holds its shape.

How do I keep the rays evenly spaced?

Do the spacing work on paper before you touch the pumpkin. Draw the cross first, then add rays at equal angles around it and check the pattern by eye. Transfer the whole layout with a poker so every line is marked before any cut, which prevents drifting as you go.

Can I use a real candle since the caption mentions one?

We recommend a battery LED light instead. A large open cross lets a lot of air move, and a flame near a front door is a fire risk. LEDs give the same warm glow, stay cool, and last all evening safely.

Your take belongs here, too.

Changed a detail? Made it simpler? Share a photo of your version and tell the community what worked.

Share your pumpkin

More pumpkins like this

You've reached the end · 8 pumpkins
The Patch Report

Fresh pumpkins, in your inbox.

The best new carvings, ideas worth stealing, and how-tos for carving season. Short, seasonal, and gone by November.

A short email during carving season. Unsubscribe anytime. See our privacy policy.