Halloween Pumpkin Carving Contest · Starts October 1st · $500 in prizes
← Back to ideas
@ai_concepts
Sep 8, 2026
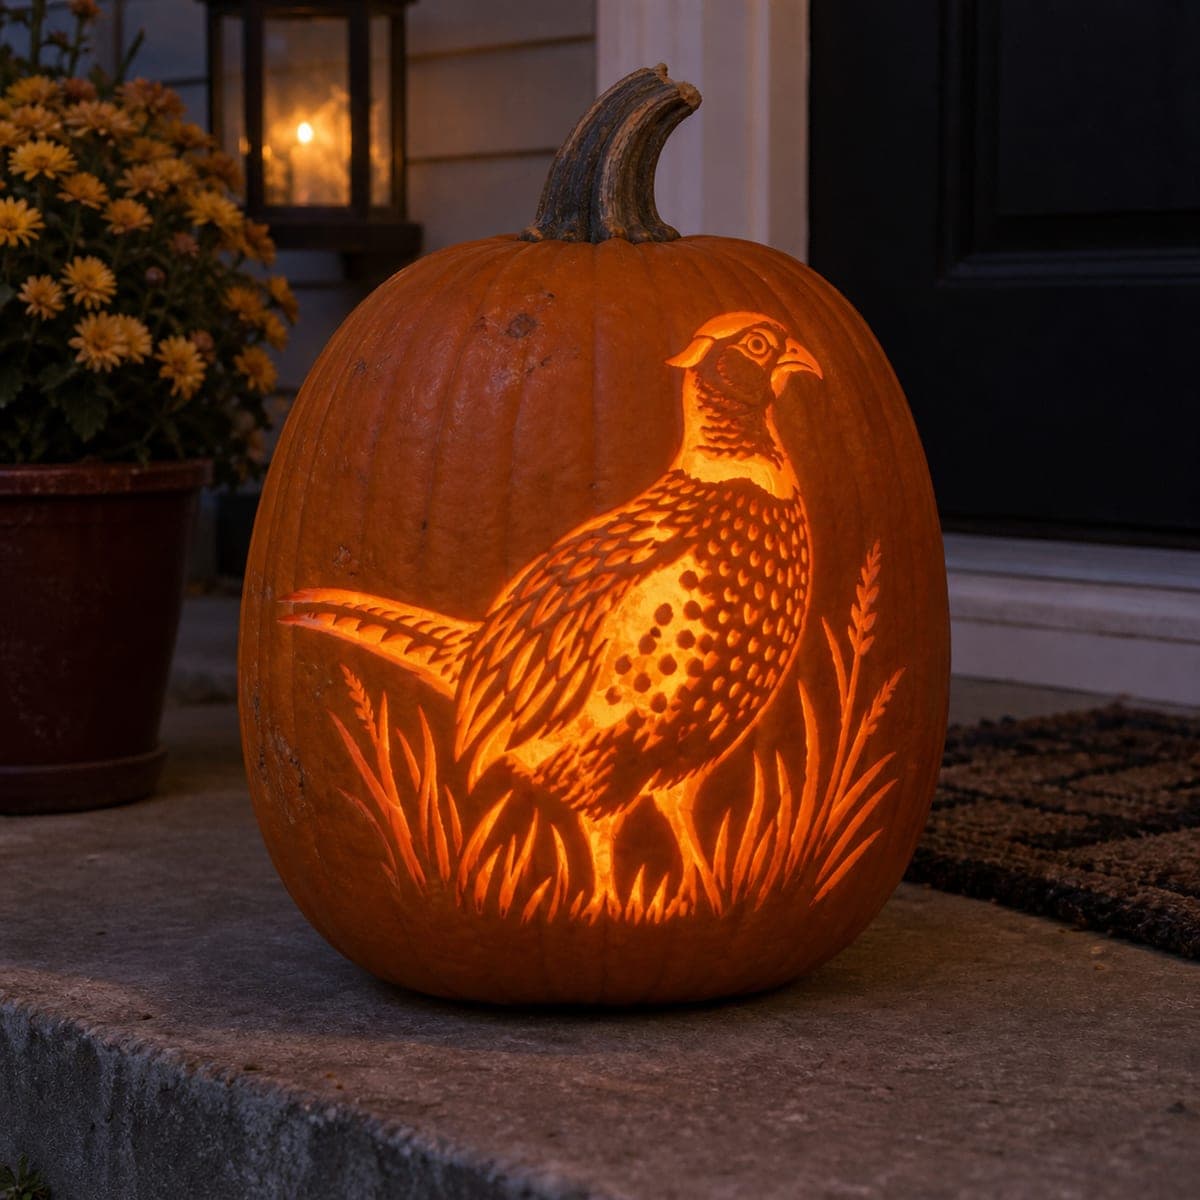
Ring-Necked Pheasant Pumpkin Carving in Tall GrassAI
0

Ring-Necked Pheasant Pumpkin Carving in Tall Grass

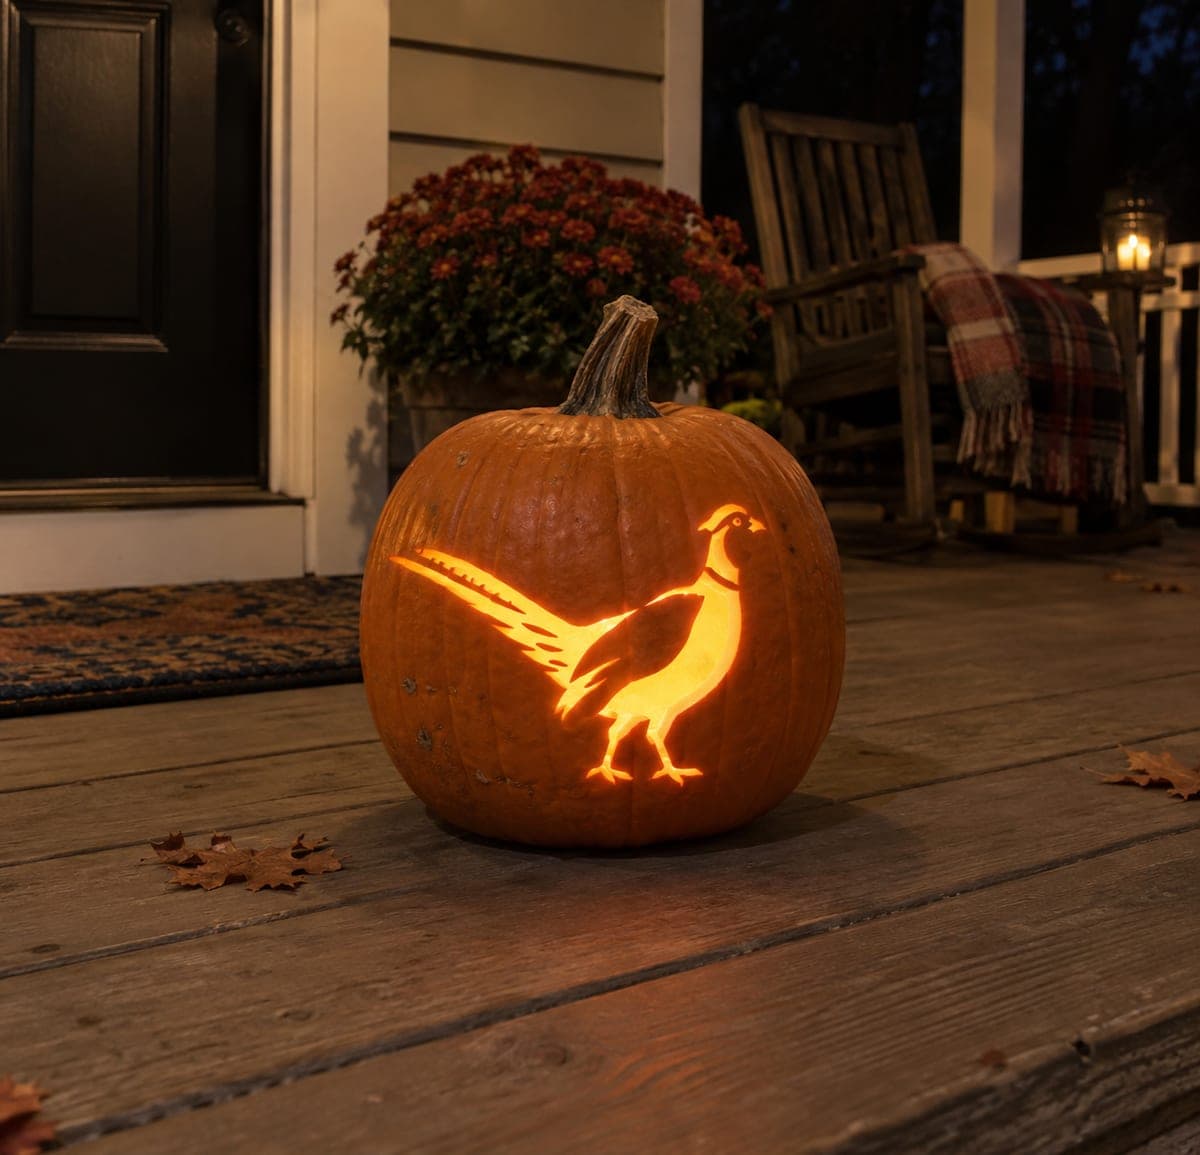
A strutting pheasant glows among carved grass blades and seed heads in this hunter-friendly pumpkin carving idea. Speckled breast feathers are made by punching small holes at varying sizes, while the tail and grasses are shaved shallow so they light up softly instead of blazing. Start with the fine speckling in the middle of the design and work outward to keep the wall strong. Warm LED light suits the autumn-field mood better than a cold white bulb.

This is an AI-generated concept image: a realistic, carvable design idea rather than a photo of a finished carve. AI concepts are always labeled and sit out the leaderboard and the contest.

No ratings yet · Sign in to rate
Comments (0)

  • No comments yet — be the first.

Save without an account. Sign in to like or comment.

Our tips for carving a similar design

The core trick here is depth control: the bird's speckled breast is made from many small drilled holes, while the tail feathers and grass are shaved thin so they glow soft rather than blazing white. You build the picture in layers, mixing punched dots, shallow shaving, and a few true cutouts. Working from the detailed center outward keeps the pumpkin wall strong until the end.

Written by PumpkinCarvingIdeas.com, inspired by the image above. These are our suggestions, not instructions from the uploader. This approach to the AI concept has not been tested on a real pumpkin.

From pumpkin to porch

  1. Prep the pumpkin and mount the pattern

    Choose a tall, smooth pumpkin with a flat facing side for the bird. Cut a lid or a base-access hole so you can hollow it, and thin the carving wall to about one inch for easier shaving. Tape your pheasant and grass stencil flat, smoothing out wrinkles around the curve. Poke the outlines with a transfer tool or pin so the design is dotted onto the skin.

  2. Punch the speckled breast first

    Start in the middle with the breast speckling while the wall is still fully supported. Use a small drill bit or a round clay tool to punch holes that go partway or fully through, varying the size for a natural feather pattern. Keep the biggest holes toward the belly and shrink them as you move up the chest. Doing this fine work early means you are not fighting a weakened shell later.

  3. Shave the tail and wing feathers

    Switch to a shading loop or ribbon tool for the long tail and layered wing feathers. Peel only the top skin so the flesh glows a dim amber, and leave thin ridges of skin between feathers to define each one. Vary how deep you go so some feathers read brighter than others. This shallow shading gives the soft, layered look instead of a flat glowing blob.

  4. Carve the grass and seed heads

    Shave the tall grass blades and wheat-like seed heads at the base and sides, keeping them shallow so they glow gently. Leave narrow bridges of skin between overlapping blades so nothing snaps off. Let a few blade tips cross in front of the bird for depth. Angle your cuts to suggest blades bending in the field.

  5. Open the brightest accents last

    Now cut fully through only the small bright spots, such as the eye highlight, a gap under the beak, and a few open pockets between grass blades. Big openings go last so the shell stays rigid while you do the delicate work. Clean up ragged edges from the back with your tool tip. Check the balance by holding a light inside as you go.

  6. Light it and photograph

    Drop in a warm-white LED puck or a battery string, never a candle, to match the autumn-field mood. Set the pumpkin on a porch step at dusk and look for hot spots that need a touch more shaving. Warm light makes the speckled breast and grass feel like a real prairie scene. Snap your photo in low ambient light so the glow reads clearly.

Gather your supplies

Check things off as you get ready.

Work on a stable surface, keep your free hand out of the cutting path, and have an adult handle sharp tools.

Three levels of light

  • Leave intact

    The outline ridges between feathers and the grass blade edges stay as dark skin for definition.

  • Peel & shade

    The tail, wing feathers, and grass blades are shaved thin for a soft amber glow.

  • Cut through

    The eye highlight, beak gap, and a few pockets between grass blades are cut through for the brightest points.

Learn the carving basics

Before you start cutting

How do I get the speckled breast to look natural?

Vary the hole sizes instead of making them all identical. Punch larger, more frequent holes low on the belly and taper to smaller, sparser ones up the chest. Some can go fully through for bright dots and some only partway for dimmer ones, which adds depth.

Why carve the center speckles before the grass?

The many small holes weaken the wall, so you want to do them while the surrounding shell is still solid. If you cut the grass openings first, the pumpkin flexes and cracks become likely as you drill. Working center-out keeps the structure strong the whole time.

Since this is a concept image, can a real pumpkin hold this much detail?

Yes, if you keep the thin details attached. Leave skin bridges between grass blades and feather layers rather than cutting them free, and shave most areas instead of fully piercing them. Only open a few small full cutouts so the wall stays rigid.

Your take belongs here, too.

Changed a detail? Made it simpler? Share a photo of your version and tell the community what worked.

Share your pumpkin

More pumpkins like this

You've reached the end · 8 pumpkins
The Patch Report

Fresh pumpkins, in your inbox.

The best new carvings, ideas worth stealing, and how-tos for carving season. Short, seasonal, and gone by November.

A short email during carving season. Unsubscribe anytime. See our privacy policy.