Halloween Pumpkin Carving Contest · Starts October 1st · $500 in prizes
← Back to ideas
@ai_concepts
Aug 14, 2026
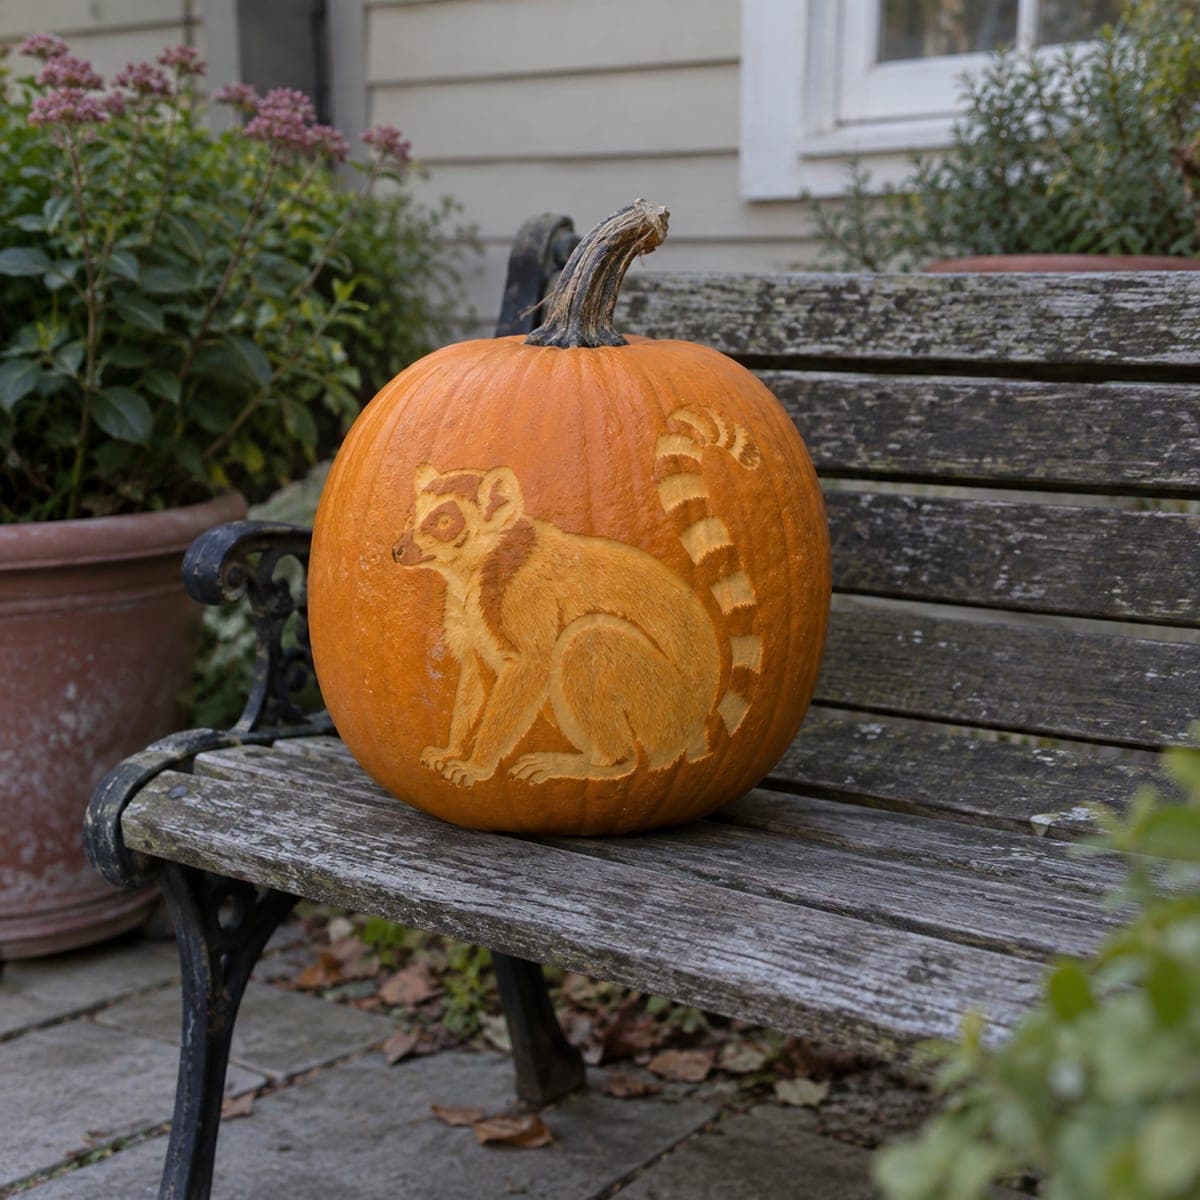
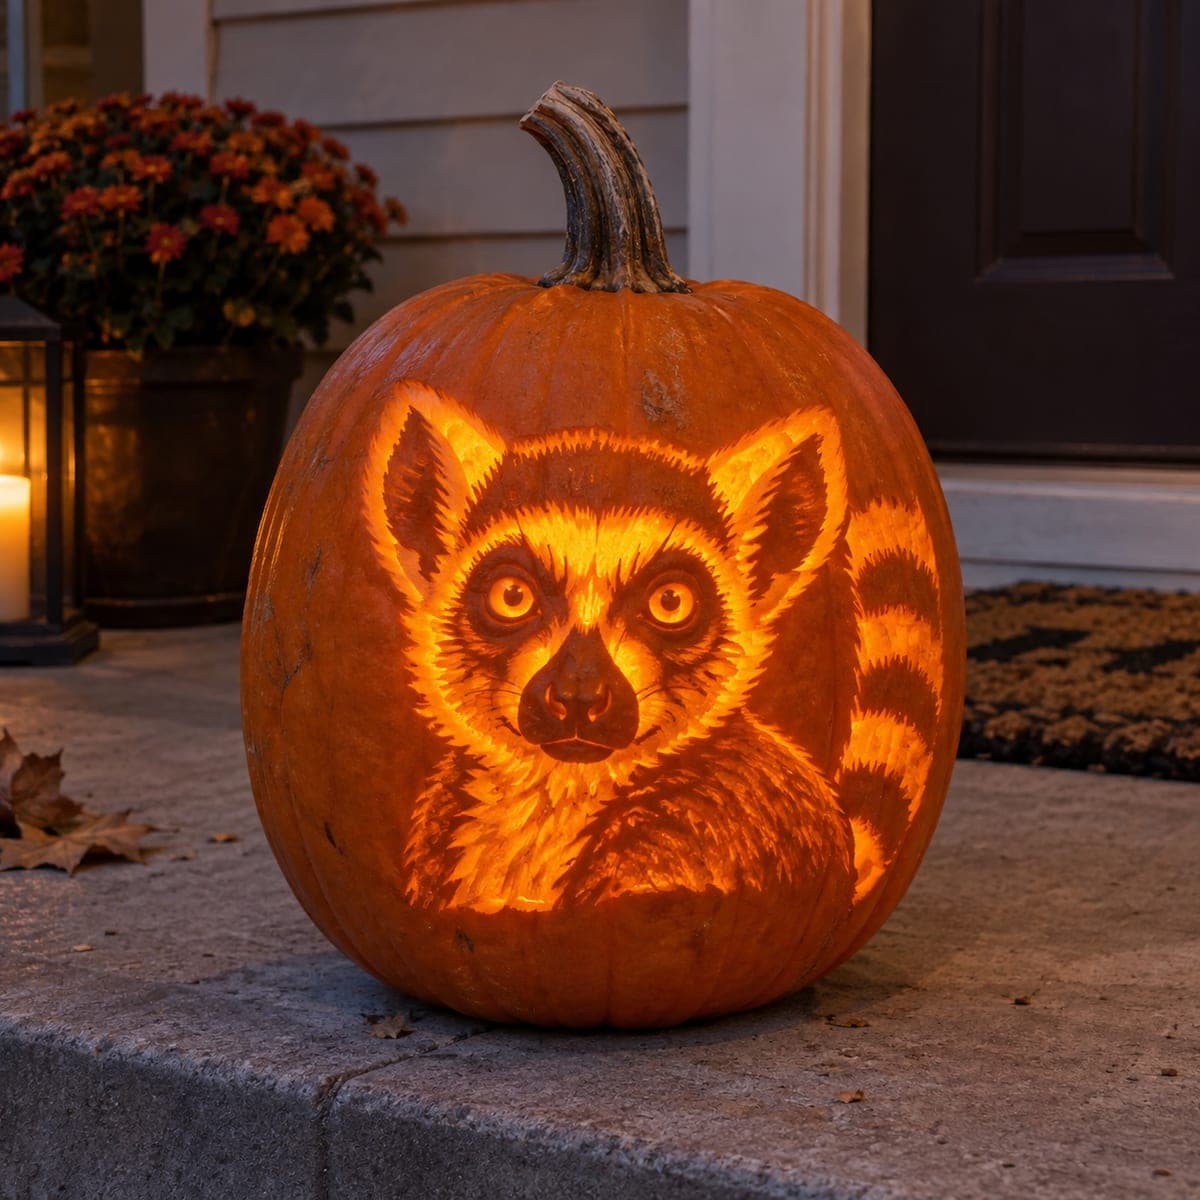
Ring-Tailed Lemur Etched Pumpkin PortraitAI
0

Ring-Tailed Lemur Etched Pumpkin Portrait

A ring-tailed lemur sits in profile on this etched pumpkin, its striped tail curling up and over its back in a bold graphic arc. The design is scraped into the skin at a shallow, even depth, so it shows well in daylight and glows amber after dark. The alternating tail stripes are the trickiest part, so mark them with a marker before you peel, and keep a striped photo reference handy.

This is an AI-generated concept image: a realistic, carvable design idea rather than a photo of a finished carve. AI concepts are always labeled and sit out the leaderboard and the contest.

No ratings yet · Sign in to rate
Comments (0)

  • No comments yet — be the first.

Save without an account. Sign in to like or comment.

Our tips for carving a similar design

The whole design lives in the skin, so the core trick is shallow, even scraping that lets daylight read the shape and an LED glow warm it after dark. The lemur sits in profile with a bold striped tail arcing over its back, which is the star element. Plan to render the body and face in soft peeled shading, then treat the tail stripes as a controlled pattern you map out before you touch a tool.

Written by PumpkinCarvingIdeas.com, inspired by the image above. These are our suggestions, not instructions from the uploader. This approach to the AI concept has not been tested on a real pumpkin.

From pumpkin to porch

  1. Pick and prep the pumpkin

    Choose a large, round, smooth pumpkin with a broad face-side that has few ribs, since ribs distort etched detail. Cut a lid from the bottom or back rather than the top so the stem stays intact and light seals in. Scoop the inside until the front wall is about one inch thick, scraping the interior smooth with a metal spoon or loop tool. A thinner, even wall makes shallow etching glow evenly.

  2. Transfer the lemur outline

    Tape your stencil over the flat front and poke the main outlines with a pin or transfer them with a washable marker. Focus on the body, the seated legs, the face, and the sweeping curve where the tail rises. Keep the tail arc clearly separated from the body edge so the two shapes do not blur together. Step back and check the whole animal reads before you cut anything.

  3. Map the tail stripes first

    Before any peeling, mark every alternating tail stripe with your marker and keep a striped reference photo beside you. Draw the dark rings you will leave and the light bands you will peel, alternating them evenly along the curve. Getting this rhythm right on paper saves you from losing count mid-carve. Double check the count and spacing, since fixing stripes later is nearly impossible.

  4. Peel the body shading

    Using a shallow gouge or lino-style tool, skin off just the top layer across the lemur's body, face, and legs to create the dim amber midtones. Work in the direction of the fur to suggest texture, keeping the depth light and consistent. Leave a thin unpeeled outline around the whole animal so it stays crisp against the dark background. Take your time here, because even pressure is what makes shading look smooth.

  5. Detail the face and stripe the tail

    Peel the brightest areas a touch deeper, such as the muzzle, the eye ring, and the inner ears, for extra contrast. Then peel only the light tail bands you marked, leaving the dark rings as untouched skin so the alternating pattern pops. Keep each band the same width and follow the curve smoothly. Leave narrow bridges of skin between stripes intact so nothing weakens or tears.

  6. Light it and photograph

    Drop in a battery LED, warm white looks best for that amber glow, and test it in a dark room. If any area looks dull, gently scrape a bit more skin until light comes through evenly. Set the finished pumpkin on a bench or step in soft evening light for photos, when the etching shows both texture and glow. Mist it with water and store it cool between displays to slow drying.

Gather your supplies

Check things off as you get ready.

Work on a stable surface, keep your free hand out of the cutting path, and have an adult handle sharp tools.

Three levels of light

  • Leave intact

    The background pumpkin and the dark alternating rings of the tail stay untouched for deep shadow.

  • Peel & shade

    The lemur's body, legs, and the light tail bands get skin-peeled for a soft amber glow.

  • Cut through

    Reserve the deepest peels for the muzzle, eye ring, and inner ears so those brights read strongest, avoiding full cutouts to keep the etched look.

Learn the carving basics

Before you start cutting

How do I keep the tail stripes even?

Mark every stripe with a washable marker before you peel anything, alternating dark rings and light bands along the curve. Count them against a reference photo and confirm the spacing on the pumpkin surface first. Peel only the light bands and leave the marked rings as skin, which keeps the rhythm clean.

This is an etched design, so how deep should I scrape?

Keep the peel shallow and even, just removing the orange outer skin to reach the lighter layer beneath. Deeper areas like the face can go a bit further for contrast, but avoid cutting all the way through since this design relies on glow, not open holes. Test a small hidden patch to find a depth that lights up nicely.

The reference is an AI concept, so is this shape actually carvable?

Yes, because it is almost entirely surface shading with no fragile floating pieces. Just keep thin skin bridges between the tail stripes so nothing tears, and leave a solid outline around the animal. Work on a broad, low-rib face so the etched detail stays readable.

Your take belongs here, too.

Changed a detail? Made it simpler? Share a photo of your version and tell the community what worked.

Share your pumpkin

More pumpkins like this

You've reached the end · 8 pumpkins
The Patch Report

Fresh pumpkins, in your inbox.

The best new carvings, ideas worth stealing, and how-tos for carving season. Short, seasonal, and gone by November.

A short email during carving season. Unsubscribe anytime. See our privacy policy.