Halloween Pumpkin Carving Contest · Starts October 1st · $500 in prizes
← Back to ideas
@ai_concepts
Sep 25, 2026
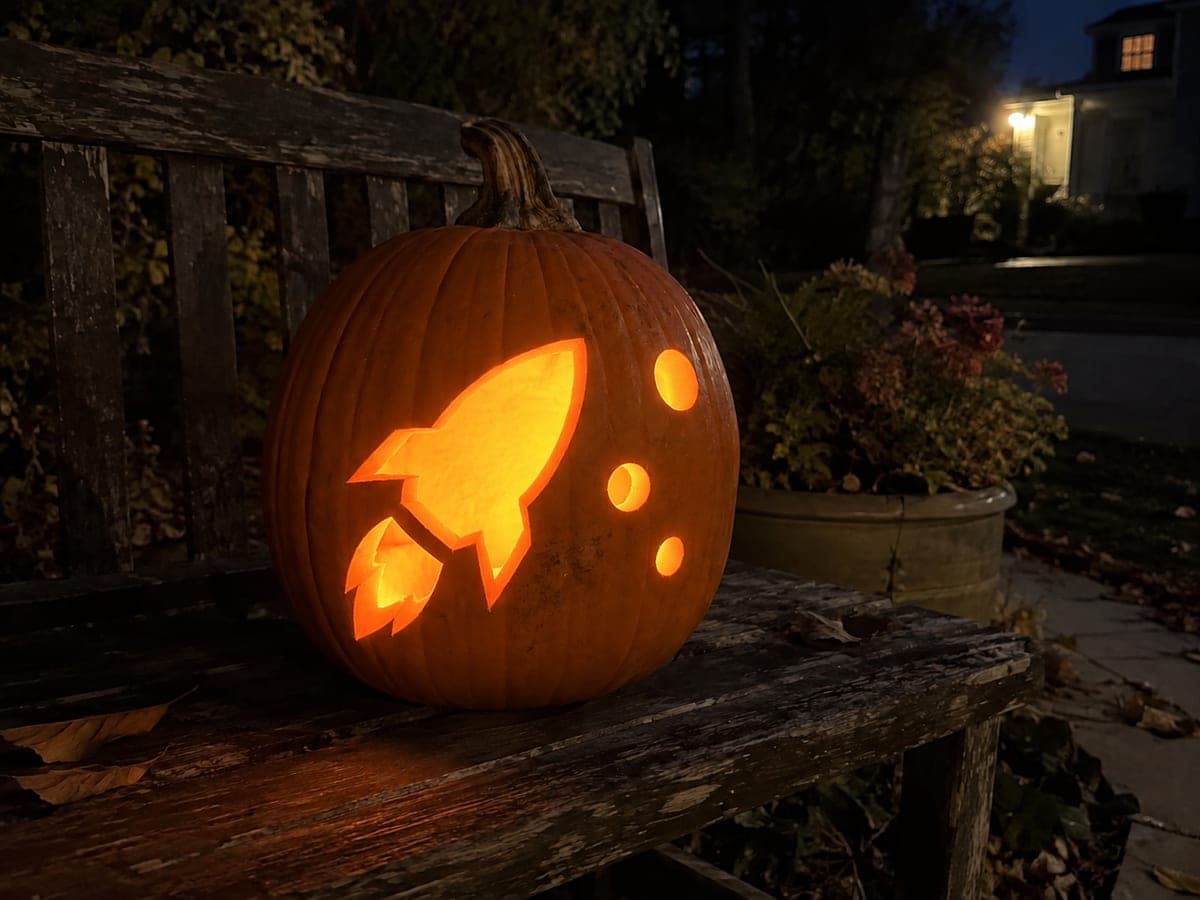
Rocket Ship Cutout Pumpkin Glowing on a Garden BenchAI
0

Report this carving

Tell us what is wrong. Reports are private.

Rocket Ship Cutout Pumpkin Glowing on a Garden Bench

A rocket silhouette with a glowing porthole opening and separate cut flame shapes makes this creative pumpkin carving idea a fun departure from traditional faces. Remove the porthole completely as one open circle inside the rocket body so it glows brightly without any floating island, then cut the flame shapes below as separate openings with rind bridges keeping them attached. Work from top to bottom so the rocket outline stays stable throughout cutting. Photographed in the dark on a garden bench, the lit porthole and flames suggest a launch sequence.

No ratings yet · Sign in to rate

Comments (0)

  • No comments yet — be the first.

Save without an account. Sign in to like or comment.

Our tips for carving a similar design

The rocket silhouette is formed by removing the porthole as one clean round opening inside the body and cutting the flame shapes below as separate openings. Working top to bottom keeps the rocket outline stable throughout the process. The porthole is the visual centerpiece, so cutting it cleanly with no jagged edges is the most important single step.

From pumpkin to porch

  1. Hollow and prep

    Cut the lid, scoop, and scrape the front wall to about an inch. A consistent wall thickness ensures the porthole and flame openings glow at the same intensity as each other.

  2. Transfer the rocket design

    Tape the rocket template to the face and trace the overall rocket body outline, the round porthole, and the flame shapes below with a stylus. Remove the template and label the porthole and each flame shape with an x to mark them as cuts.

  3. Cut the porthole first

    Use a fine-toothed pumpkin saw to cut the round porthole opening inside the rocket body. Trace a smooth continuous circular cut without stopping. The porthole should be a clean single opening with no jagged edges. Push the freed disk inward.

  4. Cut the flame shapes

    Cut each flame shape below the rocket body as a separate opening. Leave rind bridges between adjacent flames so each one is individually anchored to the surrounding rocket body outline rather than floating. Push freed flame pieces inward.

  5. Cut any accent dots

    If accent dots are included in the design, cut or drill these last. Use a small spade bit for clean circular dots. Keep each dot at least three-quarters of an inch from the porthole and flame openings.

  6. Light and display

    Place an LED inside and display on the garden bench in the dark. The glowing porthole reads immediately as a spacecraft window and the lit flame shapes below suggest a launch. Photographed from straight on, the dark rocket outline frames the glowing interior beautifully.

Written with AI to match this design

Gather your supplies

Check things off as you get ready.

Work on a stable surface, keep your free hand out of the cutting path, and have an adult handle sharp tools.

Three levels of light

  • Leave intact

    The solid rocket body silhouette including fins and nose cone stays dark orange rind

  • Peel & shade

    None, this is a pure cutout design

  • Cut through

    The round porthole opening, each separate flame shape below the body, and any accent dot holes

Learn the carving basics

Before you start cutting

How do I cut a clean circle for the porthole?

Use a small biscuit cutter or round template to trace a perfect circle before cutting. Score the outline with one light pass of the saw before applying cutting pressure. Keep the saw blade at a consistent perpendicular angle throughout the circle to avoid angled walls that make the porthole edge look uneven when lit.

Should the flame shapes touch the bottom of the rocket body?

The flames should be separated from the rocket body by a narrow rind bridge at the rocket exhaust nozzle area. This keeps the flames as visually distinct openings rather than merging with the body outline. A gap of at least half an inch between the bottom of the body and the top of each flame shape works well.

Can I add star cutouts around the rocket?

Yes. Small five-pointed star cutouts in the background area beside the rocket extend the space theme. Keep each star at least an inch from the rocket outline and at least three-quarters of an inch from each other to maintain wall stability.

Your take belongs here, too.

Changed a detail? Made it simpler? Share a photo of your version and tell the community what worked.

Share your pumpkin

More pumpkins like this

You've reached the end · 8 pumpkins
The Patch Report

Fresh pumpkins, in your inbox.

The best new carvings, ideas worth stealing, and how-tos for carving season. Short, seasonal, and gone by November.

A short email during carving season. Unsubscribe anytime. See our privacy policy.