Halloween Pumpkin Carving Contest Β· Starts October 1st Β· $500 in prizes
← Back to ideas
@ai_concepts
Sep 25, 2026
Round Eyes and Surprised Mouth Bumpy PumpkinAI
0

Report this carving

Tell us what is wrong. Reports are private.

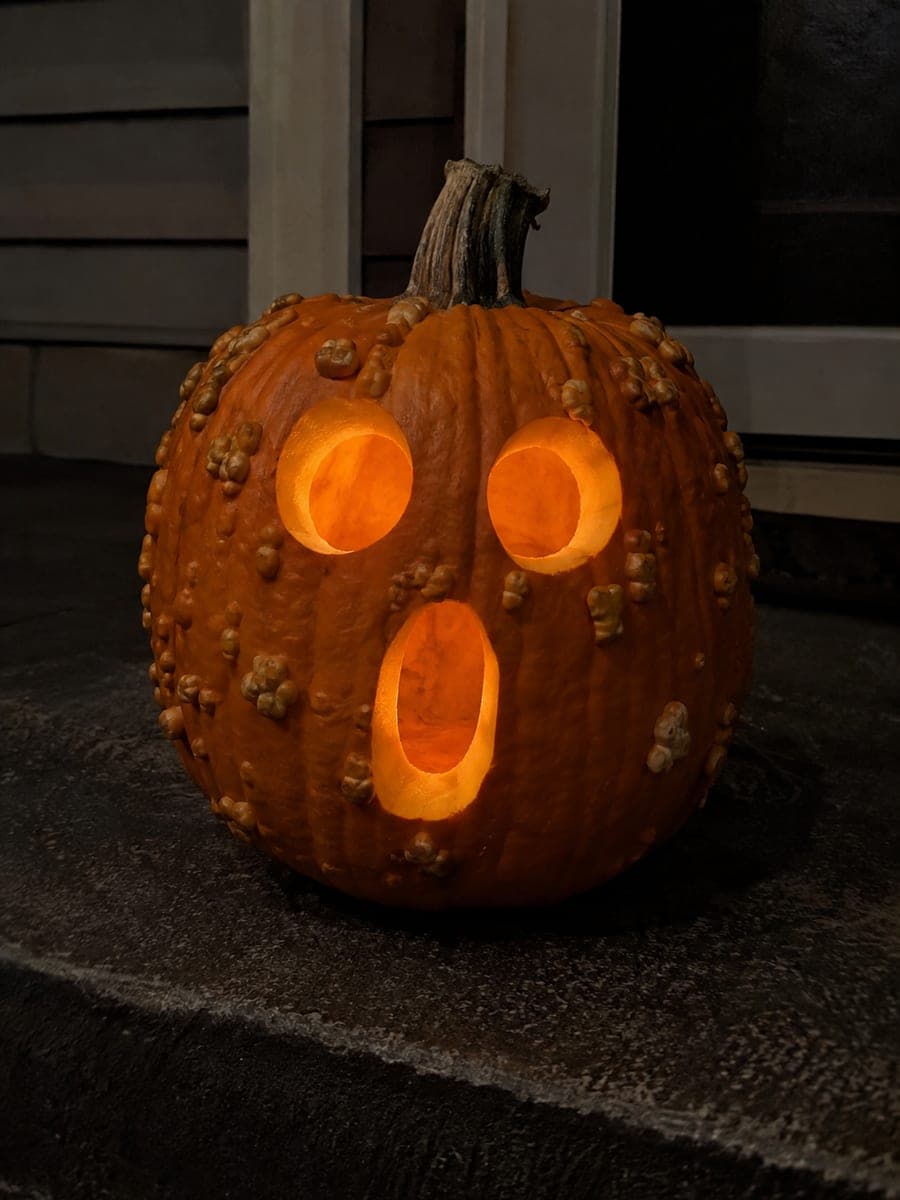
Round Eyes and Surprised Mouth Bumpy Pumpkin

Two round eye holes and one oval surprised mouth cut cleanly through an uneven bumpy orange shell give this pumpkin an endearingly startled expression while dozens of natural tan bumps stay intact across the surface. Trace your shapes on the flattest face panel and use a sharp jab saw at a straight-in angle so the uneven exterior does not skew the cut. Photograph it on a dark porch step with a warm LED inside to make the bumpy silhouette pop against the glow.

No ratings yet Β· Sign in to rate

Comments (0)

  • No comments yet β€” be the first.

Save without an account. Sign in to like or comment.

Our tips for carving a similar design

Two round eyes and an oval surprised mouth are among the easiest shapes to cut cleanly on an irregular surface because they require no points or sharp corners. The key is finding the flattest panel of the bumpy face for your three cuts, then using a straight-in saw angle so the uneven exterior does not skew the blade. All the surrounding bumps remain untouched, making the startled expression funnier by contrast.

From pumpkin to porch

  1. Find the flattest panel and hollow

    Rotate the pumpkin to find the face side where the largest smooth panels exist for the eyes and mouth. Cut the lid from the top, hollow to a 2 cm wall, and dry the outer carving surface.

  2. Mark the features

    Draw two equal circles for the eyes and one taller oval for the surprised mouth using a dry-erase marker. Center the oval between and below the circles. Keep all shapes within the flat patches, away from any prominent bump clusters.

  3. Drill or saw the eye circles

    For cleanest results on bumpy rind, use a spade bit to bore both eye holes. This produces a consistent circle without the blade wandering over surface irregularities. Alternatively, use a serrated pumpkin saw with short straight-in strokes.

  4. Cut the surprised mouth oval

    Pierce the rind at the top of the oval outline with a jab saw and cut around the entire oval in one continuous motion, keeping the blade perpendicular to the rind. If the surface bumps cause the blade to drift, stop and reinsert perpendicular before continuing.

  5. Clean and light on the porch step

    Trim any ragged edges with a paring knife. Insert a warm LED tea light, replace the lid, and set the pumpkin on the dark porch step where the backlit bumpy silhouette creates a dramatic textured glow.

Written with AI to match this design

Gather your supplies

Check things off as you get ready.

Work on a stable surface, keep your free hand out of the cutting path, and have an adult handle sharp tools.

Three levels of light

  • Leave intact

    All natural tan bumps across the surface and the surrounding rind stay dark, casting textured shadows.

  • Peel & shade

    None on this design.

  • Cut through

    Both round eye holes and the oval surprised mouth are cut through for full glow.

Learn the carving basics

Before you start cutting

Should I drill or saw the round eyes on bumpy rind?

Drilling is easier and gives cleaner circles. A spade bit bores straight through even uneven surfaces more reliably than a saw that can be deflected by surface irregularities. If you do not have a drill, use the saw with short perpendicular strokes and follow up with a paring knife to round any flat spots.

The oval mouth came out slightly lopsided. How do I fix it?

Shave the narrow side of the opening with a paring knife in thin passes until both sides curve symmetrically. Work from the inside as well as outside for the cleanest finish. Small corrections are much easier to make before the pumpkin dries out.

Will bumps near the cut edges crack off over time?

Bumps very close to a cut edge can dry and loosen as the pumpkin ages, especially if the cut came within 5 mm of a bump root. Monitor those areas and if a bump loosens, either glue it lightly in place or remove it cleanly before it falls. Bumps set further back from cuts are generally stable.

Your take belongs here, too.

Changed a detail? Made it simpler? Share a photo of your version and tell the community what worked.

Share your pumpkin

More pumpkins like this

You've reached the end Β· 8 pumpkins
The Patch Report

Fresh pumpkins, in your inbox.

The best new carvings, ideas worth stealing, and how-tos for carving season. Short, seasonal, and gone by November.

A short email during carving season. Unsubscribe anytime. See our privacy policy.