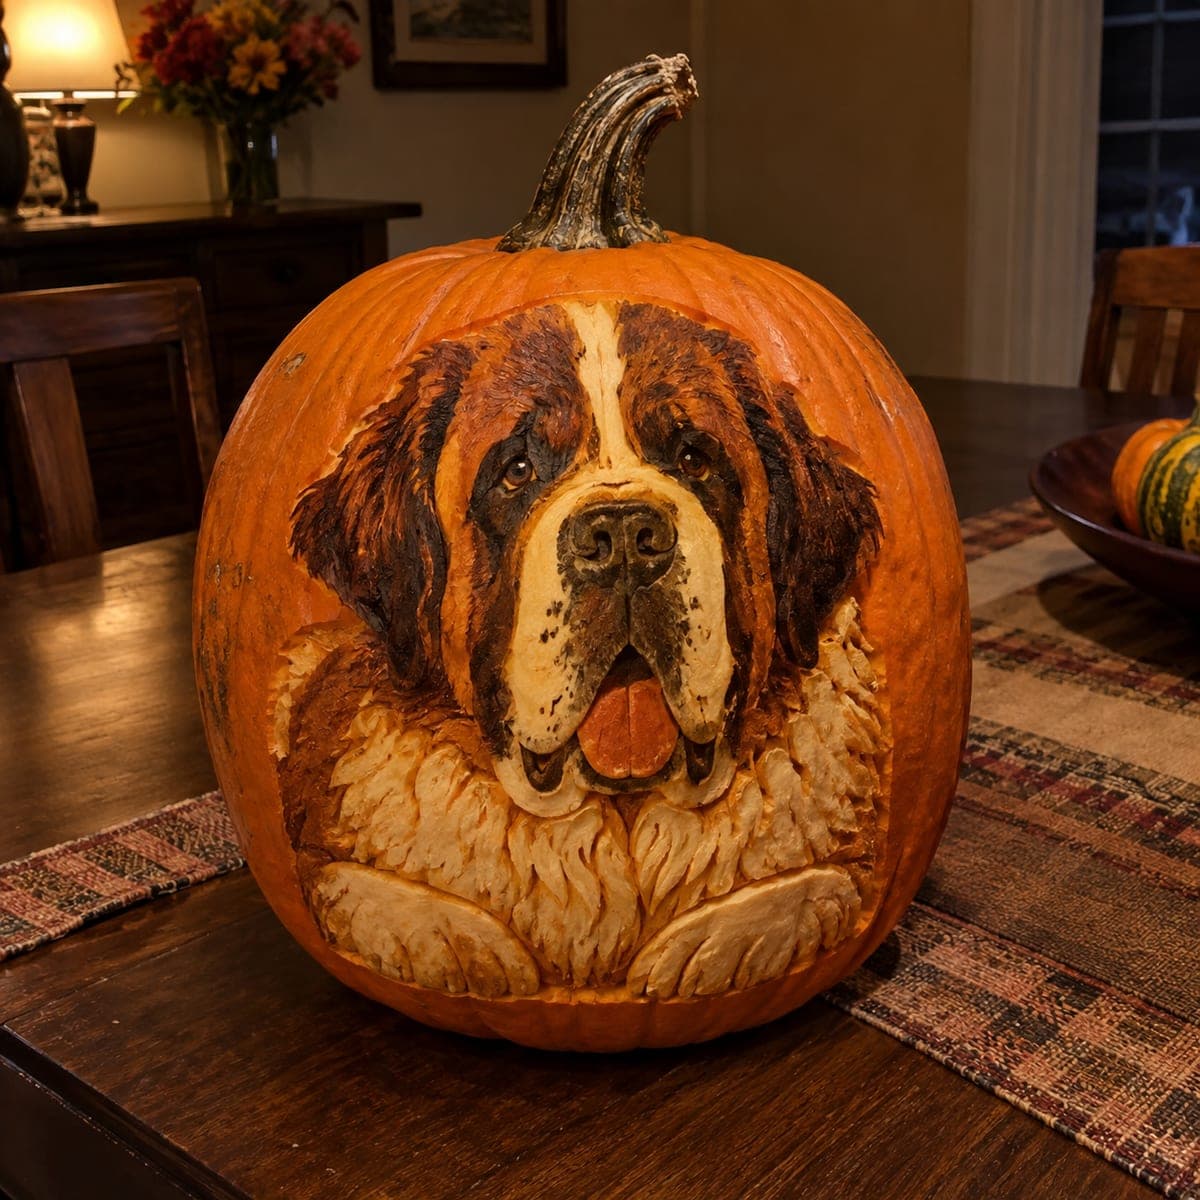
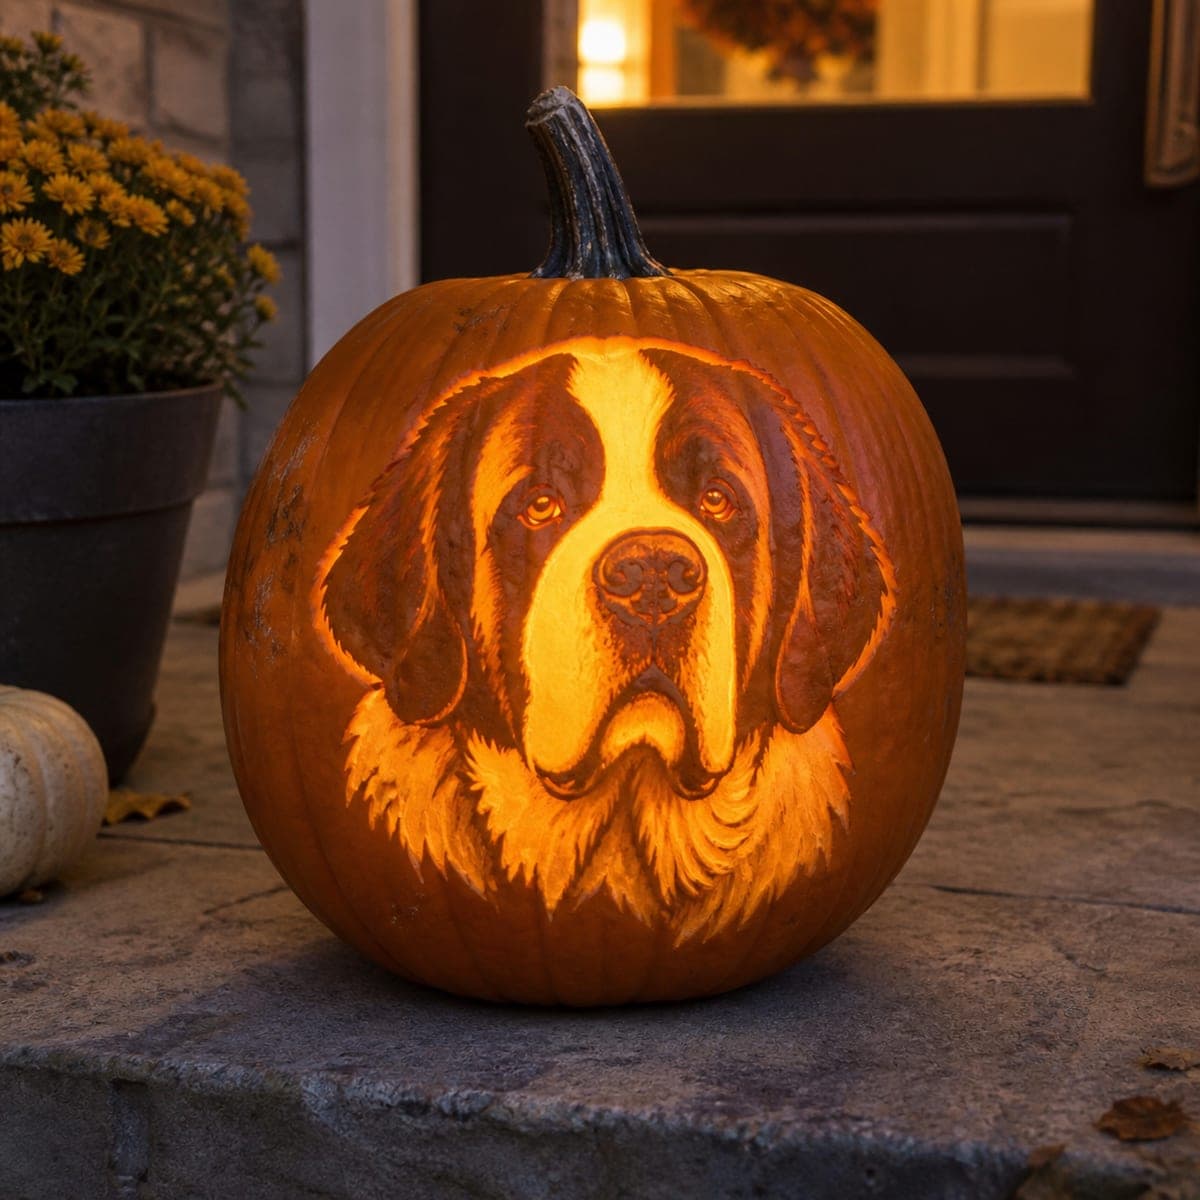
A Saint Bernard leans out of this pumpkin with its tongue out, the brown mask, jowls, and shaggy chest sculpted in deep painted relief. The mix of carving and color makes the portrait read instantly from across a dining room. Carve the full head and paws in relief first, seal the cut surfaces, then build up thin washes of brown and cream so the paint settles into the fur grooves.
This is an AI-generated concept image: a realistic, carvable design idea rather than a photo of a finished carve. AI concepts are always labeled and sit out the leaderboard and the contest.
The core trick here is combining shallow relief sculpting with thin paint washes so the Saint Bernard's fur, mask, and lolling tongue read from across the room without ever cutting through the wall. You leave the whole face on the surface, scoop away skin at different depths to sculpt the muzzle, jowls, and chest, then let brown and cream washes settle into the carved grooves. Nothing punches through to the light, so this is all about texture and color rather than glow.
Written by PumpkinCarvingIdeas.com, inspired by the image above. These are our suggestions, not instructions from the uploader. This approach to the AI concept has not been tested on a real pumpkin.
From pumpkin to porch
1
Map the portrait and prep the pumpkin
Pick a tall, wide, smooth pumpkin so the dog's head and paws all fit on one face. Since this is a concept image, treat it as a target look and adjust to your own pumpkin's shape. Cut a lid from the bottom or back rather than the top so the stem stays intact, then scrape the front wall down to an even one inch thickness. Transfer a dog portrait stencil with a pounce wheel or tape it and trace the main shapes with a fine tool.
2
Rough in the relief shapes
Use a large ribbon loop tool to remove skin from the areas that should sit lower, like the far cheeks and the background around the head. Keep the muzzle, brow ridges, and front paws standing higher as raised forms. Work slowly and check depth often, since you never want to break through to the hollow interior. Adults should handle all the cutting and sculpting tools.
3
Sculpt the face and fur detail
Switch to smaller loop and V tools to carve the fur direction, pulling short strokes outward on the cheeks and downward on the chest ruff. Round the muzzle and jowls with smooth scoops, and carve the tongue and nose as their own raised bumps. Add the eyes last as shallow domes so they catch light. Leave thin ridges between grooves intact so the fur texture holds together.
4
Seal the cut surfaces
All that exposed flesh will brown and soften fast, so wipe the carving clean and brush a thin coat of clear acrylic sealer or matte spray over every cut surface. Let it dry fully before painting. Sealing also stops your washes from soaking in and turning muddy. A light rub with lemon water first slows discoloration if you want extra insurance.
5
Build up the painted washes
Thin acrylic paint with water to a loose wash and start light. Float pale cream over the muzzle, chest, and paws, then drop watery brown into the mask, ears, and fur grooves so the pigment pools in the low lines and leaves the ridges bright. Add a warm orange wash on the tongue and a dark brown on the nose. Build color in several thin layers rather than one heavy coat, drying between each.
6
Light it and photograph
This portrait reads by reflected light, not glow, so skip an interior LED and instead aim a warm LED spotlight or lamp across the surface at a low angle. Raking light throws shadows into the fur grooves and makes the relief pop. Set it on a table runner as shown and shoot slightly above eye level. Keep it cool and out of direct sun to stretch its display life.
Gather your supplies
Check things off as you get ready.
Work on a stable surface, keep your free hand out of the cutting path, and have an adult handle sharp tools.
Three levels of light
Leave intact
The surrounding pumpkin skin and the darkest brown of the ears and mask stay untouched for depth.
Peel & shade
The muzzle, jowls, chest ruff, and paws are skin-peeled and sculpted, then tinted cream so they read soft and pale.
Cut through
Nothing is cut all the way through on this design, since the portrait relies on relief and paint rather than backlight.
Do I need to cut through the pumpkin wall anywhere?
No. This is a relief and paint portrait, so every shape is scooped into the skin and flesh, never punched through. Keeping the wall intact is what lets the fur texture and washes hold together. Aim for a consistent one inch wall so you have room to sculpt depth safely.
Will the paint really settle into the fur grooves like the picture?
Yes, if you seal first and keep your washes thin. Sealing stops the flesh from drinking up the paint, so watery pigment flows into the low grooves and pools there while the raised ridges stay lighter. Build several thin layers and wipe back any excess with a damp cloth to control it.
How long will a sculpted and painted pumpkin like this last?
A relief carving with no big openings holds up longer than a cut-through jack-o-lantern, often several days to a week if you seal the surfaces. Keep it cool, out of direct sun, and mist it lightly if edges start to curl. Refrigerating it overnight also helps it look fresh for a party.
Your take belongs here, too.
Changed a detail? Made it simpler? Share a photo of your version and tell the community what worked.
 AI
AI

Comments (0)