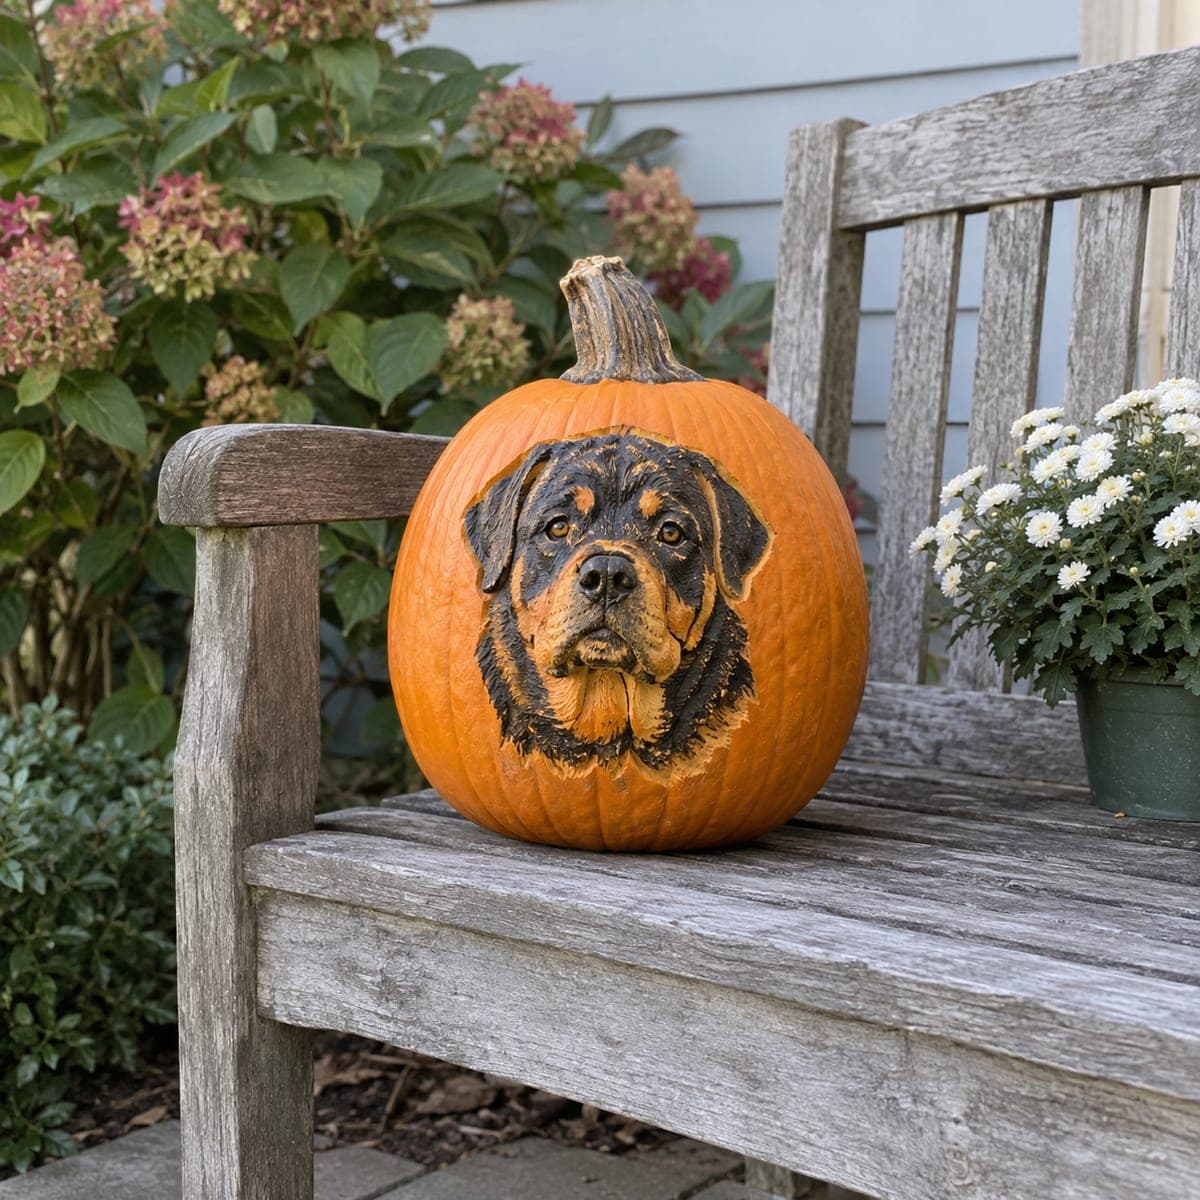
A noble Rottweiler head in full black-and-tan color rests on this carved and painted pumpkin, jowls and brow sculpted in gentle relief. Establish the relief first, then paint: black masses, tan points, and finally dry-brushed highlights across the raised muzzle and cheeks. Because no light passes through, it displays best in daylight on a garden bench where the paint contrast reads from the street.
This is an AI-generated concept image: a realistic, carvable design idea rather than a photo of a finished carve. AI concepts are always labeled and sit out the leaderboard and the contest.
The core trick here is a portrait built from shallow relief rather than cut-through openings, so the light comes from paint contrast instead of a bulb inside. You sculpt gentle depth into the brow, muzzle, and jowls, then layer black masses, tan points, and dry-brushed highlights on top. Since no light passes through, plan it as a daylight display piece.
Written by PumpkinCarvingIdeas.com, inspired by the image above. These are our suggestions, not instructions from the uploader. This approach to the AI concept has not been tested on a real pumpkin.
From pumpkin to porch
1
Transfer the portrait and plan your depths
Pick a large, smooth-faced pumpkin and wipe it clean. Tape your Rottweiler stencil flat and trace the outline plus the major shapes: the dark mask, the tan cheeks, the muzzle, and the jowls. Mark which zones will be deepest so you carve with a plan. Keep the whole face on the flattest part of the pumpkin so it reads well from the front.
2
Score the outline and main features
With a fine detail knife or a loop tool, lightly score along every traced line to lock in the shapes. Go slow around the eyes, nose, and mouth where small mistakes show most. These shallow cuts become the borders between your paint colors later. An adult should handle all sharp tools, and keep your free hand behind the blade.
3
Sculpt the relief
Use a ribbon or loop tool to shave away thin layers and raise the muzzle, cheeks, and brow slightly above the surrounding skin. Aim for gentle, rounded transitions rather than sharp steps so the face looks soft and lifelike. Push a bit deeper around the eyes and under the jowls to create natural shadow lines. Work in passes and step back often to check the shaping.
4
Seal and paint the base colors
Let the carved areas dry, then brush on a clear sealer or matte medium so paint sticks and lasts. Paint the large black mask, ears, and back of the head first with acrylics, then fill the tan points on the cheeks, brow spots, and lower muzzle. Keep the wet edges tidy along your scored borders. Let each color dry before adding the next so they stay crisp.
5
Dry-brush the highlights
Load a stiff brush with a lighter tan or warm brown, wipe most of it off on a paper towel, then drag it lightly across the raised muzzle, cheeks, and brow. This catches only the high spots and gives the fur its depth and direction. Add a tiny warm catchlight in each eye and a soft sheen on the nose. Build these highlights slowly since a little goes a long way.
6
Seal, stage, and photograph
Once everything is dry, add a final coat of matte sealer to protect the paint from dew. Set the pumpkin on a garden bench or porch step where daylight rakes across the relief and shows off the contrast. Because there is no interior light, this design shines in the daytime rather than at night. Snap your photo in soft morning or late afternoon light for the richest color.
Gather your supplies
Check things off as you get ready.
Work on a stable surface, keep your free hand out of the cutting path, and have an adult handle sharp tools.
Three levels of light
Leave intact
The untouched orange skin around the head frames the portrait and stays as the background.
Peel & shade
Lightly shaved cheeks and brow take the tan paint and give the softer, mid-tone fur.
Cut through
No areas are cut fully through on this design, so all depth comes from shallow relief and paint.
No, this is a solid relief portrait with no cut-through openings, so an interior light would not shine through. It is meant to be seen in daylight where the paint contrast and carved shadows do the work. Stage it on a bench or step where natural light rakes across the surface.
How deep should the relief carving be?
Keep it shallow, roughly a quarter inch or less in most spots. You only need enough depth to raise the muzzle and cheeks and to cast soft shadows around the eyes and jowls. Going too deep weakens the wall and makes the paint transitions harder to control.
What paint holds up best outdoors?
Acrylic craft paint works well and dries fast, especially over a coat of sealer that helps it grip the carved skin. Seal again on top once everything is dry to guard against dew and light rain. Bring the pumpkin under cover during heavy weather to keep the colors sharp.
Your take belongs here, too.
Changed a detail? Made it simpler? Share a photo of your version and tell the community what worked.
 AI
AI



Comments (0)