Halloween Pumpkin Carving Contest · Starts October 1st · $500 in prizes
← Back to ideas
@ai_concepts
Jul 10, 2026
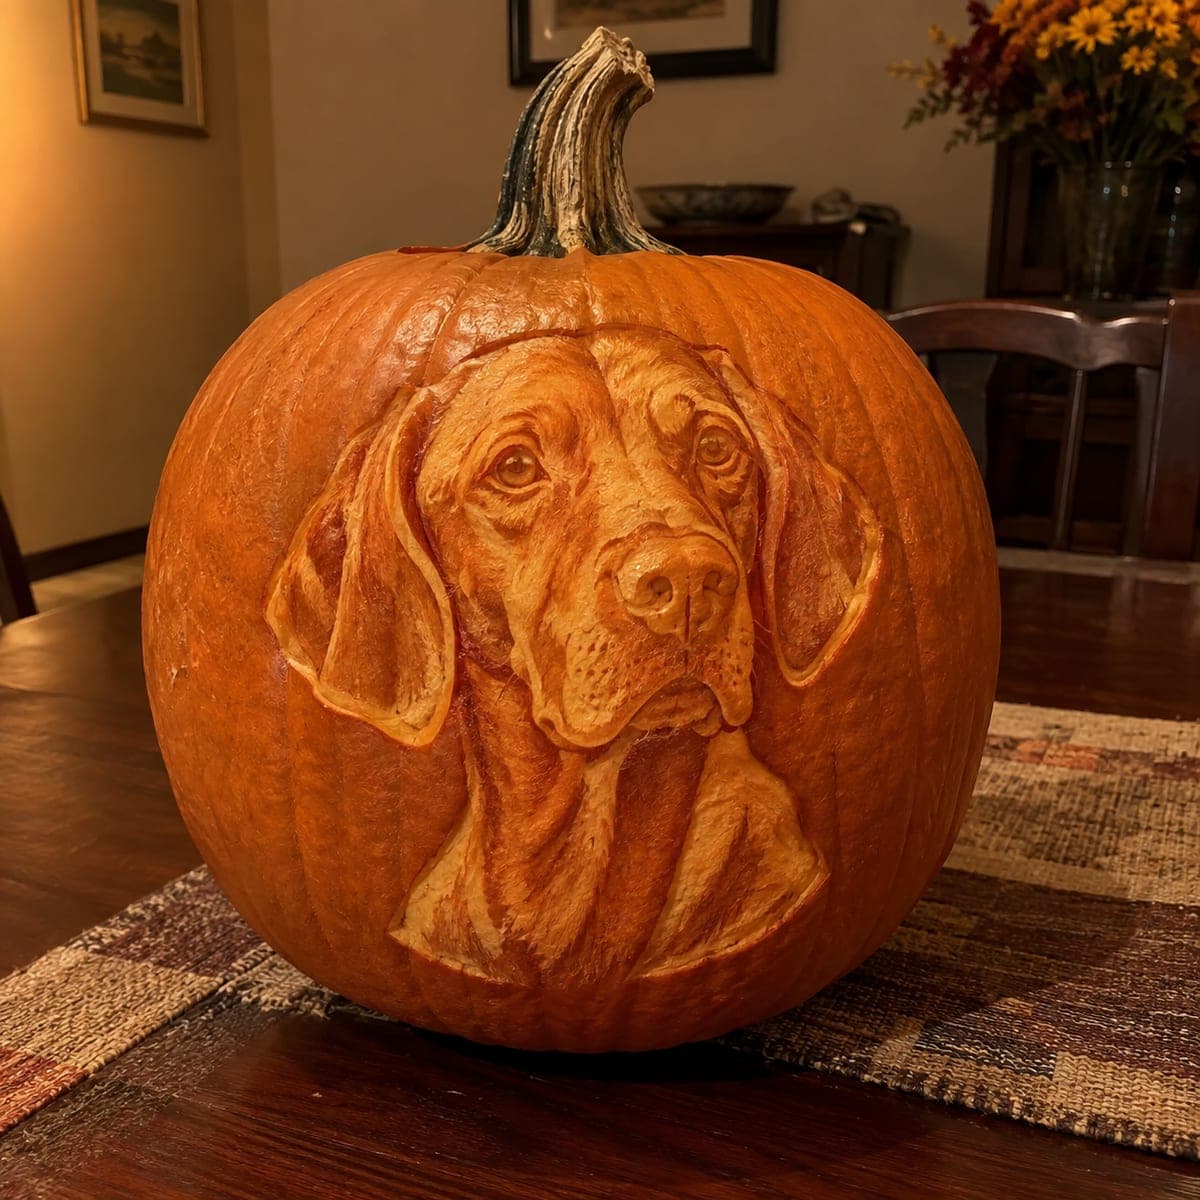
Vizsla Dog Portrait Sculpted PumpkinAI
0

Vizsla Dog Portrait Sculpted Pumpkin

Carved in soft, lifelike relief, this Vizsla portrait captures the breed's silky ears and gentle eyes without a single pierced hole. It is pure sculptural shading, closer to woodcarving than to a traditional jack-o-lantern, done with ribbon and loop tools. Work from a printed reference photo taped beside you, block in the big head planes first, and save fine muzzle detail for the very end.

This is an AI-generated concept image: a realistic, carvable design idea rather than a photo of a finished carve. AI concepts are always labeled and sit out the leaderboard and the contest.

No ratings yet · Sign in to rate
Comments (0)

  • No comments yet — be the first.

Save without an account. Sign in to like or comment.

Our tips for carving a similar design

The core trick here is pure relief shading, where you never pierce the wall of the pumpkin and instead peel the skin to different depths so light glows softly through thinned flesh. Think of it like woodcarving a portrait: block in the broad head planes first, then slowly develop the ears, muzzle, and eyes from dark untouched skin to bright shallow areas. Keep a printed reference photo taped beside you and work from big shapes down to fine detail.

Written by PumpkinCarvingIdeas.com, inspired by the image above. These are our suggestions, not instructions from the uploader. This approach to the AI concept has not been tested on a real pumpkin.

From pumpkin to porch

  1. Pick a pumpkin and prep your reference

    Choose a tall, smooth pumpkin with a broad, blemish-free face so you have room for the full head and chest. Leave it uncarved and hollow only lightly from a bottom or back opening, thinning the front wall to about an inch so light can pass later. Tape a printed Vizsla photo right beside your work area at eye level. Transfer a simple outline of the head, ears, and chest onto the skin with a washable marker or a poked stencil.

  2. Score the outline and lock in the borders

    Using a fine detail knife, lightly score the outer edges of the ears, muzzle, and chest so you have clean boundaries to shade against. Do not cut deep here, just define where the portrait ends and the plain pumpkin begins. This outline keeps your shading from wandering and gives the finished face a crisp silhouette. An adult should handle all blade work and keep the free hand behind the cutting edge.

  3. Block in the big planes with a ribbon tool

    Switch to a ribbon or loop tool and peel the skin off the whole portrait area, staying shallow at first. Establish the largest forms: the rounded forehead, the bridge of the muzzle, and the flat drape of each ear. Work in smooth, even passes and constantly compare depth against your reference. Resist detail for now, you are only setting the light and dark map.

  4. Deepen the shadows and lift the highlights

    Now build contrast by going deeper on the brightest zones, like the top of the muzzle, the brow ridges, and the front of the chest, so those areas thin down and will glow most. Leave the recesses beside the muzzle, under the ears, and around the eyes barely touched so they stay dark. Round every transition with the loop tool so the surface reads as soft fur and skin rather than steps. Rotate the pumpkin often to check the gradients from different angles.

  5. Sculpt the fine muzzle and eye detail last

    Save the delicate work for the end when the big forms are settled. Use a small loop and a fine detail knife to stipple the whisker dots on the muzzle, carve the gentle fold of each eyelid, and suggest the wet nose leather. Keep the eyes just slightly recessed with a thin bright catchlight peeled near the top. Go slow, since these shallow marks are what make the portrait feel alive.

  6. Light it and photograph

    Slip a battery LED puck inside, warm white looks best on a Vizsla's coppery coat, and never use a candle on a thin relief carving. Dim the room and check that the thinned highlights glow while the recesses stay shadowed. If any area is too dark, shave a little more from the back of that spot. Coat the cut surfaces with petroleum jelly to slow drying, then photograph it soon since relief carvings fade within a day or two.

Gather your supplies

Check things off as you get ready.

Work on a stable surface, keep your free hand out of the cutting path, and have an adult handle sharp tools.

Three levels of light

  • Leave intact

    The plain background pumpkin and the deep recesses beside the muzzle, under the ears, and around the eyes stay as untouched dark skin.

  • Peel & shade

    Most of the face and ears get lightly peeled for a soft mid orange glow that reads as coat and fur.

  • Cut through

    Nothing is cut fully through on this design, but the thinnest peeled highlights on the muzzle, brow, and chest let the most light shine for the brightest tones.

Learn the carving basics

Before you start cutting

Do I really carve this without any holes through the pumpkin?

Yes, this is a relief portrait, so you only peel and thin the skin rather than cutting openings. The glow comes from light passing through flesh that you have shaved to different depths. If you accidentally break through, patch it from behind and keep that spot as a deep shadow.

How do I keep the two ears from looking flat and identical?

Vary the depth and angle on each ear so one drapes slightly forward and catches more light. Carve soft lengthwise ripples to suggest the silky texture, and let the inner edge near the head sit a touch deeper for shadow. Comparing constantly to your reference photo keeps them natural rather than mirror images.

How thin should I make the front wall before I start shading?

Aim for about one inch on the front face so light can travel through your shallowest cuts. Thin it evenly from the inside before you begin the portrait, checking with a fingertip or by holding a light behind it. Going much thinner risks collapse once you start carving detail.

Your take belongs here, too.

Changed a detail? Made it simpler? Share a photo of your version and tell the community what worked.

Share your pumpkin

More pumpkins like this

You've reached the end · 8 pumpkins
The Patch Report

Fresh pumpkins, in your inbox.

The best new carvings, ideas worth stealing, and how-tos for carving season. Short, seasonal, and gone by November.

A short email during carving season. Unsubscribe anytime. See our privacy policy.