Halloween Pumpkin Carving Contest · Starts October 1st · $500 in prizes
← Back to ideas
@ai_concepts
Aug 1, 2026
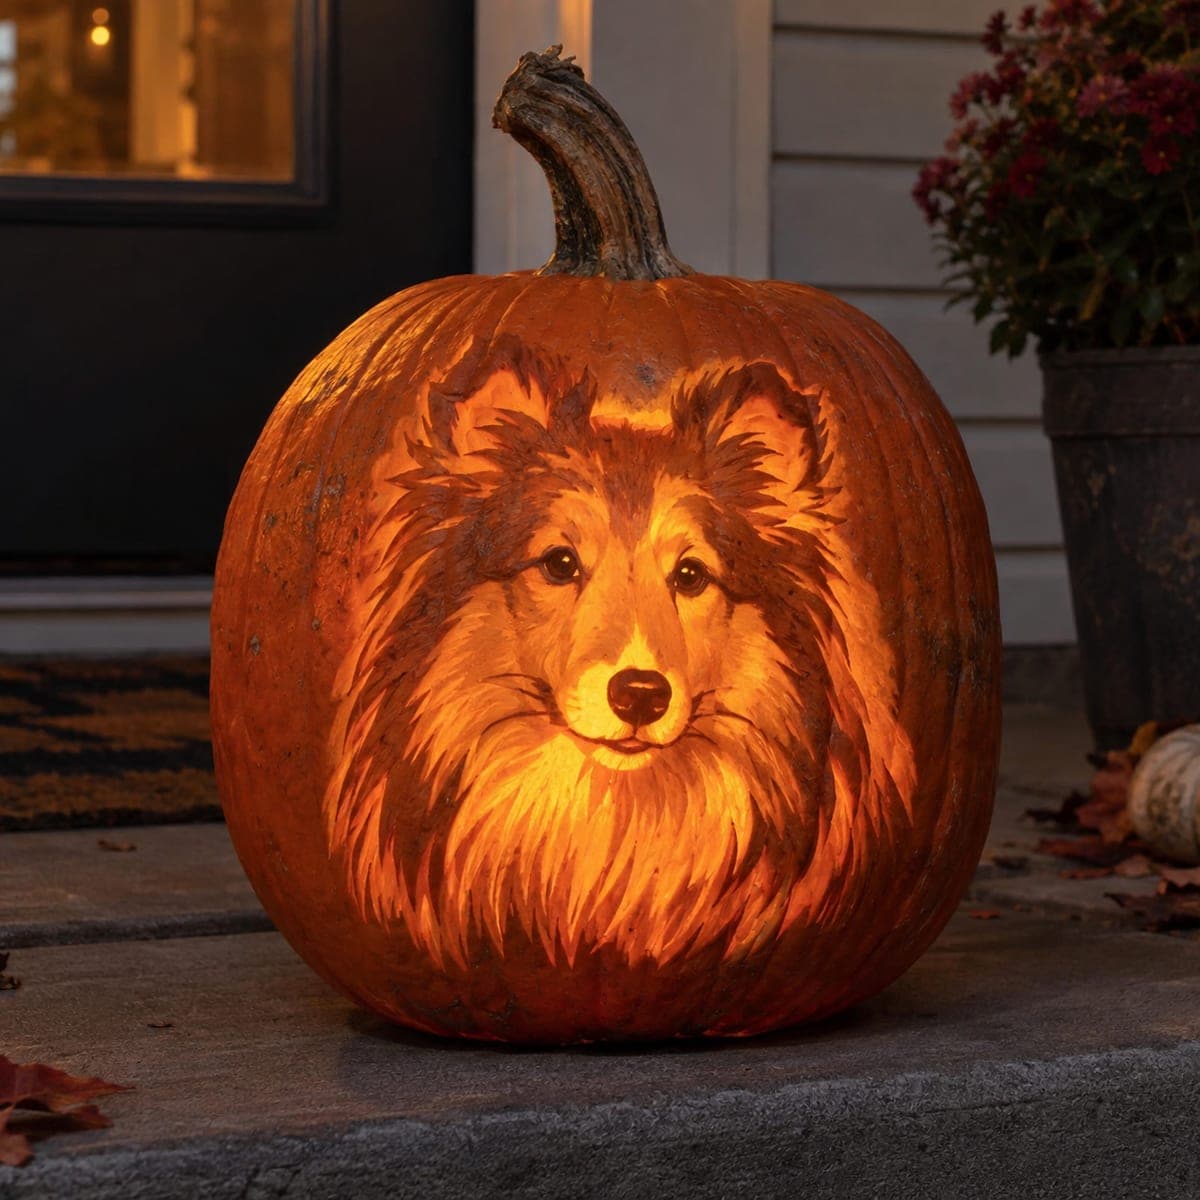
Shetland Sheepdog Glowing Pumpkin PortraitAI
0

Shetland Sheepdog Glowing Pumpkin Portrait

A Shetland sheepdog's luminous face emerges from this pumpkin at dusk, its thick mane rendered in hundreds of fine glowing fur strokes carved at graduated depths. Portraits like this are shaved, never pierced, so the pumpkin wall acts like a lampshade with the LED inside doing the shading for you. Keep your reference photo taped beside you and check the glow with the light in place every twenty minutes as you thin the flesh.

This is an AI-generated concept image: a realistic, carvable design idea rather than a photo of a finished carve. AI concepts are always labeled and sit out the leaderboard and the contest.

No ratings yet · Sign in to rate
Comments (0)

  • No comments yet — be the first.

Save without an account. Sign in to like or comment.

Our tips for carving a similar design

The core trick here is relief shading, where you shave the pumpkin flesh to different depths so light passes through thin spots and stays dark under thick ones. Nothing gets pierced all the way through, so the outer wall works like a lampshade and the LED inside does the shading for you. Plan the whole face as a map of light, with the muzzle and eyes brightest and the mane fading into dark orange at the edges.

Written by PumpkinCarvingIdeas.com, inspired by the image above. These are our suggestions, not instructions from the uploader. This approach to the AI concept has not been tested on a real pumpkin.

From pumpkin to porch

  1. Open the pumpkin and thin the wall

    Cut a wide access hole in the bottom or back so you can reach the inside, and never through the portrait area. Scrape the inner wall behind the face down to about an inch thick using a loop tool. An even, thinned wall glows consistently and is easier to shade from the front. Set your LED inside and check that light comes through faintly before you start carving detail.

  2. Transfer the Sheltie face

    Tape your printed reference and stencil beside your work, then attach the pattern to the pumpkin and poke the main outlines with a pin or dotting tool. Mark the eyes, nose, muzzle line, and the overall boundary of the mane. Keep the dots light since this is a guide, not a cut line. Step back and confirm the face is centered and roughly at eye level on the pumpkin.

  3. Shave the brightest zones first

    Using a small ribbon or detail loop tool, shave the flesh thinnest where you want the most light: the muzzle, the bridge of the nose, the inner eyes, and the highlights on the cheeks. Go slowly and check the glow with the LED in place every twenty minutes. You can always remove more, but you cannot put flesh back. Aim for smooth, gradual transitions rather than hard edges.

  4. Build the fur in graduated strokes

    Carve the mane as hundreds of short directional strokes that follow the way the fur lies, deeper and brighter near the face, shallower and darker toward the outer edge. Vary your pressure so strokes fade out naturally into untouched skin. This layering is what gives the coat its depth. Rotate the pumpkin often so your strokes stay consistent with the growth direction.

  5. Set the eyes and nose

    Leave two small dark points as catchlights in the eyes so they read as alive rather than empty. Keep the nose slightly darker than the muzzle by shaving less there, which gives it that soft rounded look. Do not cut through any of these features. Small differences in depth around the eyes make the whole expression, so adjust in tiny passes.

  6. Refine and light it for the photo

    Do a final glow check, deepening any spots that should pop and softening any edge that looks too sharp. Wipe the carved surface clean and coat it lightly to slow drying if you want it to last. Place a bright LED inside, close up the access hole, and shoot at dusk when the ambient light is low. A cool evening and a fresh LED will give you the warm portrait glow.

Gather your supplies

Check things off as you get ready.

Work on a stable surface, keep your free hand out of the cutting path, and have an adult handle sharp tools.

Three levels of light

  • Leave intact

    The outer edges of the mane and the background, left as untouched skin so they stay dark and frame the face.

  • Peel & shade

    The bulk of the coat and cheeks, shaved to a medium depth for a soft dim orange glow.

  • Cut through

    Nothing is cut fully through; the muzzle, nose bridge, and eye highlights are shaved thinnest for the brightest areas.

Learn the carving basics

Before you start cutting

Do I cut any holes through the pumpkin for this dog?

No. This is a shaded portrait, so the entire face is carved by shaving flesh to different depths, never by piercing the wall. The only opening is your access hole in the back or bottom for the light. Keeping the wall intact is what lets it glow like a lampshade.

How thin should I make the wall behind the face?

Thin the inner wall to about an inch overall before you start, then shave the front surface further only in the areas you want to glow. The brightest spots like the muzzle may end up a quarter inch or less. Check the glow with your LED every twenty minutes so you do not accidentally break through.

How do I keep the fur strokes looking natural?

Follow the actual direction the coat grows, using short curved strokes that fan out from the face. Make them deeper and brighter near the center and let them fade shallow at the edges. Rotate the pumpkin as you go and glance at your reference often so the flow stays consistent.

Your take belongs here, too.

Changed a detail? Made it simpler? Share a photo of your version and tell the community what worked.

Share your pumpkin

More pumpkins like this

You've reached the end · 8 pumpkins
The Patch Report

Fresh pumpkins, in your inbox.

The best new carvings, ideas worth stealing, and how-tos for carving season. Short, seasonal, and gone by November.

A short email during carving season. Unsubscribe anytime. See our privacy policy.