Halloween Pumpkin Carving Contest · Starts October 1st · $500 in prizes
← Back to ideas
@ai_concepts
Sep 25, 2026
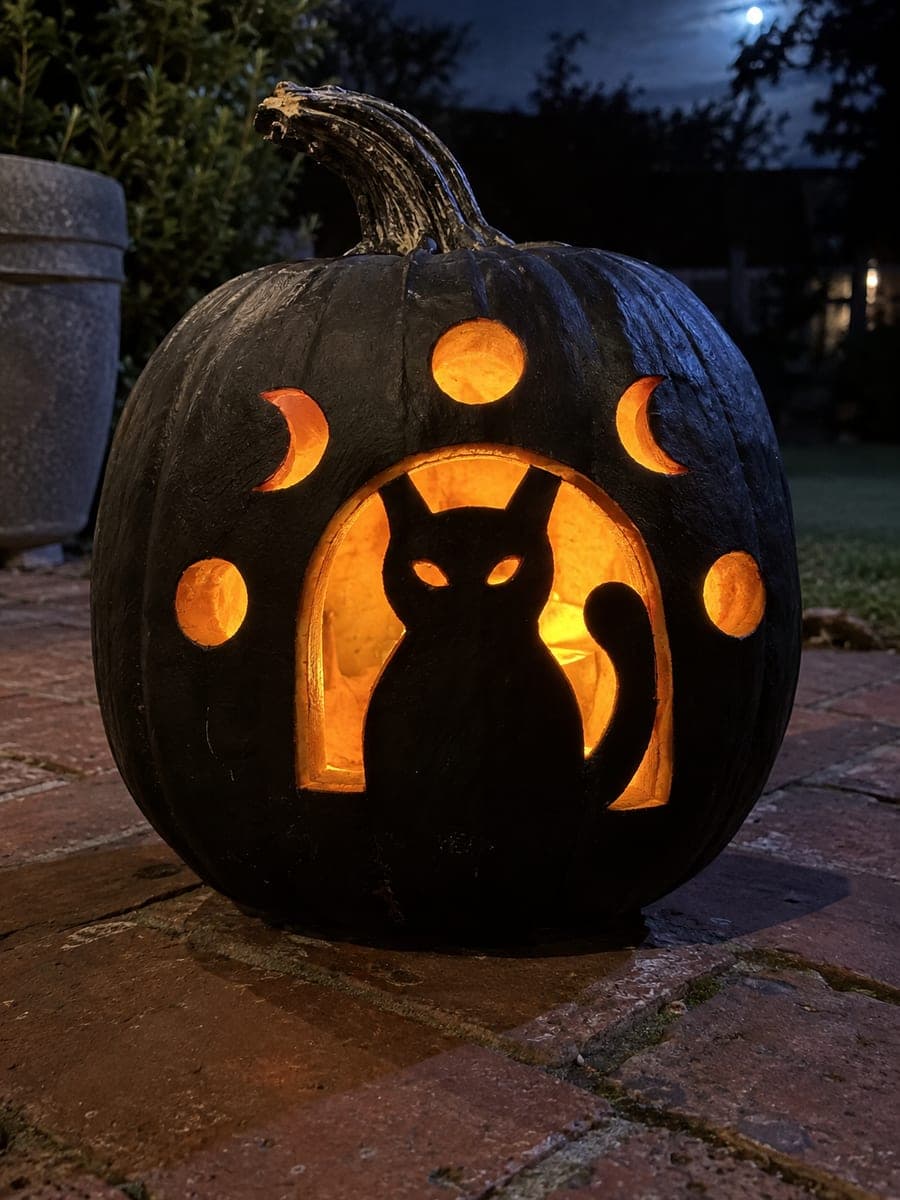
Sitting Cat Silhouette Pumpkin Inside a Glowing ArchAI
0

Report this carving

Tell us what is wrong. Reports are private.

Sitting Cat Silhouette Pumpkin Inside a Glowing Arch

A full sitting cat silhouette is retained within a bright glowing arch in this hard cat pumpkin carving, the cat's body supported by a broad base connection, a tail-side join and two wide ear bridges at the top. The face holes are cut through the retained cat shape itself, adding expression without removing structural material from the supporting bridges. Begin by cutting the surrounding arch opening, then refine the cat outline and finish with the small face apertures. Backlit from below with a strip LED, the silhouette reads dramatically against the glowing surround.

No ratings yet · Sign in to rate

Save this design for carving night, then share a photo of your own jack-o'-lantern once it's glowing.
Comments (0)

  • No comments yet — be the first.

Save without an account. Sign in to like or comment.

Our tips for carving a similar design

The drama here comes from leaving a solid cat shape in place while the arch around it glows brilliantly. Four anchor points, a broad base, a tail-side join and two wide ear bridges at the top, hold the cat securely so the large surrounding opening can be removed safely. Cutting the arch first, then refining the cat, keeps the structure predictable.

From pumpkin to porch

  1. Prep the pumpkin

    Open the pumpkin from the back or base and scoop the interior thoroughly. Thin the entire front face wall to about 1.5 cm so the LED light travels evenly through the large arch opening and silhouettes the cat cleanly. A thicker wall can leave the cat looking muddy against the glow.

  2. Transfer the full pattern

    Tape the arch-and-cat pattern to the pumpkin face and poke through every outline with a pin. Mark the four bridge points in a different color so they are unmistakable during cutting. The two ear bridges at the top are the narrowest connections, so label them clearly and confirm they are at least 1.5 cm wide.

  3. Cut the arch surround first

    Start cutting the large arch opening, working section by section and leaving the four bridge zones untouched. Remove the rind of the arch in small manageable pieces rather than trying to extract one large section. Once the arch opening is clear, check that all four cat attachment points are undamaged.

  4. Refine the cat outline

    Now work carefully along the cat's body outline, cutting the gap between the cat and the arch edge. Use a thin blade for the tight areas around the ears and tail. The cat should remain completely immobile as you work; if you feel any flex, stop and reinforce the nearest bridge point before continuing.

  5. Add facial apertures

    Cut the small eye and mouth holes through the retained cat body. Because these openings are inside the silhouette rather than in the surrounding frame, they add expression without weakening any bridges. Keep them modest in size relative to the cat's head area.

  6. Light with a strip LED

    A strip LED placed along the bottom interior, aimed at the back wall, bounces light forward and upward through the arch opening. This bottom-lit approach causes the arch to glow brightly while the solid cat reads as a sharp dark shape. Set the pumpkin in a completely dark outdoor spot for the full effect.

Written with AI to match this design

Gather your supplies

Check things off as you get ready.

Work on a stable surface, keep your free hand out of the cutting path, and have an adult handle sharp tools.

Three levels of light

  • Leave intact

    The entire retained cat silhouette and all bridge rind stay dark and solid.

  • Peel & shade

    None. The contrast relies entirely on the open arch versus the solid cat.

  • Cut through

    The full arch surround is cut through and glows, plus the small facial apertures inside the cat body.

Learn the carving basics

Before you start cutting

How do I stop the ear bridges from snapping?

Keep ear bridges at least 15 mm wide and cut toward them from both sides rather than sawing directly into the bridge zone. Work the narrow arch sections near the ears last, once the bulk of the surrounding rind has been removed and the cat's structural position is confirmed. If a bridge does weaken, a strip of electrical tape applied to the inner wall can hold it for several days.

Can I substitute a candle for the strip LED?

A candle will produce a glow, but a strip LED or bright LED puck is strongly recommended here. Candles cast uneven light and the heat can warp the large open arch faster than it would on a smaller-hole design. An LED also lets you leave the pumpkin lit all night without any fire risk.

The cat outline looks wavy when I step back. How do I fix it?

Small irregularities in the cut edge are normal and mostly invisible once the pumpkin is lit. To smooth a particular curve, use a linoleum cutter to shave the edge from the inside, removing tiny amounts at a time. Avoid sanding the cut edge with paper, as friction can cause the rind to split along the grain.

Your take belongs here, too.

Changed a detail? Made it simpler? Share a photo of your version and tell the community what worked.

Share your pumpkin

More pumpkins like this

You've reached the end · 8 pumpkins
The Patch Report

Fresh pumpkins, in your inbox.

The best new carvings, ideas worth stealing, and how-tos for carving season. Short, seasonal, and gone by November.

A short email during carving season. Unsubscribe anytime. See our privacy policy.