@grinninggreta
Sep 5, 2026
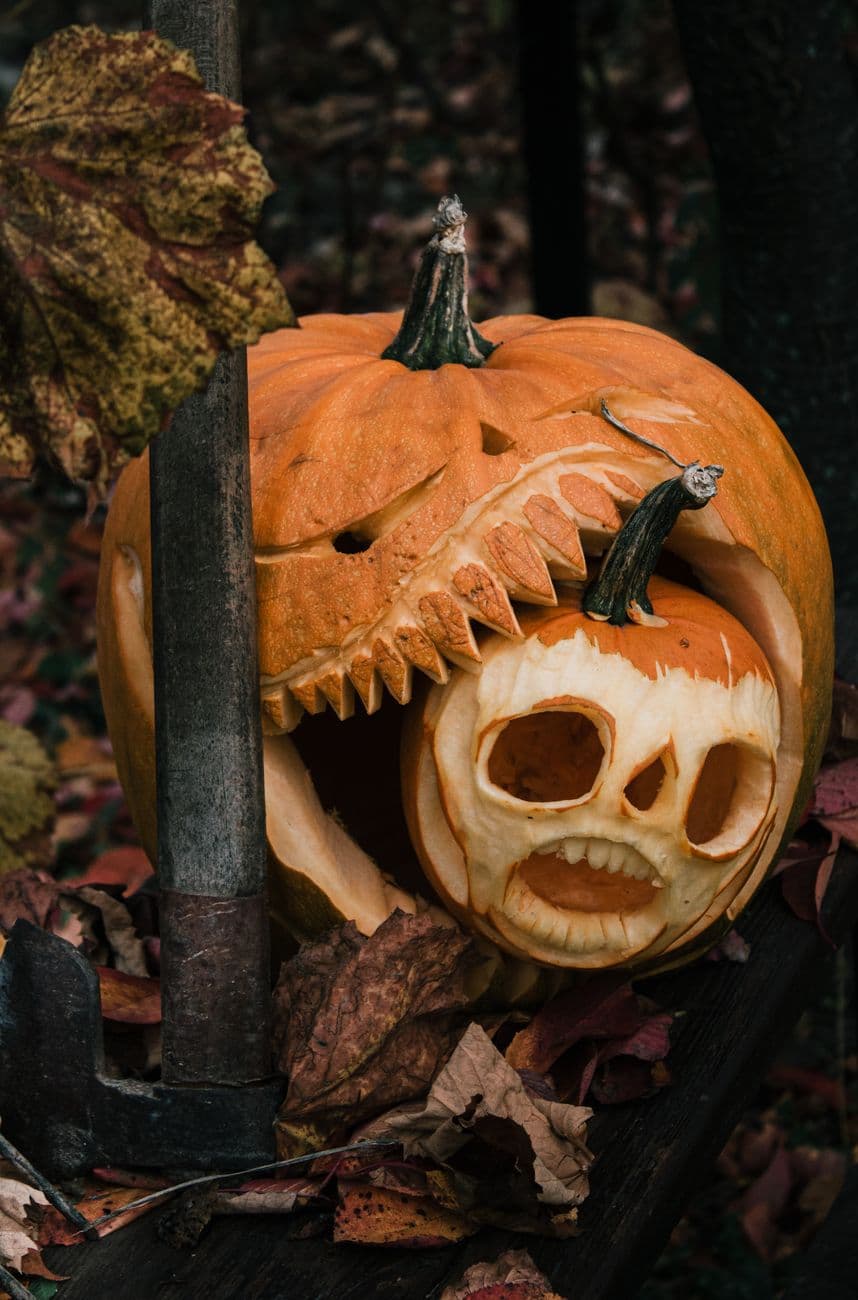
Skull for supper
A saw-toothed jack mid-chomp on a skull-faced little pumpkin, staged on a bench with an axe for effect. Peel-carved teeth and a lot of patience.
No ratings yet · Sign in to rate
A saw-toothed jack mid-chomp on a skull-faced little pumpkin, staged on a bench with an axe for effect. Peel-carved teeth and a lot of patience.
The core trick here is staging two pumpkins so a big saw-toothed mouth appears to be chewing on a smaller skull-faced gourd. The large pumpkin gets a jagged jaw with tall pointed teeth, while the little one is skin-peeled into a pale skull that glows dim against the dark cavern behind it. Plan both pumpkins together before you cut so the skull tucks naturally into the open jaw.
Written by PumpkinCarvingIdeas.com, inspired by @grinninggreta's photo above. These are our suggestions, not instructions from the uploader, and this approach hasn't been tested on their exact carve.
Pick a large pumpkin for the biting head and a smaller round one for the skull. Cut a big lid or a rear access hole in the large pumpkin and scoop the walls down to about one inch so light passes through the thinned areas. Dry-fit the small pumpkin into the front opening so you know exactly where the jaw and teeth need to land. Mark the mouth line with a washable marker before any blade touches the skin.
Transfer or draw a wide zigzag mouth across the front of the large pumpkin. Carve the upper and lower rows of teeth as tall triangles, leaving them attached at the base so they stay strong. Keep the very back of the mouth as a large opening you will cut through last. Work slowly with a small saw blade and leave a little extra material so you can refine points later.
On the small pumpkin, use a lino or loop tool to skin off the outer orange layer where the skull should glow, leaving the pale flesh exposed for a bone tone. Peel a soft hairline at the top and rake shallow texture so it reads as a forehead. Leave the eye sockets, nose, and mouth outlines marked but not yet cut. This is the patient part, so take breaks and keep your shading even.
Now cut fully through the eye sockets and the triangular nose for the brightest openings. Carve the open mouth and leave a thin bridged row of teeth across it so the grin holds its shape. Keep blade strokes short and pull the tool toward open space, never toward your holding hand. Undercut the edges slightly so the light spreads and the sockets look deep.
Nestle the finished skull into the open jaw of the big pumpkin so the teeth frame it. Place a battery LED inside the large pumpkin behind the skull to backlight the cavern, and a second small LED inside the skull to make its face glow. Skip candles, since two stacked pumpkins trap heat and the thin walls scorch fast. Adjust the skull's angle until the bite looks convincing.
Set the scene on a bench or board with fallen leaves tucked around the base to hide the seam between pumpkins. A prop like an old axe or rake handle adds a spooky story without touching the carving. Shoot in low light so the peeled skull glows and the jaw stays shadowy. Mist the cut edges with water between viewings to keep everything fresh.
Check things off as you get ready.
Work on a stable surface, keep your free hand out of the cutting path, and have an adult handle sharp tools.
The untouched orange skin of the big pumpkin's head and the small pumpkin's cap stays dark for contrast.
The skull's pale bone face and its raked hairline glow a soft dim orange from skin peeling.
The skull's eye sockets, nose, grin, and the deep throat behind the jaw read as the brightest full cutouts.
Carve each tooth as a triangle that stays connected at its base rather than a free-standing spike. Leave the pumpkin wall a bit thicker along the jaw line for support. Cut the large throat opening behind them last so the rows stay braced while you work.
No, and it is easier if they do not. Rest the small skull pumpkin inside the front opening of the big one and let gravity and a few tucked leaves hold the pose. Keeping them separate means you can light each one and swap the skull's angle freely.
Peeling leaves a solid pale surface that looks like bone and glows softly, which sells the skull shape better than open holes alone. You still cut fully through the eyes, nose, and mouth for bright contrast. The mix of peeled flesh and true cutouts is what gives the face its depth.
Changed a detail? Made it simpler? Share a photo of your version and tell the community what worked.
The best new carvings, ideas worth stealing, and how-tos for carving season. Short, seasonal, and gone by November.



Comments (0)