@lanternlane
Sep 5, 2026
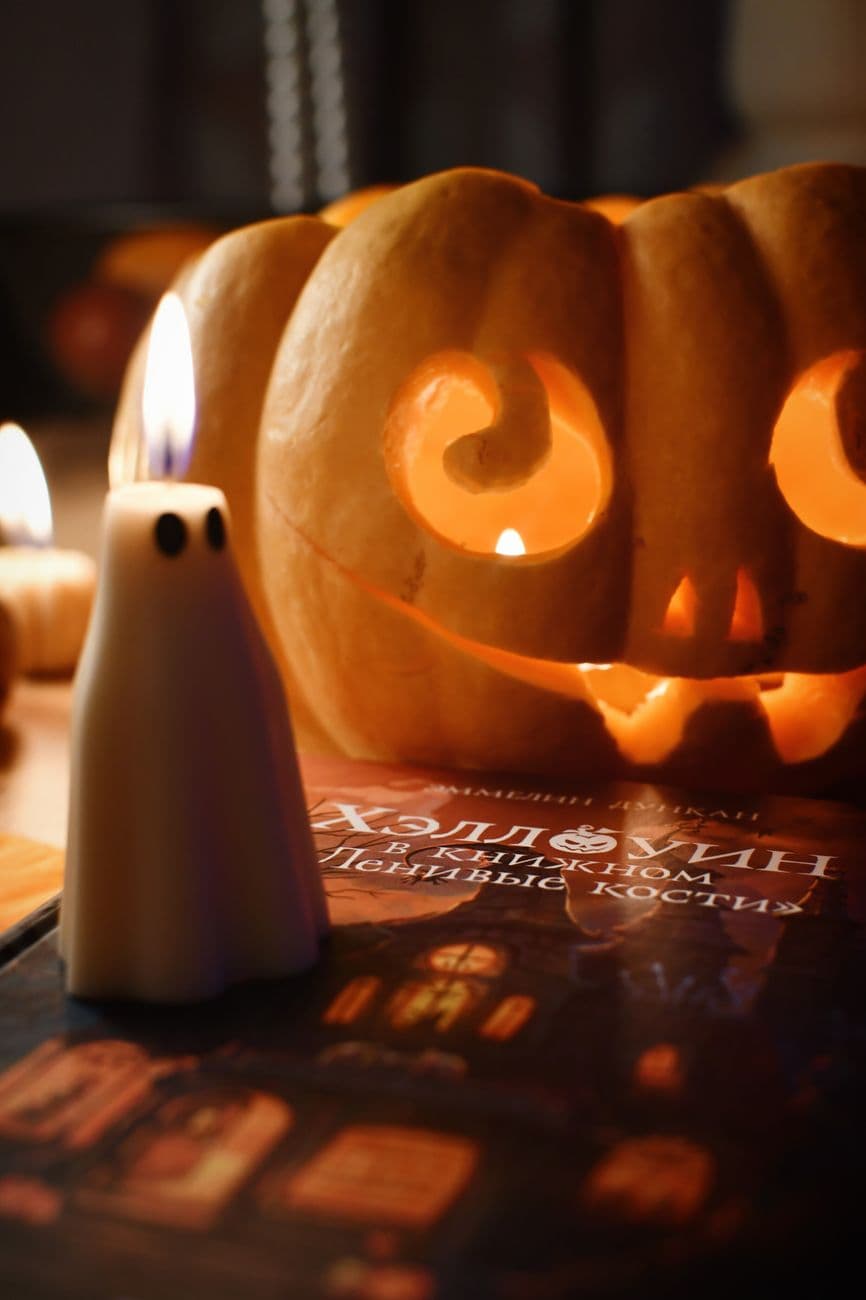
Spiral eyes at story time
Hypnotic spiral eyes glowing over a sly grin, guarding a Halloween storybook beside a little ghost candle.
No ratings yet · Sign in to rate
Hypnotic spiral eyes glowing over a sly grin, guarding a Halloween storybook beside a little ghost candle.
The whole trick here is the pair of spiral eyes, cut as smooth swirling openings that read like whirlpools of light. Everything else, a small triangle nose and a long curving grin, stays simple so the eyes carry the drama. Plan your two spirals first, keep the center curl attached to the surrounding skin with a little bridge of pumpkin, and cut all the big openings last so the wall stays strong while you work.
Written by PumpkinCarvingIdeas.com, inspired by @lanternlane's photo above. These are our suggestions, not instructions from the uploader, and this approach hasn't been tested on their exact carve.
Pick a pumpkin with a wide, fairly flat front so the two spirals sit side by side without warping. Cut a lid or a bottom access hole and scoop the inside until the front wall is about one inch thick. A thinner wall makes the curved cuts easier and lets more light through. Use a battery LED tealight or puck light, never a real candle, since the small ghost figure and any storybook nearby are flammable.
Tape your stencil flat and poke the outline with a pushpin, following each spiral as a dotted path. Mark the triangle nose and the long grin the same way. Pull the paper off and connect the dots lightly with a marker so you can see the full swirl before any blade goes in. Double check that each spiral has a small uncut bridge holding its center curl to the outer ring.
Start with the innermost part of each spiral using a fine detail saw or a craft knife, taking short strokes and letting the blade follow the curve rather than forcing it. Work slowly outward along the swirl, keeping the channel an even width so the glow looks smooth. Leave the little bridge intact at first for stability, then trim it thin at the end if you want the curl to float. An adult should handle all the sharp cutting.
Saw the small triangle nose next, angling the blade slightly inward so the piece pops out cleanly. Then cut the long grin as one flowing line, widening it a touch at the corners for that sly look. Keep the mouth opening modest so the front wall does not sag under the weight of the spirals above it. Push cut pieces out from inside to avoid cracking the edges.
Shave the inside edges of every opening at a slight bevel so light spreads instead of showing a hard rim. Drop in the LED, dim the room, and check that both spirals glow evenly. If one eye looks dark in the center, thin the bridge or scrape the inner wall a little more. Wipe away marker lines with a damp cloth.
Set the pumpkin behind a Halloween book and place a small ghost-shaped LED figure to one side for a cozy scene. Shoot in a dark room with the pumpkin as the main glow, letting the warm light spill onto the book cover. Keep any open flame out of the setup and use only battery lights near paper and fabric. A low camera angle makes the spiral eyes look tall and hypnotic.
Check things off as you get ready.
Work on a stable surface, keep your free hand out of the cutting path, and have an adult handle sharp tools.
The broad cheeks and forehead stay as untouched skin, holding the deep orange body of the face.
Optional shallow scraping just outside each spiral can add a soft halo, dimly glowing around the eyes.
The two spiral eyes, the triangle nose, and the long grin are cut all the way through for the brightest light.
Leave a small bridge of uncut pumpkin connecting each center curl to the surrounding ring while you carve the rest of the swirl. That bridge acts like a support beam and stops the delicate center from snapping. If you want the curl to look free-floating, thin the bridge only at the very end once everything else is stable.
A fine-toothed detail saw turns inside tight spirals better than a big knife, and a small craft knife handles the sharpest inner corners. Take short strokes and let the tool follow the curve instead of forcing it sideways. Going slow keeps the channel width even, which is what makes the glow look smooth.
The spirals are the hard part because the continuous curve and the fragile centers take patience. If you are new, try a simpler round or teardrop eye first and save the full swirl for once you are comfortable steering the blade. You can also carve wider, more open spirals, which are more forgiving than tight ones.
Changed a detail? Made it simpler? Share a photo of your version and tell the community what worked.
The best new carvings, ideas worth stealing, and how-tos for carving season. Short, seasonal, and gone by November.

Comments (0)