Halloween Pumpkin Carving Contest · Starts October 1st · $500 in prizes
← Back to ideas
@ai_concepts
Aug 2, 2026
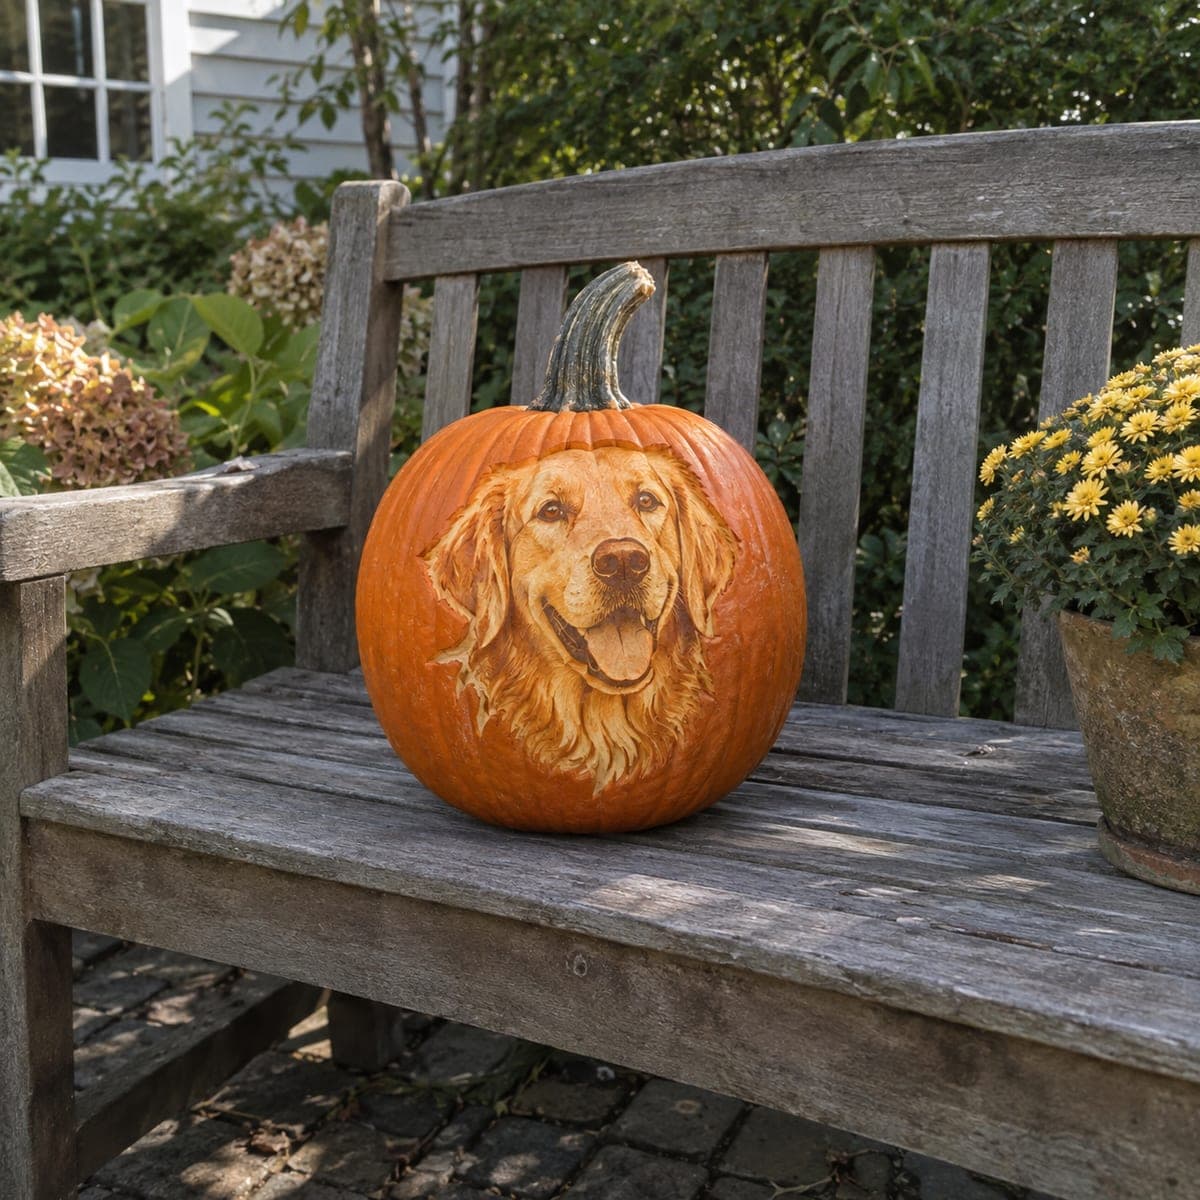
Sunlit Golden Retriever Portrait PumpkinAI
0

Sunlit Golden Retriever Portrait Pumpkin

Painted and shaded in warm creams and golds, this golden retriever portrait looks almost photographic against the pumpkin's orange skin. Build it up like a painting: block in the head shape, establish the dark eyes and nose early, then layer light strokes in the fur's direction. Because it needs daylight rather than a candle, it belongs on a garden bench or covered porch where the sun can hit it.

This is an AI-generated concept image: a realistic, carvable design idea rather than a photo of a finished carve. AI concepts are always labeled and sit out the leaderboard and the contest.

No ratings yet · Sign in to rate

Comments (0)

  • No comments yet — be the first.

Save without an account. Sign in to like or comment.

Our tips for carving a similar design

The core trick here is shallow shading rather than cutting all the way through, so the golden retriever reads like a painting on the pumpkin skin. You work in layers, removing more skin where the fur is lightest and leaving the skin dark where the face falls into shadow. Since this is a concept image with no real pumpkin behind it, treat these as suggestions for how you could build a similar sunlit portrait of your own.

Written by PumpkinCarvingIdeas.com, inspired by the image above. These are our suggestions, not instructions from the uploader. This approach to the AI concept has not been tested on a real pumpkin.

From pumpkin to porch

  1. Pick a smooth, round pumpkin and clean the face

    Choose a tall, evenly round pumpkin with a broad, blemish-free front so the portrait has room to breathe. Wipe the display area with a damp cloth and let it dry fully. You do not need to gut this pumpkin, since it is a surface design lit by daylight rather than a candle. A firm, fresh skin holds shading detail far better than a soft or bruised one.

  2. Transfer the head shape and map your values

    Tape a golden retriever stencil to the front and poke through the main outlines with a pin or fine tool, marking the head, ears, muzzle, eyes, and nose. Remove the paper and lightly connect the dots so you can see the whole shape. Before cutting, mentally sort the face into three tones: darkest shadows, mid fur, and bright highlights. Establishing this map now keeps the layering under control later.

  3. Set the eyes and nose first

    Adults should handle all blades. Using a small detail knife or a wide-loop clay tool, gently score the outlines of the eyes and nose, then shade around them so the dark features anchor the face early. Leave the eyes and nose skin mostly intact so they stay the darkest points. Getting these landmarks placed correctly is what makes the finished dog feel alive.

  4. Peel the mid-tone fur in the direction it grows

    Switch to a shallow ribbon or gouge and scrape away just the top layer of skin across the cheeks, forehead, and chest. Always stroke in the direction the fur flows, curving down the muzzle and outward on the ears. Vary your pressure so some areas glow a little lighter than others. This is the slow, meditative part, so take breaks and step back often to check the shape.

  5. Scrape the brightest highlights thin

    For the lightest cream areas, the muzzle bridge, the chest ruff, and the fur catching sun, remove more of the flesh so the wall goes thin and pale. Do not cut fully through, since open holes would break the painted look and weaken the structure. Keep narrow bridges of skin between highlight strokes so the fur stays connected and strong. Feather the edges where light fur meets dark so the transition looks soft.

  6. Seal it and stage it in daylight

    Rub the carved surface with a thin coat of petroleum jelly or a food-safe preservative to slow drying and deepen the warm tones. Set the pumpkin on a garden bench or covered porch where morning or afternoon sun can rake across it. Because it relies on daylight and shadow rather than an inner light, no candle or LED is needed. Snap your photo when the sun is low and warm for the richest golden effect.

Gather your supplies

Check things off as you get ready.

Work on a stable surface, keep your free hand out of the cutting path, and have an adult handle sharp tools.

Three levels of light

  • Leave intact

    The untouched dark orange skin forms the eyes, nose, mouth line, and the shadows around the ears and neck.

  • Peel & shade

    Lightly scraped skin gives the mid golden fur across the cheeks, forehead, and body a soft dim glow.

  • Cut through

    Thinned near-through highlights, kept as scrapes rather than open holes, make the muzzle bridge and chest ruff the brightest creams.

Learn the carving basics

Before you start cutting

Do I need to hollow the pumpkin or add a light?

No. This is a surface shading design meant to be seen in daylight, so it works uncarved and unlit. Skip the candle entirely, since an inner flame would not show through the thin, unbroken walls and could dry the pumpkin faster.

How do I keep the fur from looking flat?

Vary the depth of your scraping and always follow the direction the fur grows, curving strokes around the muzzle and down the chest. Leave the darkest tones as untouched skin and reserve your thinnest, palest scrapes for the highlights. That range of tones from dark to cream is what gives the coat dimension.

How long will a shaded portrait like this last?

Shaded pumpkins dry out faster than deeply cut ones because so much skin is exposed. Sealing the carved surface with petroleum jelly and keeping it in a cool, shaded spot between viewings helps. Plan to carve within a day or two of when you want it looking its best.

Your take belongs here, too.

Changed a detail? Made it simpler? Share a photo of your version and tell the community what worked.

Share your pumpkin

More pumpkins like this

You've reached the end · 8 pumpkins
The Patch Report

Fresh pumpkins, in your inbox.

The best new carvings, ideas worth stealing, and how-tos for carving season. Short, seasonal, and gone by November.

A short email during carving season. Unsubscribe anytime. See our privacy policy.