Halloween Pumpkin Carving Contest Β· Starts October 1st Β· $500 in prizes
← Back to ideas
@ai_concepts
Sep 25, 2026
Three Flower Aperture Foam Pumpkin Carving IdeaAI
0

Report this carving

Tell us what is wrong. Reports are private.

Three Flower Aperture Foam Pumpkin Carving Idea

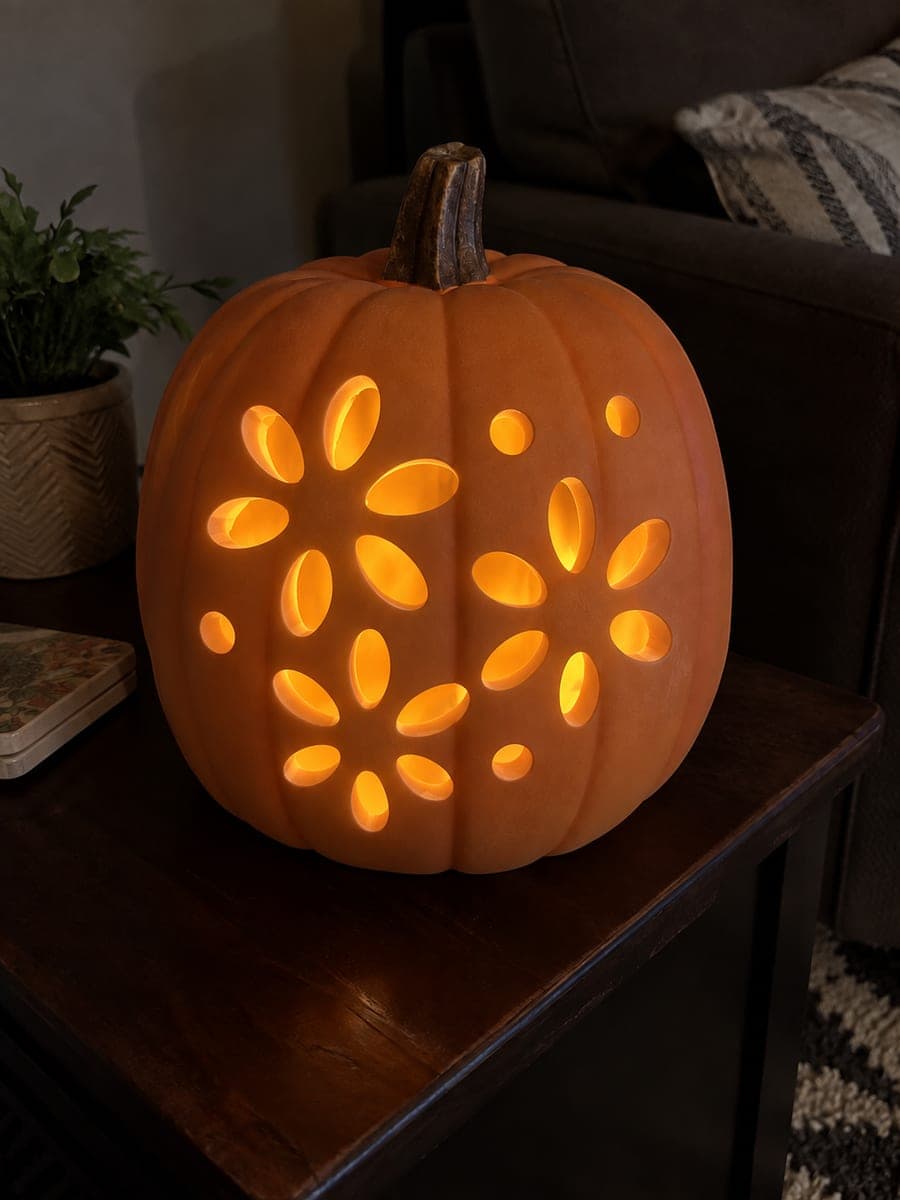
Three six-petal flowers formed purely by oval petal apertures surround solid centers on a craft-foam pumpkin, each center continuously connected to the shell by broad foam bridges, with a few round dot openings as accents. Cut the petal ovals with a sharp craft knife rather than a saw for the cleanest curves on the matte molded foam surface. On a dark living room side table, the three glowing flower clusters create a botanical lantern effect.

No ratings yet Β· Sign in to rate

Comments (0)

  • No comments yet β€” be the first.

Save without an account. Sign in to like or comment.

Our tips for carving a similar design

Each flower is formed entirely by six oval petal apertures cut around a solid foam center, with the center continuously connected to the surrounding shell by broad foam bridges. The solid centers are the structural key: they float in place only because the bridges on every side are kept wide and unbroken. A sharp craft knife is the right tool for cutting clean oval curves in foam without any moisture or resistance to fight.

From pumpkin to porch

  1. Map all three flower centers

    Divide the pumpkin face into thirds and mark the center point of each flower with a dot. Lightly sketch each petal oval around the center, keeping the connecting bridges between petals at least half an inch wide. Step back and confirm the three clusters are evenly spaced before scoring any cuts.

  2. Score the petal outlines

    Score the outline of every petal oval with the tip of the craft knife in a single light pass. This groove prevents the blade from wandering and is especially important on the tightest ends of each oval where the bridge width is narrowest.

  3. Cut the petal apertures on the first flower

    Work around the first flower in rotation, cutting each of the six petals fully through on the second pass. Remove each foam oval and check that the center island remains connected on all sides. Complete one flower before moving to the next to monitor structural integrity as you go.

  4. Complete the second and third flowers

    Repeat the same rotation method for the remaining two flowers. After each petal is cut, press lightly on the center island with one finger to confirm it has not detached from its bridges. If a bridge feels thin, widen it slightly by trimming the adjacent petal edge back.

  5. Cut the round dot accents

    Add the small round dot openings between or around the flower clusters using a short rotary motion with the knife tip. These dots are small, so a single circular score followed by a pop-through cut is all that is needed.

  6. Light and photograph

    Place a warm battery LED inside and set the pumpkin on a dark side table. Each flower cluster will project a ring of glowing petals, with the solid centers appearing as dark islands surrounded by light. Photograph from close range to capture the botanical detail.

Written with AI to match this design

Gather your supplies

Check things off as you get ready.

Work on a stable surface, keep your free hand out of the cutting path, and have an adult handle sharp tools.

Three levels of light

  • Leave intact

    The three solid flower centers, all bridges between petals, and the full uncut shell area remain dark orange.

  • Peel & shade

    None. Craft foam does not have a peelable skin layer.

  • Cut through

    All eighteen petal ovals across the three flowers, plus the small round dot accents, are cut through for full glow.

Learn the carving basics

Before you start cutting

How do I keep all six petal bridges intact around each flower center?

Mark the bridge width between each pair of petals before cutting and stick to those marks. The bridges should be at least half an inch wide. If you accidentally cut into a bridge, reinforce it immediately from the inside with a thin line of strong craft glue before continuing.

Is there a simpler way to get consistent oval shapes across all three flowers?

Cut an oval template from cardboard and trace around it for every petal. This keeps all 18 petals a consistent size and makes the flowers look intentional rather than hand-wobbled. A template also speeds up the marking stage considerably.

Why is this rated hard if the individual shapes are just ovals?

The difficulty comes from the sheer number of cuts and the precision needed to keep 18 bridges intact simultaneously. One errant cut can detach a flower center, and re-gluing foam cleanly is tricky. Patience and a fresh blade for every flower are the keys to success.

Your take belongs here, too.

Changed a detail? Made it simpler? Share a photo of your version and tell the community what worked.

Share your pumpkin

More pumpkins like this

You've reached the end Β· 8 pumpkins
The Patch Report

Fresh pumpkins, in your inbox.

The best new carvings, ideas worth stealing, and how-tos for carving season. Short, seasonal, and gone by November.

A short email during carving season. Unsubscribe anytime. See our privacy policy.