Halloween Pumpkin Carving Contest Β· Starts October 1st Β· $500 in prizes
← Back to ideas
@ai_concepts
Sep 25, 2026
Moon and Diamond Cutout Foam Pumpkin CarvingAI
0

Report this carving

Tell us what is wrong. Reports are private.

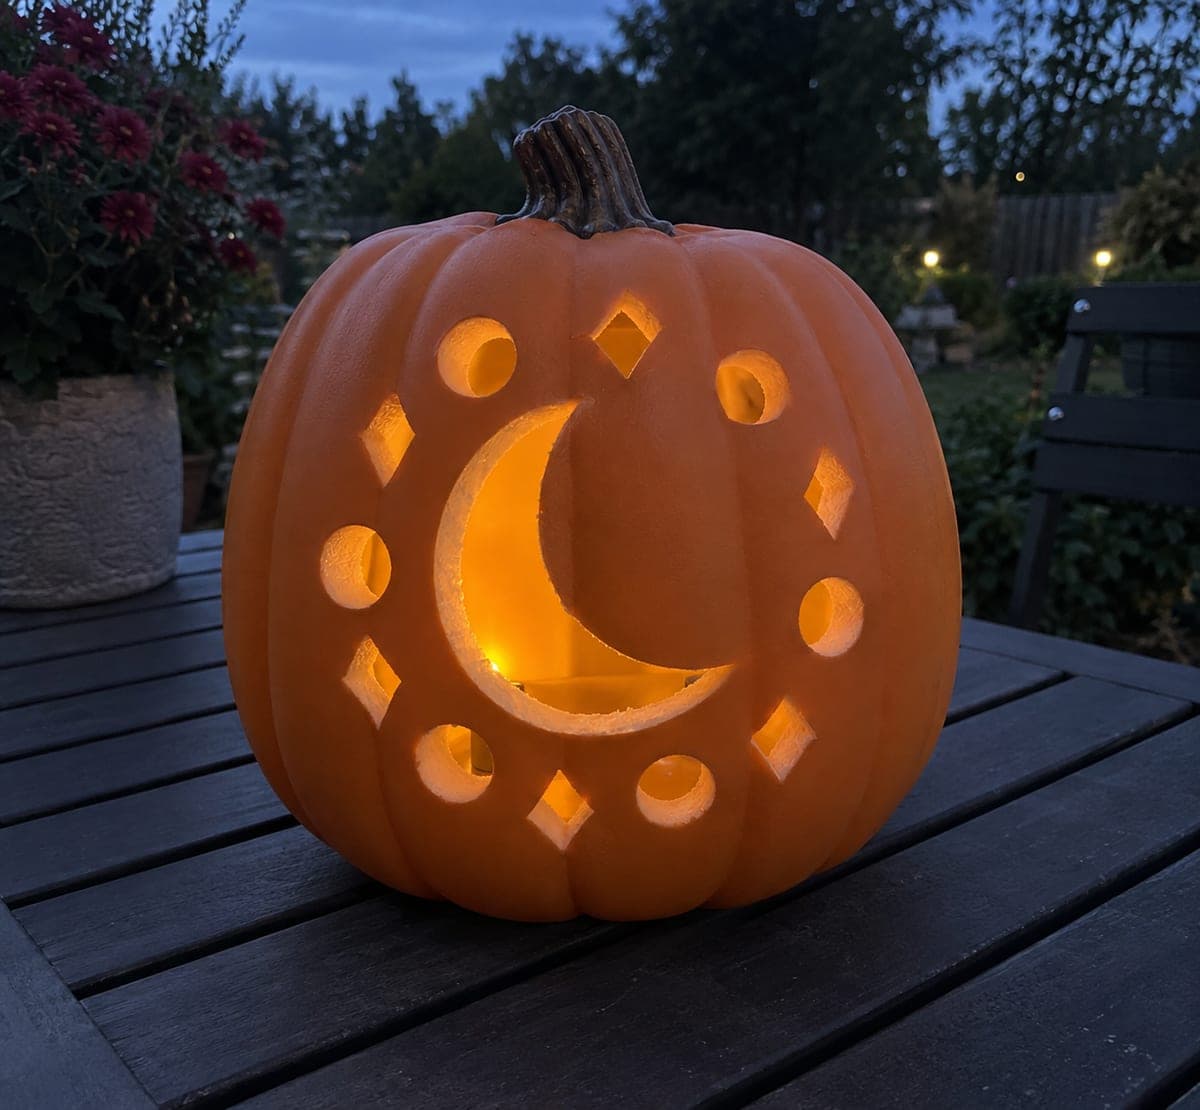
Moon and Diamond Cutout Foam Pumpkin Carving

A large crescent moon opening, separate round apertures, and diamond cutouts are carved across a craft-foam pumpkin with wide foam bridges between each shape, creating a celestial lantern on a garden table at dusk. Foam compresses slightly under a serrated blade, so score each shape's outline with a craft knife before sawing through to keep the cuts clean and sharp. The pale exposed foam at the cut edges adds a subtle two-tone contrast that real pumpkins cannot replicate.

No ratings yet Β· Sign in to rate

Comments (0)

  • No comments yet β€” be the first.

Save without an account. Sign in to like or comment.

Our tips for carving a similar design

The design arranges a large crescent moon, separate round apertures, and diamond cutouts across a craft-foam pumpkin, with wide foam bridges between every shape to hold the structure together. Foam compresses slightly under a serrated blade, so scoring each shape's outline with a craft knife before cutting prevents the blade from dragging and distorting the curves. The pale exposed foam at the cut edges adds a two-tone contrast that is unique to foam pumpkins.

From pumpkin to porch

  1. Plan the layout

    Sketch the crescent moon, round holes, and diamonds on paper first, then transfer the positions to the foam surface with a fine-tip marker. Make sure each shape is surrounded by at least three-quarters of an inch of foam on all sides to maintain the broad bridges called for by this design.

  2. Score all outlines

    Using a sharp craft knife, score every shape lightly along its outline without cutting fully through. This shallow groove acts as a guide rail and prevents the blade from wandering when you make the full cut, especially important on the curved crescent.

  3. Cut the crescent moon

    Work along the outer arc of the crescent first, then cut the inner arc to release the foam piece. Use short overlapping strokes and a fresh blade for the tightest inner curve. Pop the crescent piece free from the back and trim any foam fuzz with one clean pass.

  4. Cut the round and diamond openings

    For the round holes, rotate the craft knife in a controlled arc rather than pivoting the whole pumpkin. For the diamonds, cut each straight side in one firm stroke, meeting precisely at the corners. Remove each piece and inspect the bridge widths as you go.

  5. Check all bridges

    Run a finger lightly over every bridge between the shapes to feel for any thin or nearly severed spans. If a bridge feels fragile, reinforce it from the inside with a small dot of strong craft glue. Let the glue cure fully before lighting the pumpkin.

  6. Light and display

    Insert a battery LED inside and position the pumpkin on a garden table at dusk. The pale foam edges at the crescent and diamonds will glow with a soft two-tone contrast that looks especially striking against a dark outdoor background.

Written with AI to match this design

Gather your supplies

Check things off as you get ready.

Work on a stable surface, keep your free hand out of the cutting path, and have an adult handle sharp tools.

Three levels of light

  • Leave intact

    The broad foam bridges, the solid back panel, the ribs, and the artificial stem remain dark.

  • Peel & shade

    None. Craft foam does not have a peelable surface layer.

  • Cut through

    The crescent moon opening, each separate round aperture, and every diamond cutout are cut fully through for bright LED glow.

Learn the carving basics

Before you start cutting

How do I get a clean inner curve on the crescent without the blade slipping?

Score the inner arc in three or four overlapping segments rather than one continuous stroke. Keep the blade perpendicular to the foam surface and use the tip, not the belly of the blade, for tight curves. A fresh blade makes a noticeable difference in control.

How far apart should the shapes be so the bridges stay strong?

Aim for at least three-quarters of an inch between any two openings. On a standard 8-inch foam pumpkin, that gives you comfortable bridges for four to six cutouts without risking structural failure.

Will the foam pumpkin look good outdoors in light rain?

Craft foam handles brief light moisture better than a real pumpkin, but prolonged exposure to rain can cause the painted or dyed surface to soften. Bring the pumpkin inside during heavy rain or seal the outer shell with a quick spray of clear acrylic sealer before displaying it outside.

Your take belongs here, too.

Changed a detail? Made it simpler? Share a photo of your version and tell the community what worked.

Share your pumpkin

More pumpkins like this

You've reached the end Β· 8 pumpkins
The Patch Report

Fresh pumpkins, in your inbox.

The best new carvings, ideas worth stealing, and how-tos for carving season. Short, seasonal, and gone by November.

A short email during carving season. Unsubscribe anytime. See our privacy policy.