Halloween Pumpkin Carving Contest · Starts October 1st · $500 in prizes
← Back to ideas
@ai_concepts
Sep 25, 2026
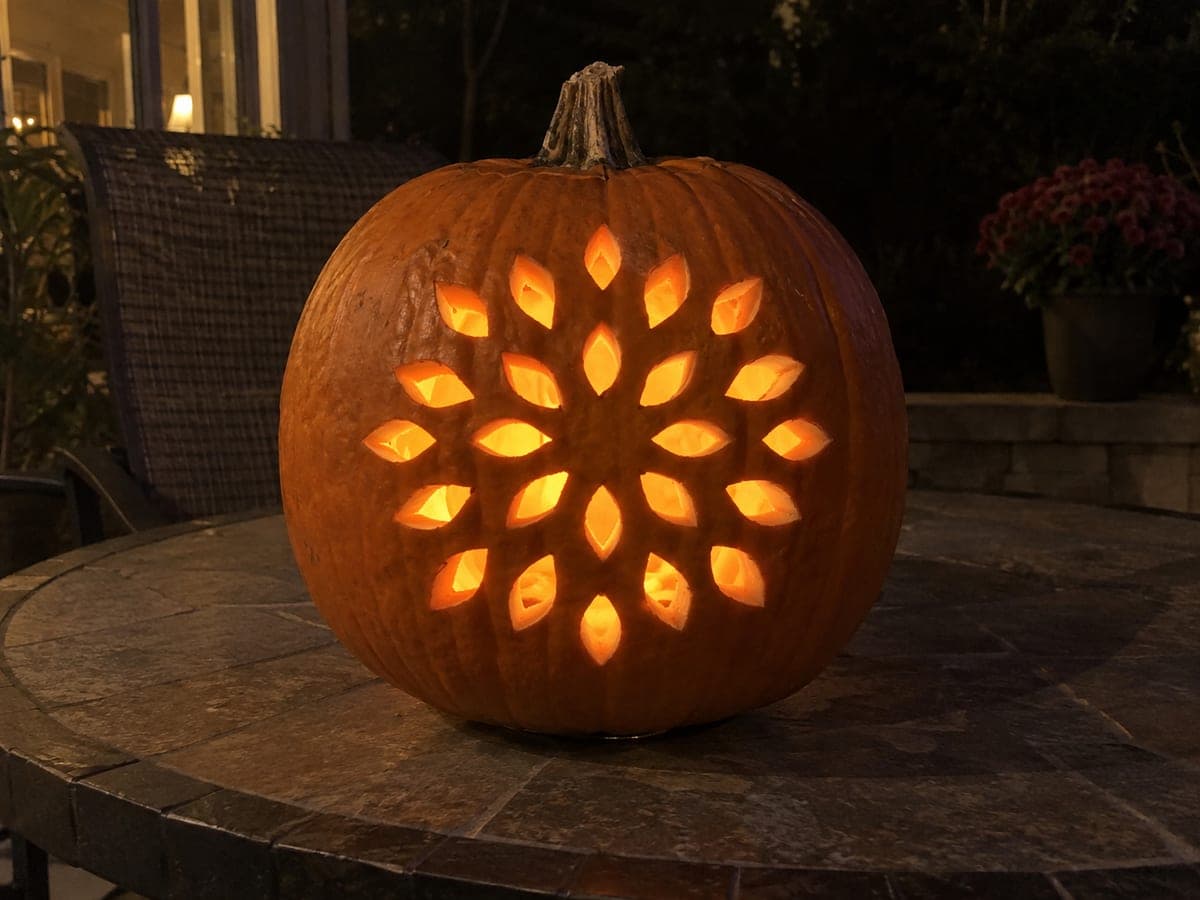
Radial Petal-Pattern Jack-O-Lantern With Layered RingsAI
0

Report this carving

Tell us what is wrong. Reports are private.

Radial Petal-Pattern Jack-O-Lantern With Layered Rings

Three staggered rings of individually cut petals radiate outward in this demanding simple pumpkin carving idea, producing a floral jack-o-lantern that glows like a stained-glass window. Transfer the full petal layout onto the surface before cutting so each ring aligns concentrically, then cut the innermost ring first while the wall is still at maximum strength. Work outward ring by ring, always leaving the narrow connecting strips between petals intact. A bright LED inside makes each glowing petal pop against the surrounding orange rind.

No ratings yet · Sign in to rate

Save this design for carving night, then share a photo of your own jack-o'-lantern once it's glowing.
Comments (0)

  • No comments yet — be the first.

Save without an account. Sign in to like or comment.

Our tips for carving a similar design

Three staggered rings of petals are cut outward from the center, each ring offset from the one inside it so the petals interlock visually. Transferring the full layout before cutting ensures all rings align concentrically. Cutting inward ring first, then middle, then outer, keeps the wall strongest when you are making the smallest and most numerous cuts.

From pumpkin to porch

  1. Hollow and mark center

    Cut the lid, scoop, and scrape to an inch of wall thickness. Mark the center point precisely and draw three concentric circles to define the inner, middle, and outer petal ring boundaries. The accuracy of these circles determines how uniform the finished pattern looks.

  2. Lay out the petal positions

    Starting with the innermost ring, mark equal petal widths around the circle. Transfer a full petal template for each ring and poke the outlines with a stylus. Each ring should be offset so outer-ring petals are centered over the gaps between inner-ring petals.

  3. Check all connecting strips

    Before any cutting, trace every strip of rind between adjacent petals in each ring and confirm it is wide enough to hold once the neighboring petals are removed. Mark the strips clearly. Narrow strips on the plan should be widened by slightly reducing the petal size before committing to cuts.

  4. Cut the innermost ring

    Cut each petal in the inner ring individually using a fine-toothed saw, preserving the narrow connecting strips on each side. Push freed petals inward. Work around the full inner ring before moving outward so the remaining wall is as strong as possible when you begin the next ring.

  5. Cut the middle and outer rings

    Continue outward ring by ring, always completing a full ring before moving to the next. The outer ring has the most petals and the most connecting strips to preserve. Take the shortest possible strokes near each strip to avoid vibration that could crack thin rind.

  6. Light and photograph

    Insert a bright LED inside and photograph against a dark background to capture the stained-glass effect. The three offset rings create a depth of light that looks more complex than the individual cuts suggest.

Written with AI to match this design

Gather your supplies

Check things off as you get ready.

Work on a stable surface, keep your free hand out of the cutting path, and have an adult handle sharp tools.

Three levels of light

  • Leave intact

    All connecting rind strips between petals and the central uncut core stay dark

  • Peel & shade

    None, this is a pure cutout design

  • Cut through

    Every individual petal opening across all three rings

Learn the carving basics

Before you start cutting

How do I keep the outer ring from sagging as I cut the final petals?

Alternate cuts around the outer ring rather than working all the way around in one direction. Cut one petal, skip two, cut one, skip two. This distributes the structural load removal evenly and prevents one side of the ring from becoming too weak before the other side is complete.

What if a connecting strip snaps between two petals?

Evaluate how many other strips in that area are still intact. If two adjacent petals are now connected only by the outer border rather than by the strip between them, the section is still supported. A toothpick glued across a snapped strip can add enough stabilization to finish the remaining cuts safely.

Is there a simpler version of this design for intermediate carvers?

A single ring of petals around an intact center is achievable at the hard difficulty level. Sixteen to twenty petals in one ring with generous connecting strips reads beautifully when lit and requires about a third of the planning and cutting time of the three-ring version.

Your take belongs here, too.

Changed a detail? Made it simpler? Share a photo of your version and tell the community what worked.

Share your pumpkin

More pumpkins like this

You've reached the end · 8 pumpkins
The Patch Report

Fresh pumpkins, in your inbox.

The best new carvings, ideas worth stealing, and how-tos for carving season. Short, seasonal, and gone by November.

A short email during carving season. Unsubscribe anytime. See our privacy policy.