Halloween Pumpkin Carving Contest · Starts October 1st · $500 in prizes
← Back to ideas
@ai_concepts
Sep 25, 2026
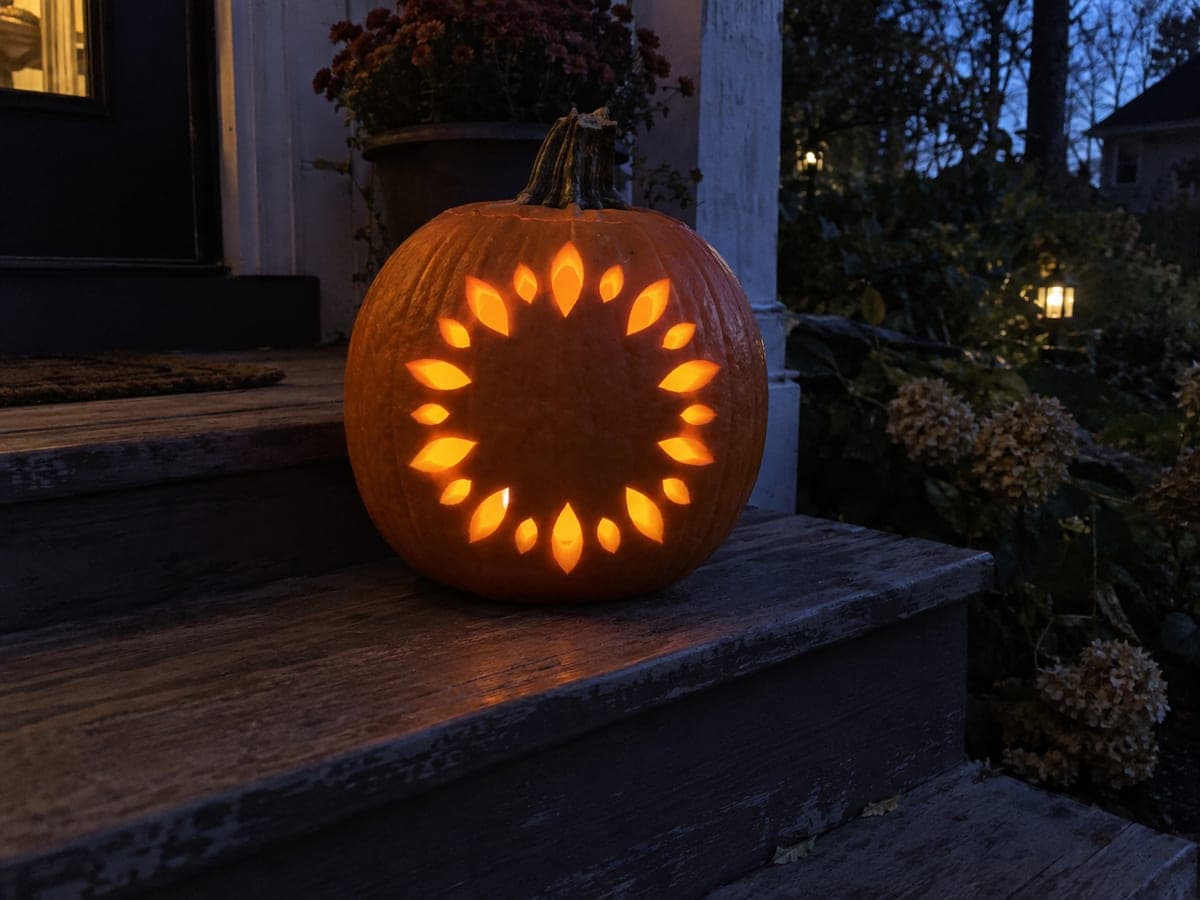
Leaf Wreath Pumpkin With Twenty-Four Glowing OpeningsAI
0

Report this carving

Tell us what is wrong. Reports are private.

Leaf Wreath Pumpkin With Twenty-Four Glowing Openings

Twenty-four individual leaf-shaped cutouts arranged in a ring create a stunning wreath on this simple pumpkin carving idea, with the center rind left fully intact as the visual anchor. Draw a circle guide on the pumpkin's face to keep each leaf evenly spaced along the ring, then cut the leaves one at a time using a fine-toothed saw. Preserve the narrow strips of rind between leaves, as each strip carries structural load and prevents the wreath from sagging. An LED pillar candle inside casts leaf-shaped light patterns across surrounding surfaces.

No ratings yet · Sign in to rate

Comments (0)

  • No comments yet — be the first.

Save without an account. Sign in to like or comment.

Our tips for carving a similar design

Twenty-four leaf-shaped openings form a complete ring around an intact center section. The center rind is the visual anchor and the structural core, so it must stay fully uncut throughout. Spacing the leaves evenly along a drawn circle guide is the key preparatory step, and preserving the thin rind strips between adjacent leaves is what prevents the wreath from sagging.

From pumpkin to porch

  1. Hollow and prep

    Cut the lid, scoop thoroughly, and scrape the front wall to a consistent inch of thickness. An evenly thinned wall means every leaf opening will glow at the same intensity when lit, giving the wreath a uniform appearance.

  2. Draw the wreath ring

    Find the center of the pumpkin face and draw a circle guide using a compass or a round lid as a template. Draw a second circle about three inches inside the first to define the inner boundary of the wreath. The ring between these two circles is where all twenty-four leaves will sit.

  3. Mark the leaf positions

    Divide the outer circle into twenty-four equal arcs by marking points along it. A protractor works well here since each leaf should be 15 degrees apart. Lightly sketch each leaf shape between the inner and outer circles, alternating the leaf tip direction slightly for a natural look.

  4. Cut leaves one at a time

    Use a fine-toothed saw to cut each leaf individually. Start with a leaf at the top of the ring and work around in one direction. Cut each leaf completely before moving to the next, and push each freed piece inward. Stopping to check structural stability after every fourth or fifth leaf is a good habit.

  5. Preserve the strips between leaves

    The narrow rind strips between adjacent leaves carry the structural load of the entire ring. If a strip feels thin or shows any flex after neighboring cuts, avoid cutting the adjacent leaves until the pumpkin has been repositioned to reduce pressure on that area.

  6. Light and display

    Place an LED pillar candle inside for steady tall light that reaches all twenty-four leaves evenly. The leaf shapes cast their outlines across any nearby surface. Display on a level surface away from wind that could topple a pumpkin with this many openings.

Written with AI to match this design

Gather your supplies

Check things off as you get ready.

Work on a stable surface, keep your free hand out of the cutting path, and have an adult handle sharp tools.

Three levels of light

  • Leave intact

    The full center section of the face and all rind strips between leaves stay intact and dark

  • Peel & shade

    None, this is a pure cutout design

  • Cut through

    All twenty-four individual leaf-shaped openings around the ring

Learn the carving basics

Before you start cutting

What if I lose count of the leaf positions while cutting?

Mark all twenty-four positions with a stylus poke before cutting any of them. That way your spacing is set in advance and you cannot accidentally skip a position or end up with uneven gaps when the ring closes.

How wide should the strips between leaves be?

Aim for at least three-quarters of an inch of intact rind between adjacent leaf edges. Narrower strips are possible on a thick-walled pumpkin but increase the risk of cracking. If your pumpkin has a smaller circumference than expected, use fewer leaves, perhaps sixteen or twenty, and widen each one rather than squeezing all twenty-four in.

Can I skip some leaves if I run out of time?

Yes. Cut as many leaves as you have time for and leave the remaining positions uncut. A partial ring still looks intentional if the cut leaves are evenly distributed around the circle. Label the uncut positions with a small x to remind yourself where to resume.

Your take belongs here, too.

Changed a detail? Made it simpler? Share a photo of your version and tell the community what worked.

Share your pumpkin

More pumpkins like this

You've reached the end · 8 pumpkins
The Patch Report

Fresh pumpkins, in your inbox.

The best new carvings, ideas worth stealing, and how-tos for carving season. Short, seasonal, and gone by November.

A short email during carving season. Unsubscribe anytime. See our privacy policy.