Halloween Pumpkin Carving Contest · Starts October 1st · $500 in prizes
← Back to ideas
@ai_concepts
Sep 25, 2026
Classic Cheerful Triangle Face Pumpkin for BeginnersAI
0

Report this carving

Tell us what is wrong. Reports are private.

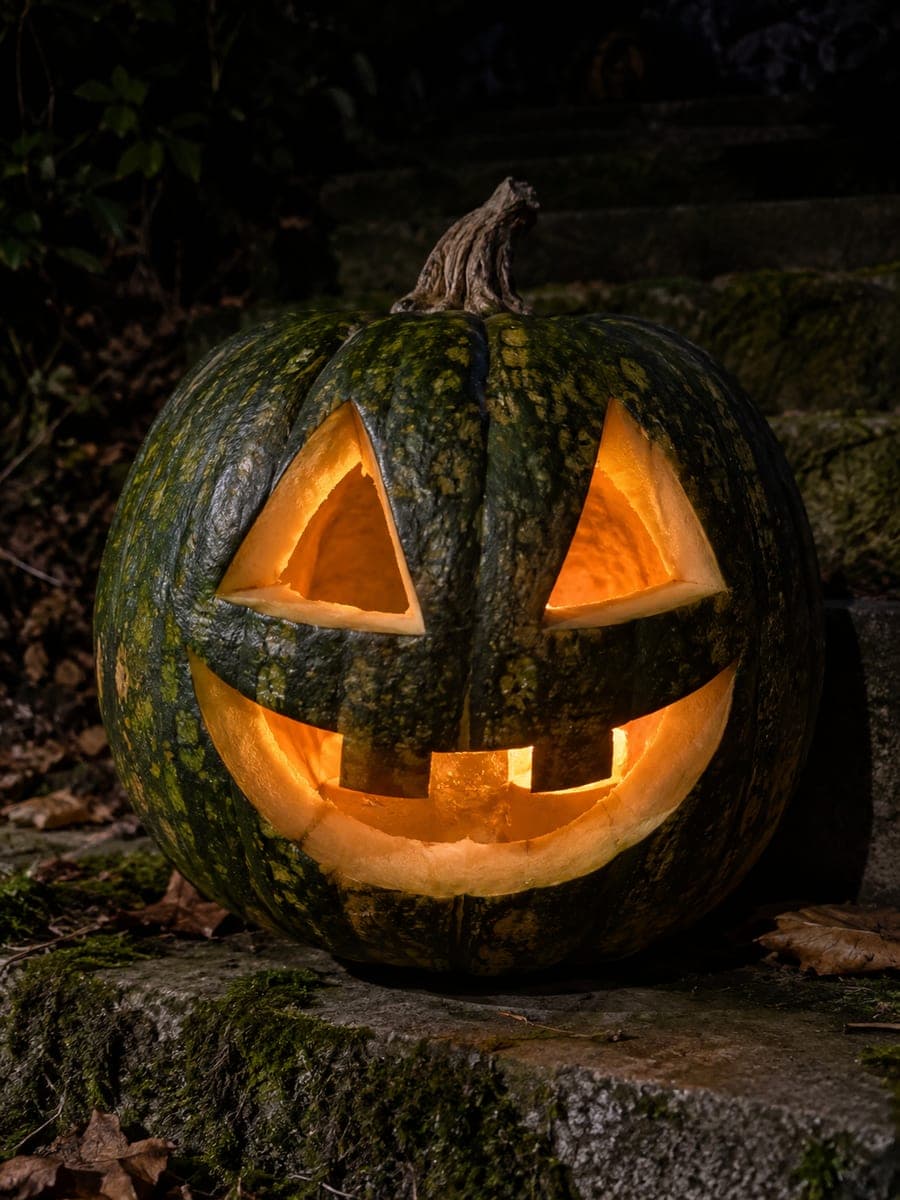
Classic Cheerful Triangle Face Pumpkin for Beginners

Two large triangle eyes, a triangle nose, and a wide toothless crescent mouth make this cheerful classic the ideal pumpkin carving idea for beginners tackling their first jack-o-lantern. Sketch each triangle onto the surface with a marker before cutting so everything is evenly spaced, and use a serrated pumpkin saw rather than a kitchen knife for better control on curves. Cut the nose triangle first as a confidence-building warm-up, then tackle the larger mouth. A simple tea light placed inside produces the warm classic glow.

No ratings yet · Sign in to rate

Comments (0)

  • No comments yet — be the first.

Save without an account. Sign in to like or comment.

Our tips for carving a similar design

The cheerful classic face is built from four simple geometric openings, two triangle eyes, one triangle nose, and one broad crescent mouth, that every first-time carver can cut confidently. Sketching each shape with a marker before cutting ensures even spacing. Cutting the nose triangle first as a warm-up builds technique confidence before tackling the larger mouth.

From pumpkin to porch

  1. Choose and hollow the pumpkin

    Pick a medium-sized pumpkin with a broad, relatively flat front. Cut the lid from the base and scoop out pulp and seeds until the inner wall is about an inch thick. A first carving goes best on a fresh, firm pumpkin that resists the saw predictably on every cut.

  2. Mark the shapes with a marker

    Draw two large triangles for the eyes, one smaller triangle for the nose, and a wide crescent for the mouth directly onto the pumpkin surface with a washable marker. Space the eyes evenly on either side of center, place the nose just below and between them, and position the mouth in the lower third of the face. Stand back to check the spacing before cutting.

  3. Cut the nose triangle first

    The nose is the smallest opening and makes an ideal starting cut for building confidence. Use a small serrated pumpkin saw held perpendicular to the rind, cut along each side of the triangle in two or three strokes, and pop the offcut free from inside with a finger. The goal is a clean, three-sided hole.

  4. Cut the eye triangles

    Move to the eyes next. Cut each triangle with the same steady, perpendicular technique: follow one side at a time rather than trying to turn corners in a single stroke. Pause at each corner, extract the blade slightly, reposition, and continue along the next side. Support each offcut as it releases.

  5. Cut the crescent mouth

    The mouth is the largest opening and the most rewarding cut. Follow the curved upper and lower edges of the crescent, taking your time on the curves. If the mouth has a pointed corner at each end, finish there last since those points are easiest to cut cleanly once both curved edges are already in place.

  6. Light and display

    Place a battery tea light or LED lantern inside, replace the bottom lid, and carry the pumpkin to its display spot. The warm glow from the classic face reads as welcoming and festive from the end of any path or driveway. This design is the benchmark every other carved pumpkin is measured against.

Written with AI to match this design

Gather your supplies

Check things off as you get ready.

Work on a stable surface, keep your free hand out of the cutting path, and have an adult handle sharp tools.

Three levels of light

  • Leave intact

    All rind outside the four openings stays solid and dark, forming the familiar jack-o-lantern face

  • Peel & shade

    None, only full cutouts are used

  • Cut through

    Both triangle eye holes, the triangle nose hole, and the crescent mouth hole are cut completely through for full classic glow

Learn the carving basics

Before you start cutting

My triangle corners came out rounded instead of pointed. How do I sharpen them?

Insert the tip of a thin paring knife into the rounded corner and pare away a small amount of rind to create the sharp point. Work a few millimetres at a time and check the result after each pass. Rounded corners are a very common first-time result and are easy to sharpen with a minute of careful knife work.

How do I stop the pumpkin from caving in before Halloween?

Keep it in a cool, shaded spot when not on display and apply petroleum jelly to all cut edges immediately after carving to slow moisture loss. Bringing it indoors each night dramatically extends its display life. A carved pumpkin kept cool and dry can last ten days or more.

Can I add teeth to the crescent mouth without starting over?

Yes. Draw small rectangular or triangle tooth shapes along the upper inside edge of the mouth and cut the gaps between them using a detail saw or craft knife. Go slowly since the mouth offcut is already gone and the surrounding rind is now less supported. Cutting teeth after the main mouth is a very common refinement.

Your take belongs here, too.

Changed a detail? Made it simpler? Share a photo of your version and tell the community what worked.

Share your pumpkin

More pumpkins like this

You've reached the end · 8 pumpkins
The Patch Report

Fresh pumpkins, in your inbox.

The best new carvings, ideas worth stealing, and how-tos for carving season. Short, seasonal, and gone by November.

A short email during carving season. Unsubscribe anytime. See our privacy policy.