Halloween Pumpkin Carving Contest · Starts October 1st · $500 in prizes
← Back to ideas
@ai_concepts
Sep 25, 2026
Leaf Wreath Pumpkin Ring for Beginner Carving ChallengeAI
0

Report this carving

Tell us what is wrong. Reports are private.

Leaf Wreath Pumpkin Ring for Beginner Carving Challenge

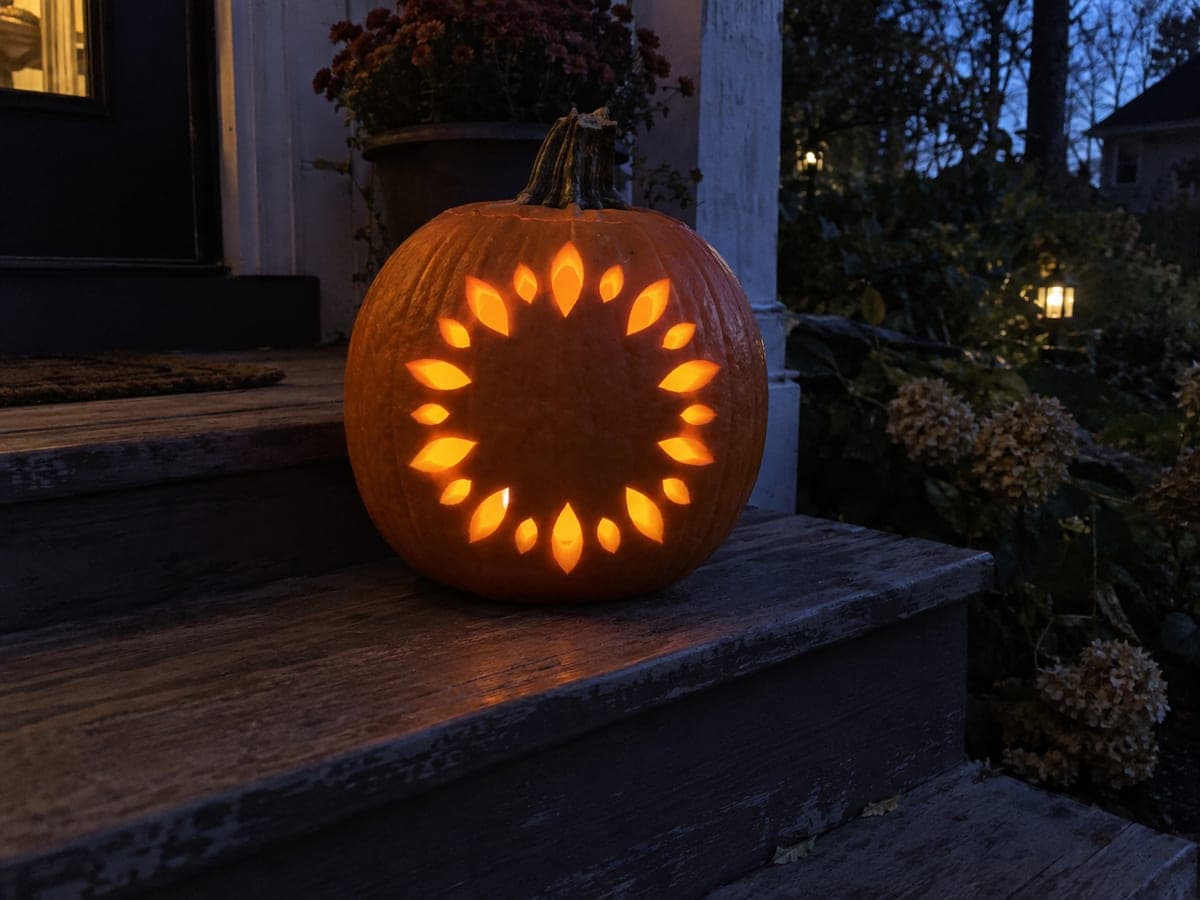
Eighteen individual leaf-shaped holes arranged in an oval ring make this leaf-wreath pumpkin carving idea a worthwhile challenge for beginners ready to move beyond a simple face. Draw a guide oval on the surface and space the leaf outlines evenly around it before cutting, so the finished wreath reads as a balanced ring. Cut each leaf as a separate opening, preserving the wide strips of rind between them and leaving the entire center of the pumpkin solid. The uncut center acts as the structural backbone that keeps the ring from sagging.

No ratings yet · Sign in to rate
Comments (0)

  • No comments yet — be the first.

Save without an account. Sign in to like or comment.

Our tips for carving a similar design

The design is a ring of eighteen individual leaf-shaped openings arranged around an oval guide, with solid rind between every leaf and the entire center of the pumpkin left completely intact as the structural backbone. The visual effect comes from the repetition of the leaf shape, so consistency in the size and orientation of each leaf matters more than perfection in any single one. Drawing the guide oval and spacing the leaves evenly before cutting any of them is the essential first step.

From pumpkin to porch

  1. Draw the guide oval

    Mark a large oval on the pumpkin surface with a washable marker, centered on the front face. This oval is your placement guide for the leaf ring and must not itself be cut. Divide the oval perimeter into eighteen equally spaced positions, marking each with a small tick. This step takes care but prevents the ring from looking unbalanced.

  2. Sketch all eighteen leaves

    Draw a leaf shape centered on each tick mark, oriented so the leaf tip points outward from the oval. Keep each leaf roughly the same size: consistency in the repeated shape is what makes the wreath read as a deliberate pattern rather than a random scatter of holes. Use the template as a guide for the leaf shape.

  3. Hollow the pumpkin

    Cut the lid from the base and scoop the cavity to a consistent inch-thick wall. The large uncut center area that forms the structural backbone must be scooped at the same thickness as the rest of the wall. Do not leave it thicker just because it is not being carved.

  4. Cut every other leaf first

    Cut leaves 1, 3, 5, and so on around the ring before cutting the even-numbered leaves. This spacing means that while you are cutting any given leaf, there is always a full uncut leaf on each side of it providing structural support. Once all the odd-numbered leaves are done, go back and cut the even-numbered ones.

  5. Maintain the rind strips between leaves

    Keep at least 8 mm of rind between every pair of adjacent leaves throughout the session. The leaf tips pointing outward from the oval should end at least 10 mm short of the outer border of the pumpkin so the outer wall stays intact all the way around the ring.

  6. Light and display

    Insert a battery LED and view the ring in low light. The wreath of glowing leaves should read as a complete oval ring with consistent spacing. This design works beautifully as a tabletop display or a windowsill piece where viewers can appreciate the detail from close range.

Written with AI to match this design

Gather your supplies

Check things off as you get ready.

Work on a stable surface, keep your free hand out of the cutting path, and have an adult handle sharp tools.

Three levels of light

  • Leave intact

    The entire center of the pumpkin face and all rind strips between leaves stay solid and dark

  • Peel & shade

    None, only full cutouts are used

  • Cut through

    All eighteen individual leaf-shaped holes are cut completely through for full interior glow

Learn the carving basics

Before you start cutting

How do I divide the oval perimeter into eighteen equal spaces without a protractor?

Cut a strip of paper the same length as the oval perimeter by wrapping it around the drawn oval and marking the circumference. Fold the strip in half three times to get eight equal divisions, then divide each section into roughly equal thirds for eighteen marks. Transfer the marks back to the oval with a light tick. Perfect mathematical precision is not required: the eye forgives small spacing variations much more readily than it forgives large ones.

Can I add more leaves to make the ring denser?

You can increase to twenty-four leaves if the pumpkin is large enough to maintain 8 mm bridges between all of them. Sketch all the leaves before cutting any to confirm the spacing works. Do not try to add more leaves after cutting has started, since the altered spacing will look inconsistent.

My leaf cuts are not all the same shape. How do I make them look more consistent?

Make a small cardboard leaf template and trace around it for each leaf rather than drawing each one freehand. A consistent physical template produces far more uniform shapes than repeated freehand sketching. Trace lightly so the template lines are easy to see but do not confuse the saw direction.

Your take belongs here, too.

Changed a detail? Made it simpler? Share a photo of your version and tell the community what worked.

Share your pumpkin

More pumpkins like this

You've reached the end · 8 pumpkins
The Patch Report

Fresh pumpkins, in your inbox.

The best new carvings, ideas worth stealing, and how-tos for carving season. Short, seasonal, and gone by November.

A short email during carving season. Unsubscribe anytime. See our privacy policy.