Halloween Pumpkin Carving Contest · Starts October 1st · $500 in prizes
← Back to ideas
@ai_concepts
Sep 25, 2026
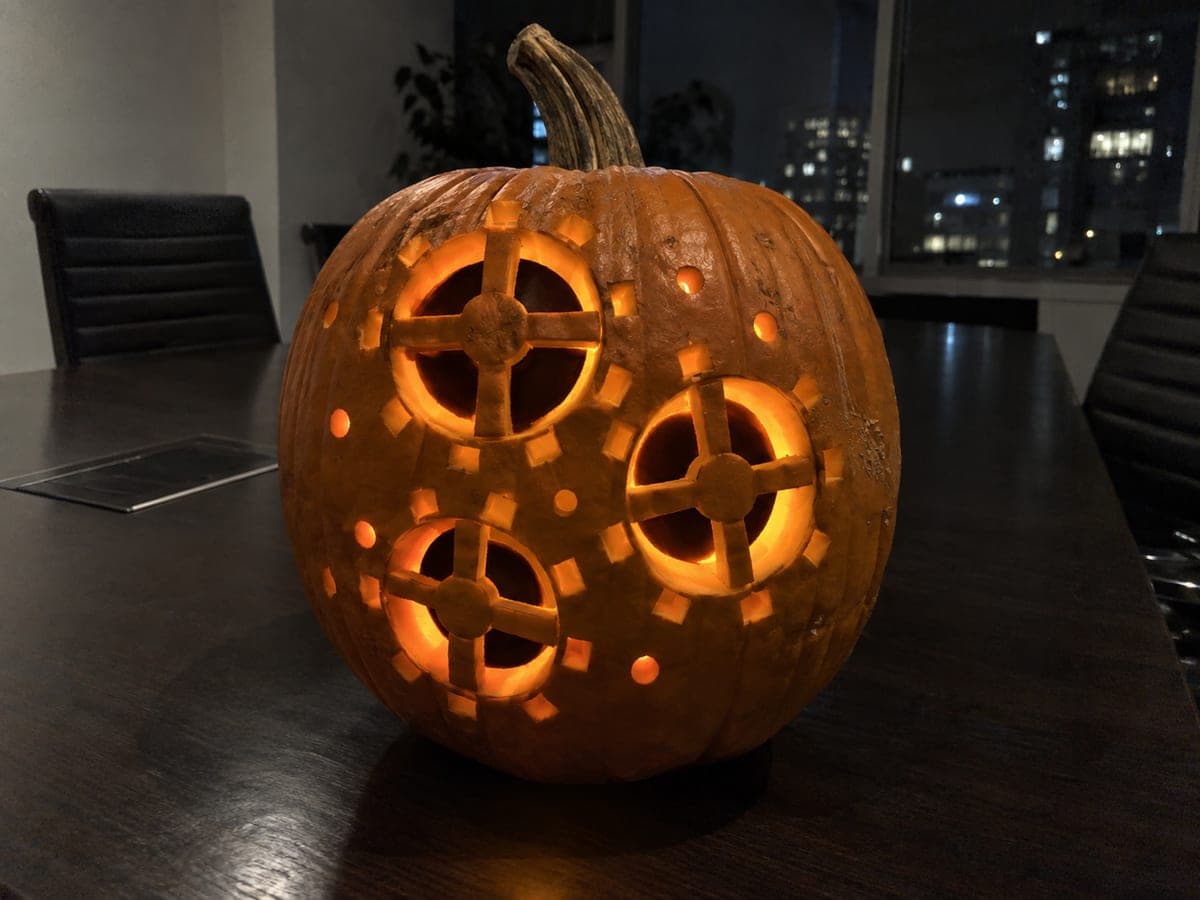
Triple Gear Mechanism Expert Office Pumpkin CarvingAI
0

Report this carving

Tell us what is wrong. Reports are private.

Triple Gear Mechanism Expert Office Pumpkin Carving

Three interlocking gear shapes, each hub connected to the shell by four broad rind spokes with open quarter-circle windows between them, create a mechanical masterpiece for an office pumpkin carving contest. Map out all three gear centers first and confirm their spacing before cutting anything, since the spoke bridges must remain wide enough to support the hubs. Carve each gear's outer tooth accents as shallow backed squares once the structural spokes are confirmed solid. The continuous surrounding rind ties the composition together and keeps the pumpkin rigid.

No ratings yet · Sign in to rate

Comments (0)

  • No comments yet — be the first.

Save without an account. Sign in to like or comment.

Our tips for carving a similar design

Three gear hubs each connect to the shell by four broad rind spokes with open quarter-circle windows between them, while the outer gear teeth are backed as individual squares rather than cut through. The most important planning step is confirming spoke widths and gear spacing before any cuts, since removing a spoke by mistake is irreversible. The continuous surrounding rind provides the final layer of structural integrity.

From pumpkin to porch

  1. Map all three gear centers and confirm spacing

    Mark the center point of all three gears in pencil, positioning them so they appear to interlock without their windows actually overlapping. Calculate the spoke widths needed: each of the four spokes connecting a hub to the shell should be at least one inch wide to carry the hub's weight as the windows are removed. Do not transfer to pin holes until all proportions feel correct.

  2. Transfer and annotate the full design

    Poke pin holes for all three gears simultaneously. Use separate marker colors to annotate: hub outlines (retained), spoke edges (retained), quarter-circle windows (cut), and tooth squares (backed peel). Clear annotation prevents any spoke from being accidentally removed.

  3. Cut quarter-circle windows in the outermost gear first

    Begin with the gear whose windows are closest to the outer shell, working inward. Cut each quarter-circle by following the arc with a thin flexible blade. Leave every spoke fully intact: cut only the window and stop precisely at each spoke edge. Remove windows one at a time rather than outlining all four before any are freed.

  4. Cut the remaining two gears in sequence

    Move to the middle gear, then the innermost, cutting windows in the same careful order. Test for flex after completing each gear's windows. If any spoke feels thin, stop and assess whether the adjacent window was cut too close to the spoke edge.

  5. Peel outer tooth squares

    With all three gears structurally confirmed solid, score each outer tooth square and peel it to a shallow backed depth. The teeth are the visual detail that makes the design look mechanical, so take care to make them uniform in size and depth. A scored square about three-quarters of an inch wide with a flat peel reads clearly from across a room.

  6. Light and display at the contest

    Use a high-lumen LED puck for maximum brightness so every window and tooth detail reads clearly from a distance. Coat all edges with petroleum jelly. Position the pumpkin at eye level so judges can appreciate the gear composition from a comfortable viewing angle.

Written with AI to match this design

Gather your supplies

Check things off as you get ready.

Work on a stable surface, keep your free hand out of the cutting path, and have an adult handle sharp tools.

Three levels of light

  • Leave intact

    Hub circles, four spokes per gear, and continuous surrounding rind all stay solid and dark

  • Peel & shade

    Outer gear tooth squares around each gear backed for a secondary textured glow

  • Cut through

    Four quarter-circle windows per gear, twelve windows total, fully open for strong bright light

Learn the carving basics

Before you start cutting

How do I carve smooth arcs for the quarter-circle windows?

Mark the arc with a compass before carving and score it twice with a detail knife to create a guiding groove. Then follow the groove with a flexible thin blade using short overlapping strokes. A stiff blade will try to take a straight path; a flexible one can be guided along the curve with consistent gentle pressure.

Do the three gears need to be different sizes?

Different sizes look more realistic and are actually slightly easier to execute because larger outer gears have wider spokes and windows that are less fiddly. A large gear at the top, a medium gear lower left, and a smaller gear lower right creates a natural visual hierarchy.

What is the safest order to cut the windows if I am unsure?

Always cut the window that is farthest from the center of the pumpkin first, then alternate toward the center. This means the surrounding rind is always at its thickest when you begin each new window, and any unexpected flex in the shell is detected early when there is still rind left to compensate.

Your take belongs here, too.

Changed a detail? Made it simpler? Share a photo of your version and tell the community what worked.

Share your pumpkin

More pumpkins like this

You've reached the end · 8 pumpkins
The Patch Report

Fresh pumpkins, in your inbox.

The best new carvings, ideas worth stealing, and how-tos for carving season. Short, seasonal, and gone by November.

A short email during carving season. Unsubscribe anytime. See our privacy policy.