Halloween Pumpkin Carving Contest · Starts October 1st · $500 in prizes
← Back to ideas
@ai_concepts
Sep 25, 2026
Painted Office Theme No-Carve Pumpkin DisplayAI
0

Report this carving

Tell us what is wrong. Reports are private.

Painted Office Theme No-Carve Pumpkin Display

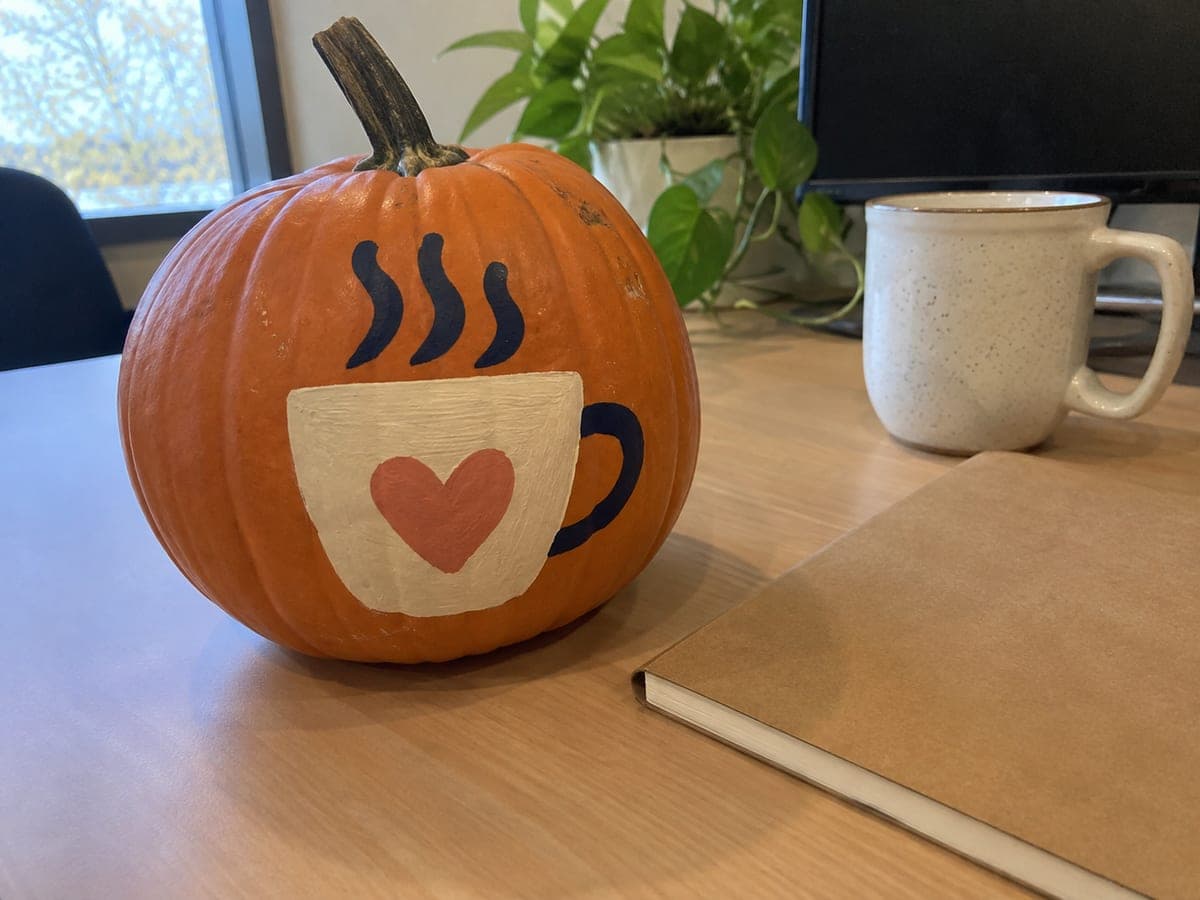
Flat painted office motifs on an intact pumpkin make a cheerful desk decoration that lasts the entire month without any carving required. Sketch your chosen office symbols (a coffee mug, pencil, or inbox tray) lightly in chalk before committing with acrylic paint. Apply colors in thin layers so the orange rind does not show through and let each coat dry fully before adding outlines. A quick coat of matte sealer protects the finished office pumpkin idea through the full season.

No ratings yet · Sign in to rate

Comments (0)

  • No comments yet — be the first.

Save without an account. Sign in to like or comment.

Our tips for carving a similar design

Office-themed flat paint shapes applied to an intact pumpkin create a desk decoration that will last the full month without any structural concerns. Sketching designs in chalk before committing paint means nothing is permanent until you are happy with the composition. Thin layered coats and a matte sealer give the finished piece a polished look that fits a professional environment.

From pumpkin to porch

  1. Clean and dry the pumpkin

    Wipe the pumpkin with a damp cloth and let it dry completely before painting. A clean surface prevents paint from beading or peeling. Choose the flattest front face as the primary painting surface.

  2. Sketch office symbols in chalk

    Lightly draw your chosen office motifs in chalk: a coffee mug, a pencil, a small inbox tray, or a paper airplane are all instantly recognizable. Chalk wipes away cleanly with a dry cloth if you want to reposition anything before painting.

  3. Apply a cream or white base coat

    Brush one or two coats of matte white or cream acrylic over the sketched area to neutralize the orange rind and make the office colors read clearly. Let each coat dry fully before proceeding.

  4. Fill in the main color shapes

    Use flat brushes to block in each object's primary color in thin, even coats. Coffee mug in a warm gray or tan, pencil in yellow, inbox tray in black or steel gray. Two thin coats dry faster and look smoother than one thick coat on the curved surface.

  5. Add outlines, details, and any text

    Switch to a fine liner brush for dark outlines, highlights, steam wisps on the mug, eraser details on the pencil, and any small text labels. Keep line work clean and deliberate, wiping the brush between strokes. Small text reads best in all capitals at this scale.

  6. Seal and place at the desk

    Once all paint is dry, apply a coat of matte sealer by brush or spray to lock in the design. Place the pumpkin on your desk, credenza, or conference table turned to its most detailed side. It will hold up well through indoor office conditions for the full month.

Written with AI to match this design

Gather your supplies

Check things off as you get ready.

Work on a stable surface, keep your free hand out of the cutting path, and have an adult handle sharp tools.

Three levels of light

  • Leave intact

    The entire pumpkin shell remains intact; orange rind shows in any unpainted areas

  • Peel & shade

    None, this design leaves the shell completely intact

  • Cut through

    None; use desk lamp or overhead office lighting to display the painted design

Learn the carving basics

Before you start cutting

Which office motif gets the best reactions?

A steaming coffee mug is consistently the most recognized office symbol and reads well from across a room with minimal detail. If you want something more unique, a tiny spreadsheet grid painted on one side with a small pumpkin-orange chart bar is a tech-office crowd pleaser.

Can I use a stencil to get cleaner shapes?

Yes, adhesive vinyl stencils or simple paper stencils held flat against the curved surface work well for simple shapes like rectangles and circles. Sponge paint through the stencil for a clean edge and peel the stencil away before the paint fully dries to prevent tearing.

Will the matte sealer yellow the white paint over time?

Most water-based acrylic matte sealers are non-yellowing and safe to use over white. Avoid oil-based varnishes, which can yellow. If you are unsure, test the sealer on a small white-painted area of a spare surface and check after 24 hours before applying it to the finished pumpkin.

Your take belongs here, too.

Changed a detail? Made it simpler? Share a photo of your version and tell the community what worked.

Share your pumpkin

More pumpkins like this

You've reached the end · 8 pumpkins
The Patch Report

Fresh pumpkins, in your inbox.

The best new carvings, ideas worth stealing, and how-tos for carving season. Short, seasonal, and gone by November.

A short email during carving season. Unsubscribe anytime. See our privacy policy.