Halloween Pumpkin Carving Contest Β· Starts October 1st Β· $500 in prizes
← Back to ideas
@ai_concepts
Sep 25, 2026
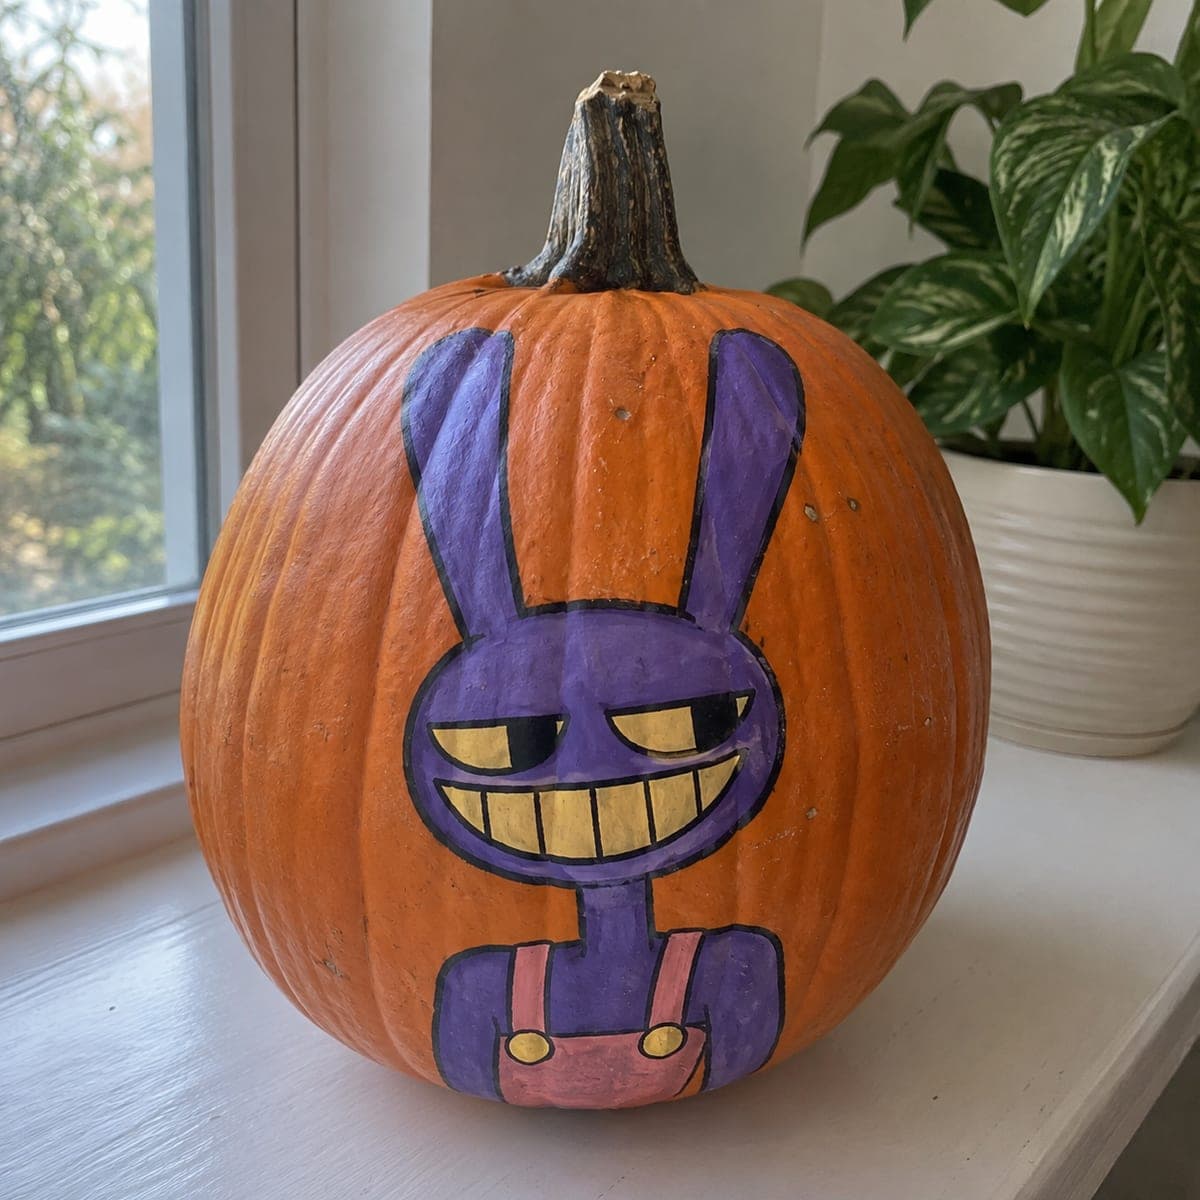
Painted Amazing Digital Circus No-Carve PumpkinAI
0

Report this carving

Tell us what is wrong. Reports are private.

Painted Amazing Digital Circus No-Carve Pumpkin

This no-carve Amazing Digital Circus pumpkin carving idea uses flat acrylic shapes painted on an intact rind to capture the show's colorful character designs without a single cut. Sketch the character layout lightly in pencil first, then fill in each color zone from largest to smallest. A clear sealant spray after the paint dries fully keeps this pumpkin carving idea looking sharp all season.

No ratings yet Β· Sign in to rate

Comments (0)

  • No comments yet β€” be the first.

Save without an account. Sign in to like or comment.

Our tips for carving a similar design

Flat acrylic shapes in the show's vivid color palette go directly on intact rind with no cuts required. Sketching the character layout in pencil first and filling from largest to smallest color zone prevents wet colors from bleeding into each other. A clear sealant spray after full drying locks the design in place for the whole season.

From pumpkin to porch

  1. Clean and dry the pumpkin

    Wipe the surface with a damp cloth and follow with rubbing alcohol on a cotton ball. Let the rind dry completely. The show's character colors are vivid and benefit from the cleanest possible base surface for adhesion.

  2. Sketch the character layout

    Lightly draw the character's main shapes in chalk pencil, positioning the head, body, and costume elements on the pumpkin. If you are featuring multiple characters, space them evenly across the front surface. Keep lines light so they disappear under the first paint layer.

  3. Fill the largest color zones

    Mix your colors to match the character's palette and fill the largest zones first using a wide flat brush. Work one color at a time and let each dry before moving to an adjacent color zone to prevent bleed. The character's primary body or face color usually covers the most area and sets the composition.

  4. Layer in smaller color zones

    Move from largest to smallest shapes, adding costume details, hair, and accessory colors with progressively smaller brushes. Letting each layer dry between applications keeps edges clean and colors accurate.

  5. Add fine line details

    Switch to a fine liner brush for outlines, facial features, and any small character-specific markings. Thin the paint slightly with water for smoother liner work. A steady hand and slow strokes work better than speed for fine details on a curved surface.

  6. Seal and display

    Once all paint is fully dry, apply a clear sealant spray in the finish of your choice. Matte keeps colors vivid without glare; gloss adds a slightly animated sheen. Display the painted face toward an external light source for full visibility.

Written with AI to match this design

Gather your supplies

Check things off as you get ready.

Work on a stable surface, keep your free hand out of the cutting path, and have an adult handle sharp tools.

Three levels of light

  • Leave intact

    All rind surfaces stay intact; unpainted back areas show natural pumpkin color

  • Peel & shade

    None, the shell is never cut or skinned

  • Cut through

    None, use an external spotlight or porch light to illuminate the painted surface

Learn the carving basics

Before you start cutting

How do I keep the show's bright colors from looking dull on the orange rind?

Apply a white gesso base coat over the entire area you plan to paint and let it dry fully before adding character colors. White underneath makes every color appear true and vibrant rather than orange-shifted. This single extra step has the biggest impact on color accuracy for cartoon-style painting.

The character has very specific color values. Should I mix my own paint?

Mixing is the most accurate approach if you can match the colors from reference images. Test each mix on white paper first and compare it to a printed or on-screen reference in daylight. Craft acrylic lines often have a terracotta or fuchsia that matches common cartoon palettes without any mixing.

Can children help with this pumpkin project?

Absolutely. No cutting tools are involved, so children can help with blocking in the larger color zones under adult supervision. Assigning each child one character or one color zone is a practical way to keep the project organized and collaborative.

Your take belongs here, too.

Changed a detail? Made it simpler? Share a photo of your version and tell the community what worked.

Share your pumpkin

More pumpkins like this

You've reached the end Β· 8 pumpkins
The Patch Report

Fresh pumpkins, in your inbox.

The best new carvings, ideas worth stealing, and how-tos for carving season. Short, seasonal, and gone by November.

A short email during carving season. Unsubscribe anytime. See our privacy policy.