Halloween Pumpkin Carving Contest · Starts October 1st · $500 in prizes
← Back to ideas
@ai_concepts
Sep 25, 2026
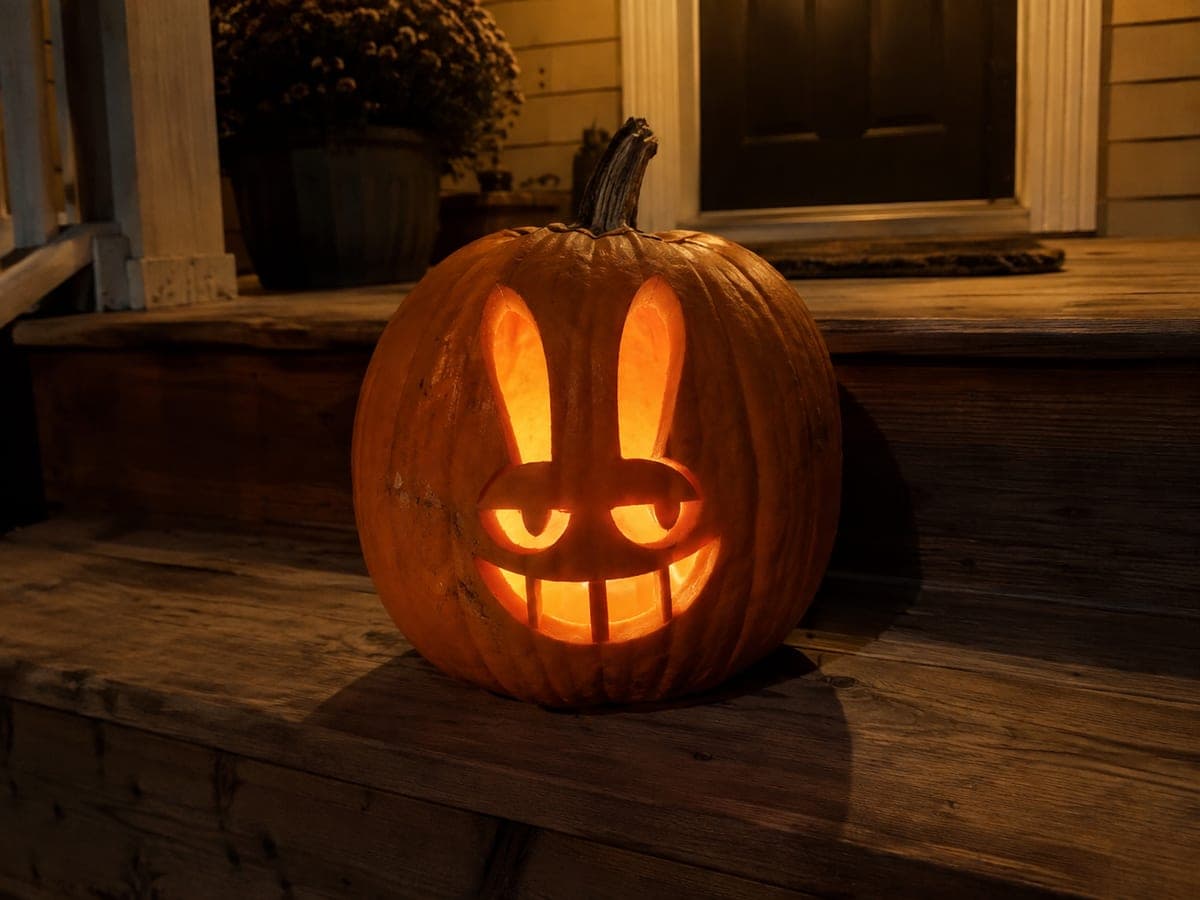
Easy Jax Pumpkin Carving With Rabbit EarsAI
0

Report this carving

Tell us what is wrong. Reports are private.

Easy Jax Pumpkin Carving With Rabbit Ears

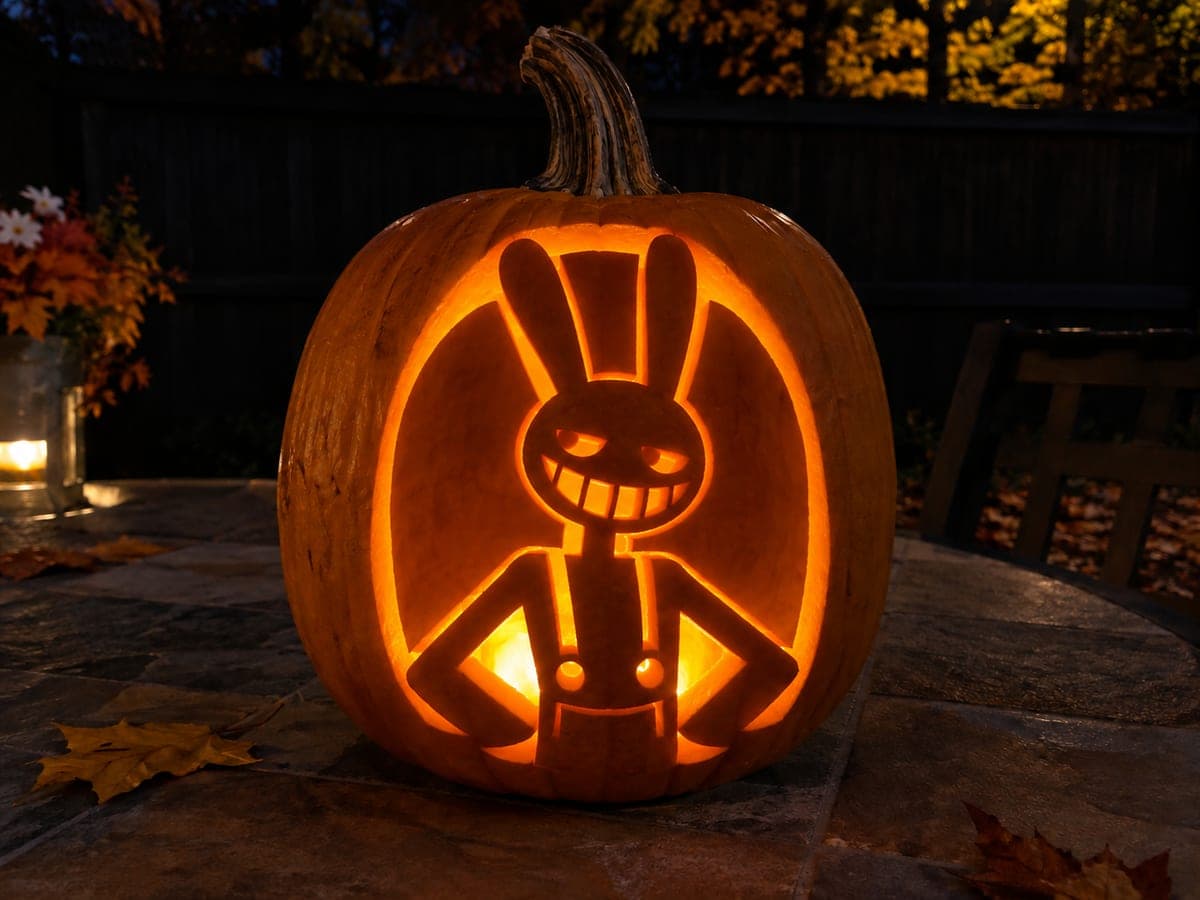
This easy Jax pumpkin carving idea cuts the character's main features through the rind while all retained detail pieces connect through wide rind roots, with secondary shallow-backed accents adding character. Cut the large background opening first to set the rabbit head proportions, then add the ears and face features. Jax's bold angular design means even simple cuts read clearly as this recognizable Amazing Digital Circus character.

No ratings yet · Sign in to rate

Comments (0)

  • No comments yet — be the first.

Save without an account. Sign in to like or comment.

Our tips for carving a similar design

Jax's angular ears and stark facial features translate directly into a clean set of through-cuts that read clearly from a distance. The strategy is to cut the large background opening first so the rabbit head proportions are defined before you work on any of the smaller face details. Retained rind pieces stay solid by keeping their connection roots wide at the base.

From pumpkin to porch

  1. Prep and gut the pumpkin

    Select a round pumpkin with a smooth front face. Cut the lid from the bottom so the cavity is accessible and the pumpkin sits flat. Scoop out seeds and pulp, scraping the interior wall until it is about 1 inch thick on the carving face. Thin walls let the cutouts glow brightly without requiring extra LED power. Dry the interior with a paper towel.

  2. Transfer the stencil

    Tape the printed Jax stencil to the pumpkin face and use a pin tool to poke the outline through the paper. Remove the stencil and connect the dots with a marker to form clean cutting lines. Identify the wide rind roots keeping each retained piece attached and circle them so you know not to cut through them.

  3. Cut the large background opening first

    Use a serrated carving knife to remove the main background area, which sets the rabbit head proportion for the whole design. Start with the largest open section and work your way around the outline. Short sawing motions give more control than pushing straight through. Remove the cut piece carefully to avoid snapping adjacent rind sections.

  4. Add the ears and face features

    Move to the rabbit ears and then the face openings in order from largest to smallest. Keep the connecting bridges wide, especially at the base of each ear, so they do not droop under their own weight. A detail blade works well for any tight corners in the facial features. Saw slowly near corners to avoid cracking the rind.

  5. Score optional secondary details

    If you want to add Jax's expression accents, use a paring knife to score the surface at a shallow depth without cutting all the way through. These lightly thinned areas will glow at a softer level than the full openings. Skip this step if you want to keep the project at the easiest level.

  6. Light and display

    Place an LED tea light or puck inside and close the bottom. Display the pumpkin at eye level so the rabbit silhouette reads clearly. Rub petroleum jelly on cut edges to slow drying. An LED is safer than a candle, especially if children are nearby, and will keep the pumpkin looking its best longer.

Written with AI to match this design

Gather your supplies

Check things off as you get ready.

Work on a stable surface, keep your free hand out of the cutting path, and have an adult handle sharp tools.

Three levels of light

  • Leave intact

    The rabbit body outline, ears as retained rind panels, and face rind bridges stay dark orange.

  • Peel & shade

    Optional shallow-scored expression accents glow at a dim mid-level if added.

  • Cut through

    The background opening and main face feature holes glow fully through for bright light.

Learn the carving basics

Before you start cutting

The rabbit ears are long and thin. How do I keep them from snapping?

The ears need to connect to the main rind panel through a broad root at the base, at least as wide as the thinnest part of the ear. Do not taper the root narrower than about a half inch. If an ear does crack, press the pieces back together and apply a small piece of clear tape inside the cavity to hold them while the pumpkin dries.

Can I skip the stencil and draw Jax freehand?

Jax's asymmetrical expression makes freehand tricky, but it is certainly possible. Draw the outline with a washable marker first and step back to check proportions before cutting. The character's eyes and mouth are the most important elements to get right since they define the recognizable smugness of the character.

How do I make sure the pumpkin glows brightly enough for Jax's bold design?

Use a bright LED puck rather than a tea light for best results. Place it as close to the center of the carved face as possible, pointing toward the front. If the glow looks uneven, try a second LED or position a small LED strip along the inner walls. Avoid real candles since the flickering light can make angular designs look less crisp.

Your take belongs here, too.

Changed a detail? Made it simpler? Share a photo of your version and tell the community what worked.

Share your pumpkin

More pumpkins like this

You've reached the end · 8 pumpkins
The Patch Report

Fresh pumpkins, in your inbox.

The best new carvings, ideas worth stealing, and how-tos for carving season. Short, seasonal, and gone by November.

A short email during carving season. Unsubscribe anytime. See our privacy policy.