Halloween Pumpkin Carving Contest · Starts October 1st · $500 in prizes
← Back to ideas
@ai_concepts
Sep 14, 2026
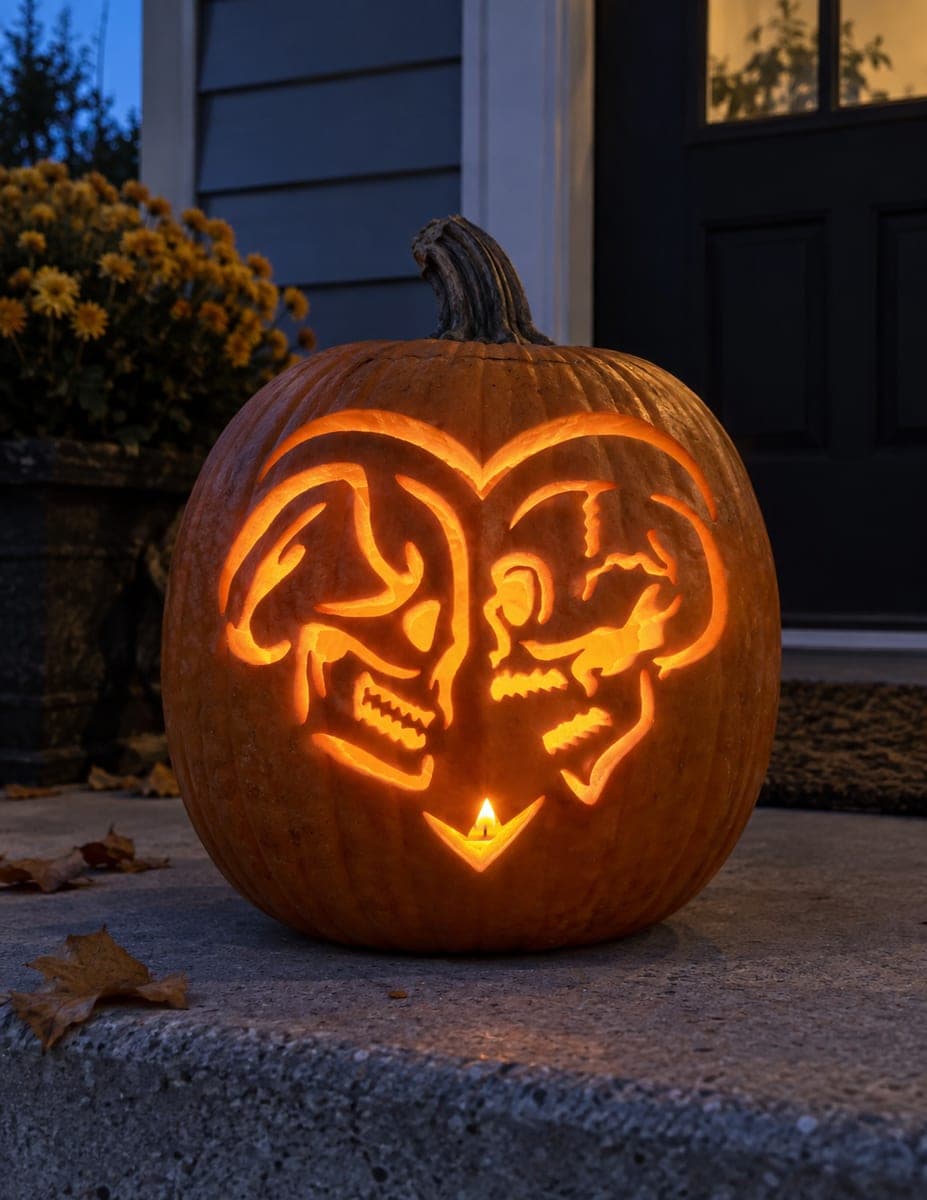
Two Horror Faces Inside a Heart PumpkinAI
0

Two Horror Faces Inside a Heart Pumpkin

Two skulls face each other and are fitted together inside a heart outline, their jawbones and brow ridges interlocking at the center dividing line, with a small candle flame cutout at the very bottom of the heart. This dark Halloween pumpkin carving idea pairs the skull imagery with a love-heart shape for a gothic romantic effect. Cut the outer heart border first to establish the overall shape, then work on each skull's interior detail from the center dividing edge outward so both faces develop evenly and the shared bridge stays intact.

This is an AI-generated concept image: a realistic, carvable design idea rather than a photo of a finished carve. AI concepts are always labeled and sit out the leaderboard and the contest.

No ratings yet · Sign in to rate
Comments (0)

  • No comments yet — be the first.

Save without an account. Sign in to like or comment.

Our tips for carving a similar design

The core trick here is a mirrored pair of skulls that meet along the center of a heart outline, so the two faces read as one interlocking design. You build the outer heart first to lock the shape, then carve each skull inward from that shared center line so both sides stay balanced. A small flame-shaped cutout at the bottom point catches the light and finishes the heart.

Written by PumpkinCarvingIdeas.com, inspired by the image above. These are our suggestions, not instructions from the uploader. This approach to the AI concept has not been tested on a real pumpkin.

From pumpkin to porch

  1. Plan and transfer the pattern

    Pick a tall, smooth pumpkin with a broad front face so the heart and both skulls have room. Print the stencil, tape it flat, and poke the outlines with a pin or transfer tool. Mark the outer heart border, the center dividing line, and the two skull shapes clearly. Take a moment to confirm the design is centered before any cutting begins.

  2. Open the pumpkin and clean the wall

    Have an adult cut a lid from the bottom or back rather than the top so the front stays strong. Scoop the guts and scrape the inside of the front wall down to about one inch thick. A thinner, even wall makes the fine skull details much easier to cut and lets more light through. Save some scooped flesh in case you want to patch a slip.

  3. Cut the outer heart border first

    Start with the large heart outline so the overall shape is established early. Use a small saw blade and make slow, steady strokes, letting the blade do the work. Cutting this big opening first gives you clean edges to reference as you add the interior skulls. Leave the very bottom point uncut for now so the wall stays stable while you detail.

  4. Detail each skull from the center outward

    Work from the shared dividing line outward on each skull so both faces develop evenly and the central bridge stays intact. Carve the eye sockets and nasal openings as full cutouts, and use skin-peeling for the cheekbones and brow ridges. Keep the interlocking jawbones connected with small bridges of uncut skin so the teeth do not fall out. Switch sides often so the two skulls stay balanced in size and depth.

  5. Add the flame cutout and refine

    Cut the small flame or point shape at the bottom of the heart last, once everything above it is stable. Clean up any ragged edges with a detail knife and gently push out cut pieces from the inside. Step back and check that both skulls mirror each other and the heart border reads clearly. Touch up any bridges that look too thin to survive handling.

  6. Light it and photograph

    Set a battery LED tea light or a small puck light inside rather than a real flame, since the thin bridges and detail can scorch. Test the glow in a dark room and reposition the light so both skulls and the flame cutout are evenly lit. Place the pumpkin on a porch step or flat surface for your photo. Shoot at dusk so the warm cutouts pop against the cooler background.

Gather your supplies

Check things off as you get ready.

Work on a stable surface, keep your free hand out of the cutting path, and have an adult handle sharp tools.

Three levels of light

  • Leave intact

    The broad outer pumpkin skin around the heart stays untouched and dark, framing the design.

  • Peel & shade

    The cheekbones, brow ridges, and skull surfaces get skin-peeled for a dim orange glow that gives the faces depth.

  • Cut through

    The eye sockets, nasal holes, gaps between teeth, and the bottom flame shape are cut all the way through for the brightest light.

Learn the carving basics

Before you start cutting

How do I keep the two skulls from merging into one blurry shape?

Carve outward from the center dividing line and keep a clear strip of uncut or peeled skin between the interlocking jaws. Work both sides in small matched passes so neither skull grows faster than the other. Stepping back often to check the mirror effect will keep each face distinct.

The teeth look fragile. How do I stop them breaking?

Cut the teeth as a row of small openings while leaving thin bridges of skin between them, rather than one long slot. Keep the front wall around one inch thick so those bridges have body to them. Save the teeth cutouts for after the larger openings are done so the area stays supported as long as possible.

Should I use a real candle for the flame cutout at the bottom?

No, use a battery LED light instead. The heat from an open flame can scorch the thin bridges and dry out the fine detail quickly. An LED puck or tea light gives a steady glow that shows off both skulls and the flame shape without the fire risk.

Your take belongs here, too.

Changed a detail? Made it simpler? Share a photo of your version and tell the community what worked.

Share your pumpkin

More pumpkins like this

You've reached the end · 8 pumpkins
The Patch Report

Fresh pumpkins, in your inbox.

The best new carvings, ideas worth stealing, and how-tos for carving season. Short, seasonal, and gone by November.

A short email during carving season. Unsubscribe anytime. See our privacy policy.