Halloween Pumpkin Carving Contest · Starts October 1st · $500 in prizes
← Back to ideas
@ai_concepts
Sep 14, 2026
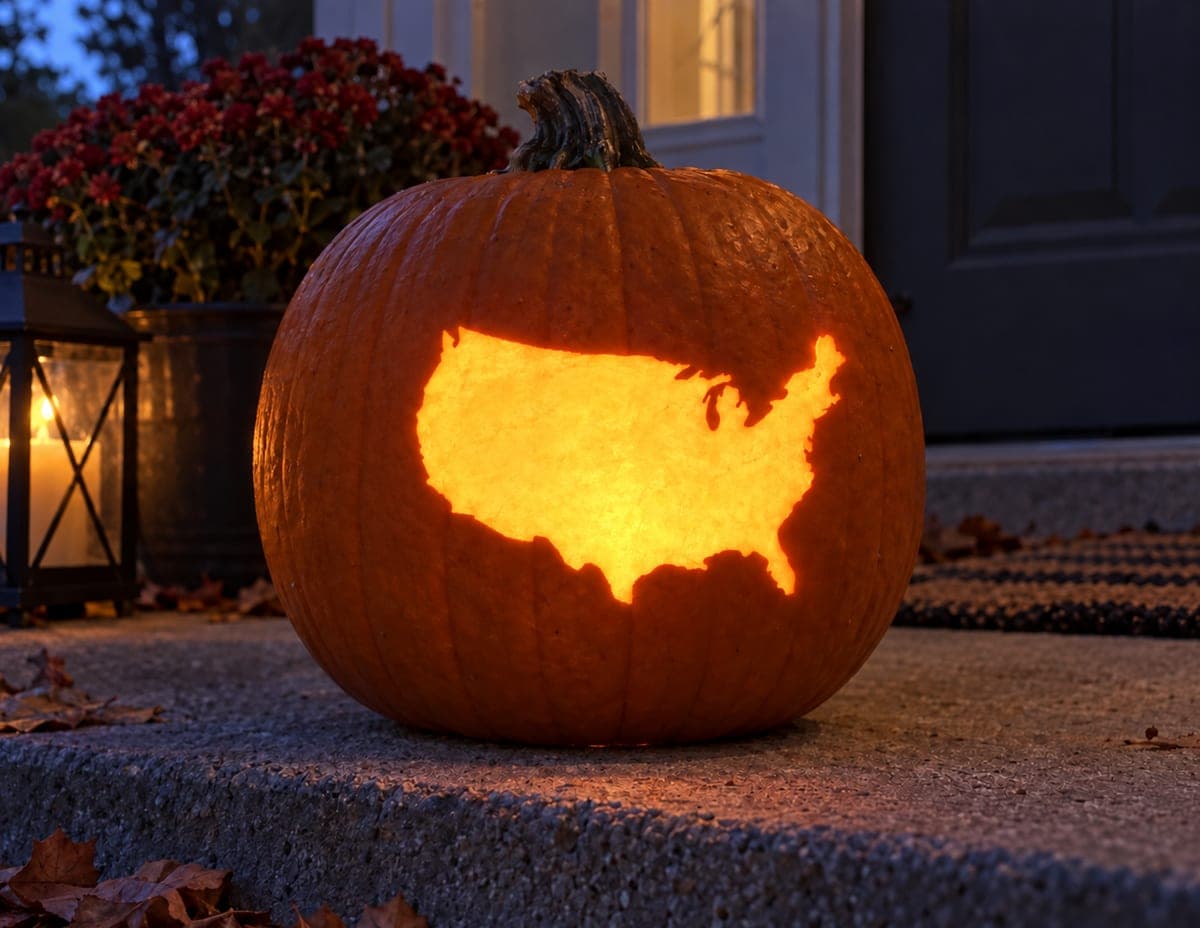
United States Mainland Map Pumpkin
1/2
AI
0

United States Mainland Map Pumpkin

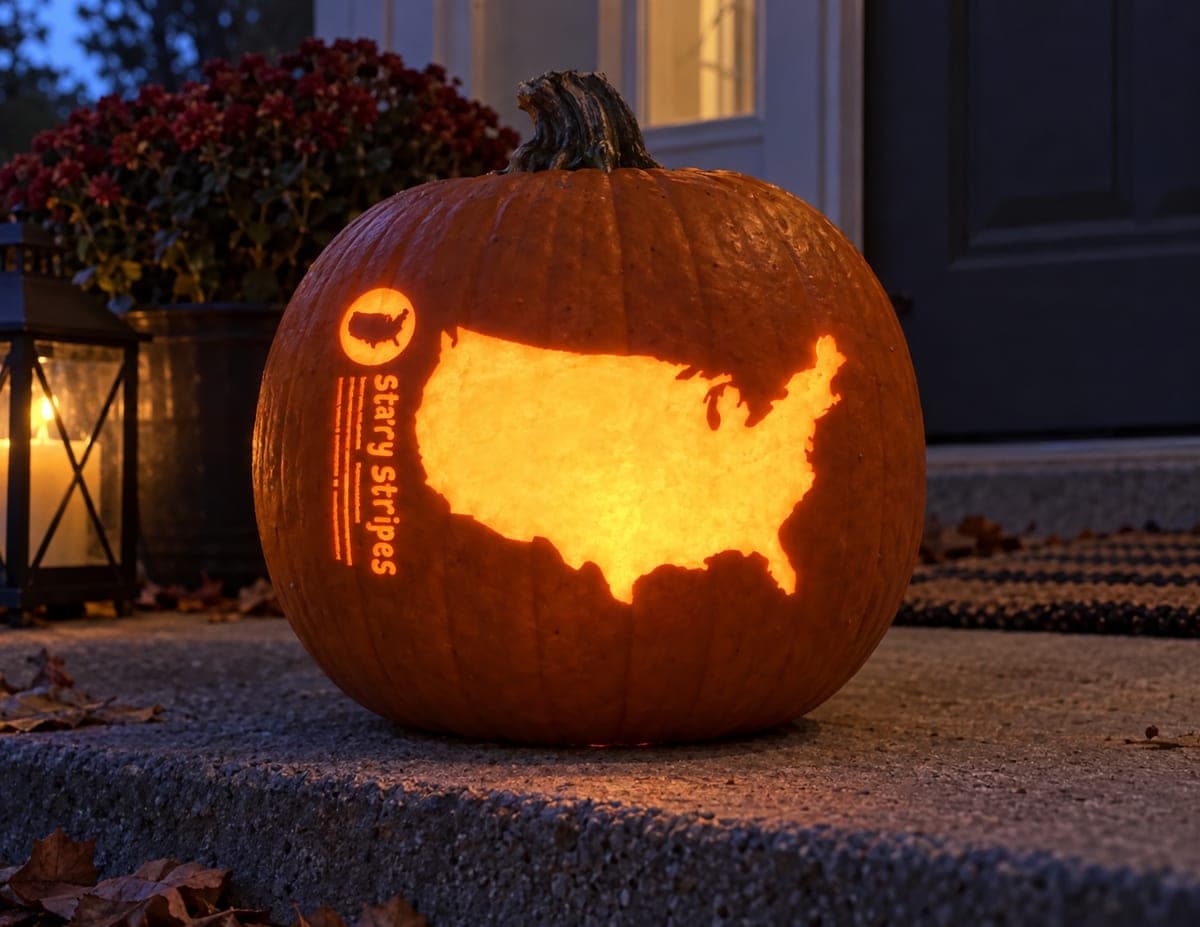
The silhouette of the contiguous United States glows as a single bright cutout against the dark rind of a round jack-o-lantern. Getting the coastal outline right is the main challenge in this pumpkin carving idea, so tape a printed reference map to the surface and use a pin tool to transfer the shape before cutting. Work the jagged Gulf Coast and the Great Lakes notch with a fine-tipped pumpkin saw, saving the smoother Pacific edge for last.

This is an AI-generated concept image: a realistic, carvable design idea rather than a photo of a finished carve. AI concepts are always labeled and sit out the leaderboard and the contest.

No ratings yet · Sign in to rate
Comments (0)

  • No comments yet — be the first.

Save without an account. Sign in to like or comment.

Our tips for carving a similar design

The whole effect rests on one trick: a single silhouette cutout of the contiguous United States that reads clearly because the surrounding rind stays dark. Since this is a concept image, you would recreate it by transferring a printed map onto a smooth section of a real pumpkin, then carving the outline in stages. Save the tricky coastal notches for careful, unhurried cutting so the border stays crisp.

Written by PumpkinCarvingIdeas.com, inspired by the image above. These are our suggestions, not instructions from the uploader. This approach to the AI concept has not been tested on a real pumpkin.

From pumpkin to porch

  1. Pick and prep the pumpkin

    Choose a tall, round pumpkin with a smooth, blemish-free front panel wide enough to hold the map at a readable size. Cut a lid or a bottom access hole and scrape the inside wall behind the design down to about one inch thick with a scoop. A thinner wall is much easier to saw cleanly through the fussy coastline. Wipe the surface dry so your stencil will stick.

  2. Transfer the map outline

    Print a simple silhouette map of the lower 48 states, sized to fit your panel, and tape it flat to the pumpkin, snipping the edges so it curves without wrinkling. Use a pin tool or a thumbtack to poke closely spaced dots along the entire coastal and border line. Press hard enough to mark the rind clearly. Peel the paper and connect the dots lightly with a washable marker so you can see the full shape.

  3. Saw the smooth interior lines first

    An adult should handle all cutting with a fine-tipped pumpkin saw held straight into the wall. Start with the calmer stretches like the long southern border and the Pacific coast so you build a steady rhythm. Let the saw do the work with gentle strokes and avoid forcing turns. Keep the cut piece supported with your free hand so it does not tear early.

  4. Work the jagged edges carefully

    Slow down for the ragged Gulf Coast, Florida, and the Great Lakes notch at the top, where tight curves can snap if rushed. Make short, controlled cuts and re-enter the rind often rather than dragging through sharp corners. For the deep Great Lakes indentation, nibble small pieces out instead of one long stroke. These details are what make the map instantly recognizable, so take your time.

  5. Push out the silhouette and clean up

    Once the entire outline is cut, gently press the map-shaped piece inward from the front and lift it free. Trim any ragged inner edges with the fine saw or a paring knife so the border looks clean. Bevel the inside edge of the cut slightly toward the center so more light escapes and the shape glows evenly. Blot away loose pulp from the opening.

  6. Light it and photograph

    Set a battery LED puck or string light inside, never a candle, since the single large cutout channels all the glow through one shape. Test in a dark room and adjust the light until the map fills evenly without hot spots. Place the pumpkin on a porch step with a lantern or mums nearby for a cozy fall scene. Shoot at dusk so the dark rind still reads against the bright map.

Gather your supplies

Check things off as you get ready.

Work on a stable surface, keep your free hand out of the cutting path, and have an adult handle sharp tools.

Three levels of light

  • Leave intact

    The entire outer rind stays untouched and dark, framing the map

  • Peel & shade

    Optionally skin-peel a thin border just outside the coastline for a soft halo glow

  • Cut through

    The full map of the contiguous United States is cut through for the brightest light

Learn the carving basics

Before you start cutting

How do I keep the thin coastal details from breaking?

Thin the pumpkin wall to about one inch first so the saw glides through without prying. Cut the delicate Florida, Gulf, and Great Lakes areas last, after the sturdier borders are done, using short strokes. If a fragile point feels weak, leave a tiny bit of extra rind and trim it once the big piece is out.

What size should I print the map?

Size it to fill most of the flat front panel, leaving a couple inches of dark rind on all sides so the silhouette stands out. A larger map is actually easier because the coastal wiggles are bigger and less cramped. Test-fit the paper on the curve before taping to be sure it lays flat.

Since this is a concept image, can a real pumpkin glow this evenly?

Yes, a single large cutout like this lights up very evenly with a bright LED placed low and centered. Use a diffused or multi-bulb LED to avoid a single hot spot. Scraping the inside wall thin behind the design also helps the whole shape read clean and bright.

Your take belongs here, too.

Changed a detail? Made it simpler? Share a photo of your version and tell the community what worked.

Share your pumpkin

More pumpkins like this

You've reached the end · 8 pumpkins
The Patch Report

Fresh pumpkins, in your inbox.

The best new carvings, ideas worth stealing, and how-tos for carving season. Short, seasonal, and gone by November.

A short email during carving season. Unsubscribe anytime. See our privacy policy.