Halloween Pumpkin Carving Contest · Starts October 1st · $500 in prizes
← Back to ideas
@ai_concepts
Jul 15, 2026
Whimsical Black Haunted House Painted PumpkinAI
0

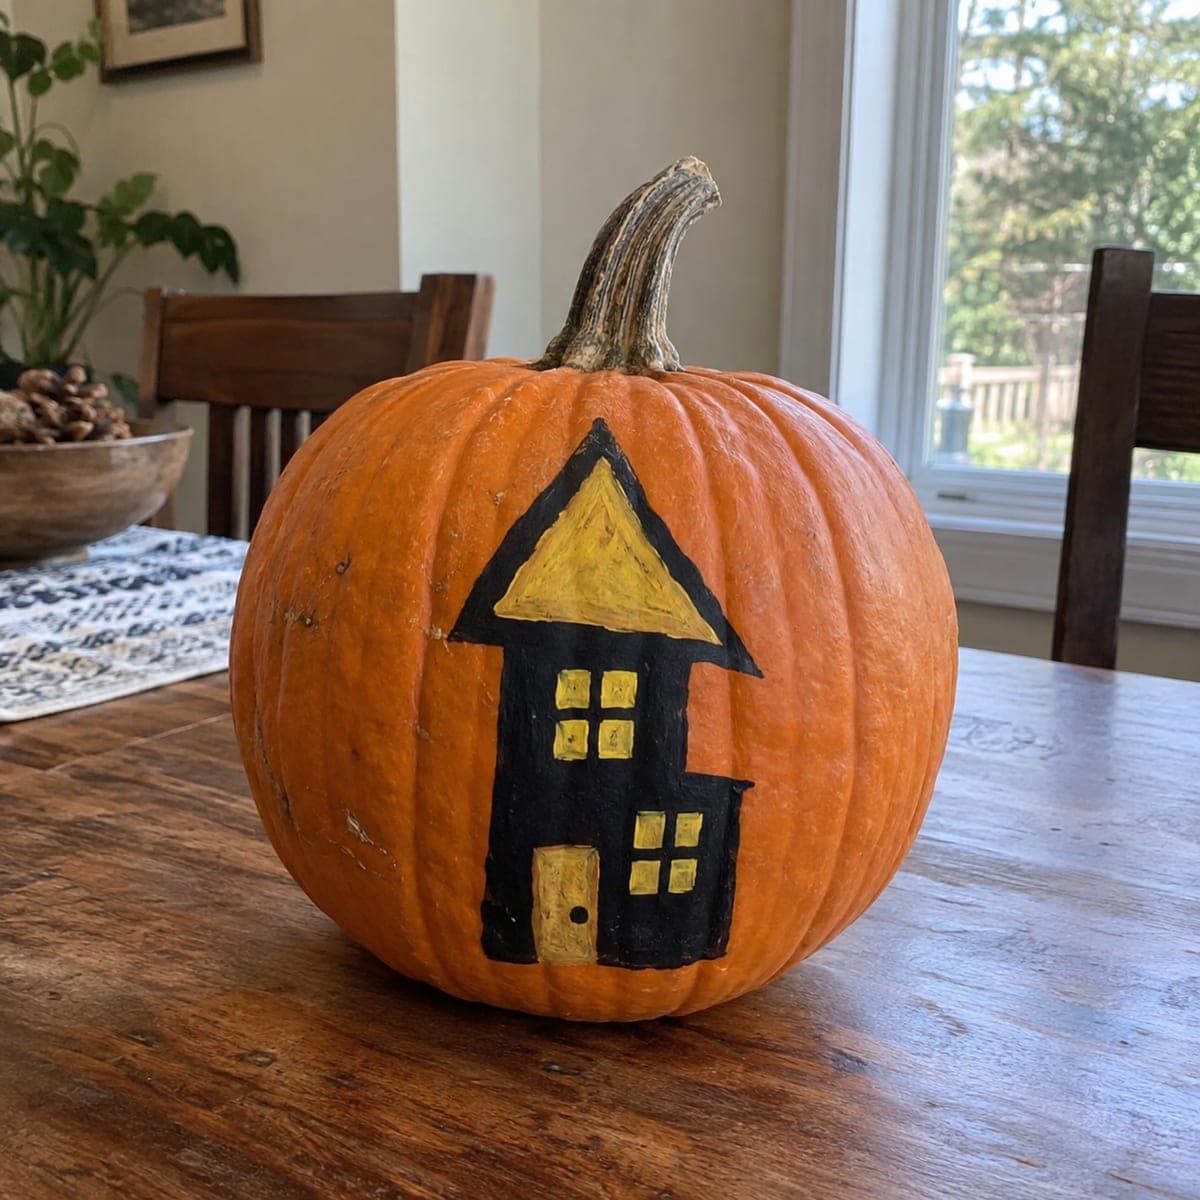
Whimsical Black Haunted House Painted Pumpkin

A tall black house with glowing yellow windows and a pointed roof is painted storybook-style on this pumpkin, a simple haunted house that charms rather than scares. Kids can help with this no-carve design: paint the yellow triangle roof and window squares first, then frame them in black so the edges stay sharp. It sits happily on a table or porch for weeks, and a second coat of black keeps the silhouette bold.

This is an AI-generated concept image: a realistic, carvable design idea rather than a photo of a finished carve. AI concepts are always labeled and sit out the leaderboard and the contest.

No ratings yet · Sign in to rate
Comments (0)

  • No comments yet — be the first.

Save without an account. Sign in to like or comment.

Our tips for carving a similar design

The whole design leans on one simple trick: block in the bright yellow shapes first, then wrap them in solid black so every edge reads crisp. Plan it as a paint-forward project, with the option to cut the tiny windows through the shell if you want them to truly glow with an LED inside. Keep the house tall and narrow so it fits neatly on the flat front of the pumpkin.

Written by PumpkinCarvingIdeas.com, inspired by the image above. These are our suggestions, not instructions from the uploader. This approach to the AI concept has not been tested on a real pumpkin.

From pumpkin to porch

  1. Pick a flat face and sketch the house

    Choose the smoothest side of the pumpkin, away from deep ribs, so your lines stay even. Draw the house lightly in pencil or washable marker: a tall body, a pointed triangle roof, and a few square windows plus a door. Keep the shape narrow and centered under the stem. Step back and check the proportions before you commit to paint.

  2. Paint the yellow shapes first

    Fill in the triangle roof, the window squares, and the door with yellow acrylic craft paint. Let kids help with this part since it is forgiving. Do not worry about perfect edges yet, because the black frame will clean them up. Let this layer dry fully before moving on.

  3. Frame everything in black

    Outline and fill the house body with black acrylic, painting right up to the yellow so the shapes stay sharp. Use a small flat brush for the straight walls and a fine tip for the window grid lines. A second coat of black keeps the silhouette bold and hides any streaks. Let it dry between coats.

  4. Add the little details

    Paint the thin cross bars on each window and a small dot for the doorknob. Touch up any wobbly black edges with a steady hand. If you want more storybook charm, add a tiny crooked chimney or a sliver of moon beside the roof. Keep details minimal so the design stays clean and readable from across a room.

  5. Optional: cut the windows for real glow

    If you want light instead of just paint, an adult can carefully cut through only the small window squares once the paint is dry. Use a fine carving saw and leave the thin cross bars in place as bridges so the panes hold their shape. Do not cut the roof or walls, just the little openings. Scoop the pumpkin from the bottom if you plan to light it.

  6. Light it and photograph

    Drop a battery LED puck inside and set the pumpkin on a table or porch. Use an LED rather than a candle so the paint and pumpkin stay safe over the weeks it sits out. Shoot photos in low light to catch the yellow windows glowing against the black house. A painted pumpkin like this can last for weeks if kept cool and dry.

Gather your supplies

Check things off as you get ready.

Work on a stable surface, keep your free hand out of the cutting path, and have an adult handle sharp tools.

Three levels of light

  • Leave intact

    The orange pumpkin skin around the house and the black-painted walls and roof outline stay untouched and dark.

  • Peel & shade

    For a soft dim glow you could shave a thin layer off the yellow triangle roof so light bleeds through faintly.

  • Cut through

    Cut fully through only the small window squares so those panes shine brightest, keeping the cross bars as bridges.

Learn the carving basics

Before you start cutting

Do I have to carve this at all?

No, the design works entirely as a painted pumpkin, which is why it is so beginner and kid friendly. If you want the windows to actually glow, an adult can cut just those small squares later. Everything else stays solid paint.

How do I keep the black edges from looking messy?

Paint the yellow shapes first and let them dry completely, then bring the black right up to them. The black frame naturally sharpens any uneven yellow edges. A second thin coat of black covers streaks and keeps the silhouette crisp.

Will the paint last if I set it outside?

Acrylic craft paint holds up well for a few weeks if the pumpkin stays cool and dry. Keep it out of direct rain and harsh afternoon sun. A battery LED inside adds glow without the heat that could soften the shell.

Your take belongs here, too.

Changed a detail? Made it simpler? Share a photo of your version and tell the community what worked.

Share your pumpkin

More pumpkins like this

You've reached the end · 8 pumpkins
The Patch Report

Fresh pumpkins, in your inbox.

The best new carvings, ideas worth stealing, and how-tos for carving season. Short, seasonal, and gone by November.

A short email during carving season. Unsubscribe anytime. See our privacy policy.