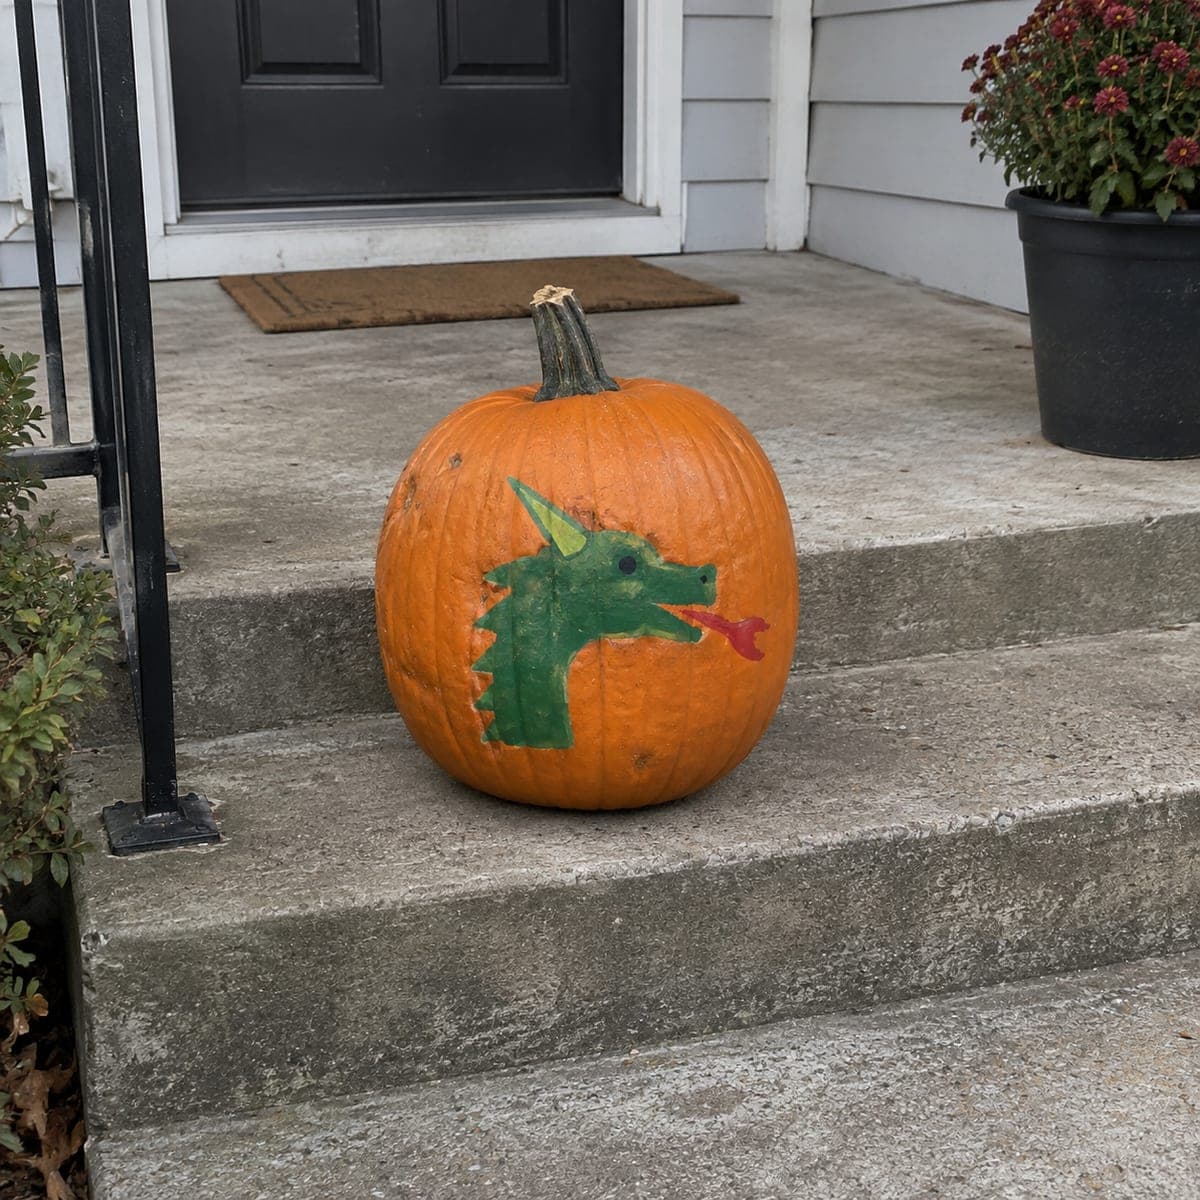
A cheery green dragon head with a pointed horn and a little red flame makes this painted pumpkin a fun no-carve project for kids. The charm is in the simple flat shapes, so let children outline the head in pencil, fill it with green craft paint, and add the spiky jaw scallops freehand. Two coats keep the color solid on the ridged rind. Since there is no cutting, it can sit out on the steps for weeks without collapsing.
This is an AI-generated concept image: a realistic, carvable design idea rather than a photo of a finished carve. AI concepts are always labeled and sit out the leaderboard and the contest.
The core trick here is keeping everything in flat, simple shapes so a child can outline and fill without fussy detail. This is a painted, no-carve concept, so the plan is to sketch the dragon head in pencil, block in the green with craft paint, then add the scalloped jaw, horn, eye, and a small red flame on top. Because nothing is cut, the pumpkin stays sturdy and can sit out for weeks.
Written by PumpkinCarvingIdeas.com, inspired by the image above. These are our suggestions, not instructions from the uploader. This approach to the AI concept has not been tested on a real pumpkin.
From pumpkin to porch
1
Clean and dry the surface
Wipe the pumpkin with a damp cloth and let it dry fully so paint grips the rind. Pick the smoothest, flattest side facing out for the dragon head. Set it on a towel to steady it while you work. A dry surface keeps the first coat from beading up on the ridges.
2
Sketch the head in pencil
Lightly draw the dragon profile: a rounded head, a pointed snout, and a jaw line along the bottom. Add a triangle horn near the top and a small dot for the eye. Keep the lines simple and easy to fill. Pencil wipes off or hides under paint, so let kids redraw as many times as they need.
3
Fill the head with green
Paint the whole head shape with green craft paint using a medium brush. Work in one direction to cover the ridges evenly, then let it dry before judging coverage. The rind often needs two coats for a solid, even green. Let each coat dry fully so colors do not smear.
4
Add the spiky jaw and horn
Once the green is dry, paint small scalloped triangles along the lower jaw freehand for the scale spikes. Fill the horn with a lighter green or yellow so it stands out. These bumps look best a little uneven, so let children go freehand. Rinse the brush between colors.
5
Paint the eye and flame
Dab a small black dot or ring for the eye and a short curved line for the mouth. Paint a little red flame just past the snout with two or three flame tips. Keep the flame small so it reads as fire and not a big blob. Let everything dry before touching it.
6
Seal and set it out
Once fully dry, brush on a thin coat of clear acrylic sealer to protect the paint from rain and dew. Let it cure, then place the pumpkin on the steps for display. Since there is no cutting, it will hold up for weeks. Snap a photo in daylight where the green really pops.
Gather your supplies
Check things off as you get ready.
Work on a stable surface, keep your free hand out of the cutting path, and have an adult handle sharp tools.
Three levels of light
Leave intact
The whole orange rind and the painted dragon stay solid and dark, since this is a no-carve design that glows only in daylight.
Peel & shade
If you want a soft nighttime glow, you could shave a shallow window in the rind behind the dragon and drop in an LED, letting that patch shine dim orange.
Cut through
For a lit version, only a small opening like the flame tip or the eye should be cut all the way through for a bright point of light, and save that cut for last.
No, this is a fully painted project, which is why it lasts so long. All you need is paint, brushes, and a pencil. If you later want a glow, you can add a single small cutout for an LED, but the design works great as paint only.
What paint holds up best on a pumpkin?
Acrylic craft paint sticks well to the rind and dries fast between coats. Plan on two coats of green for solid color on the ridges. A thin coat of clear acrylic sealer at the end protects it from dew and light rain.
How do I keep the dragon shapes clean with kids helping?
Sketch the outline in pencil first so children have lines to follow when filling. Let the green base dry completely before adding the jaw spikes, eye, and flame so colors do not bleed together. Uneven freehand scallops actually add to the charm, so there is no need for perfection.
Your take belongs here, too.
Changed a detail? Made it simpler? Share a photo of your version and tell the community what worked.
 AI
AI


Comments (0)