Halloween Pumpkin Carving Contest · Starts October 1st · $500 in prizes
← Back to ideas
@ai_concepts
Sep 14, 2026
Whipped-Cream Pumpkin Pie Slice PumpkinAI
0

Whipped-Cream Pumpkin Pie Slice Pumpkin

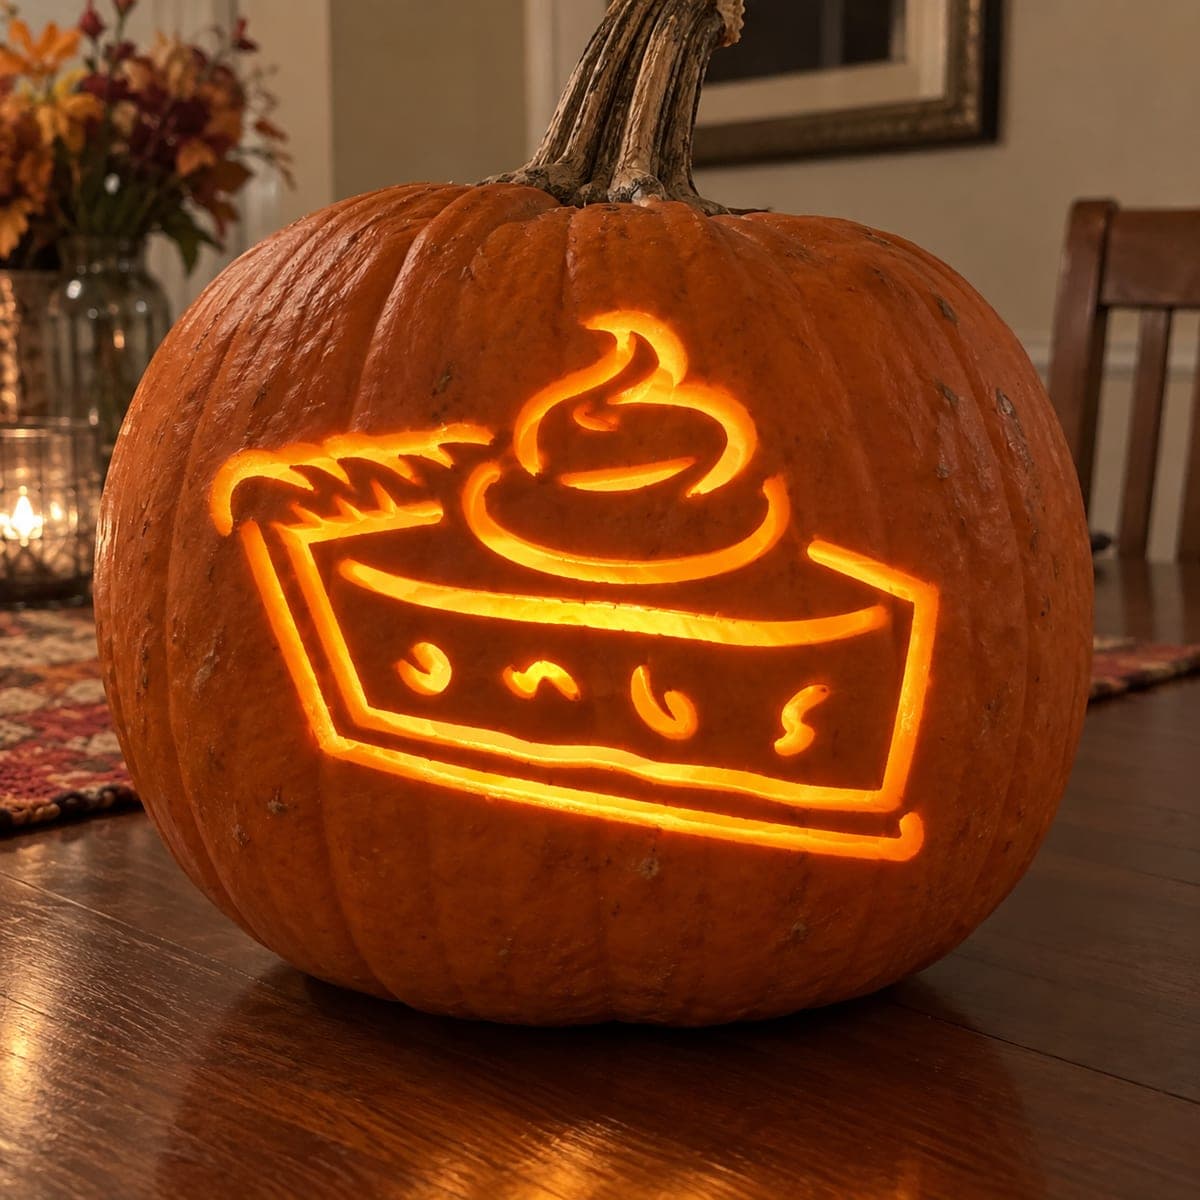
A wide wedge of pie with a cross-hatched pastry edge and small curling decorations along the filling sits below a loose swirled mound of whipped cream, all rendered as a glowing cutout pumpkin carving idea for fall. Every line is pierced through, giving the warm LED glow a clean, outline-style look that works beautifully as autumn table decor. Cut the small curling details inside the filling first, then open the pie outline and finally the whipped cream swirl at the top, keeping the narrow gap between the cream and the pie crust intact as long as possible. The whipped cream swirl has an isolated center island, so support the back of the wall with a fingertip when making those final circular cuts.

This is an AI-generated concept image: a realistic, carvable design idea rather than a photo of a finished carve. AI concepts are always labeled and sit out the leaderboard and the contest.

No ratings yet · Sign in to rate

Comments (0)

  • No comments yet — be the first.

Save without an account. Sign in to like or comment.

Our tips for carving a similar design

The whole design lives in its outlines, so the trick is pierced lines that read as one clean drawing when the LED glows through. Plan the cutting order from the smallest inner details out to the big shapes, saving the whipped-cream swirl for last because its center is an isolated island that needs a supported wall. Keep the thin gap between the cream and the crust intact as long as possible so nothing collapses.

Written by PumpkinCarvingIdeas.com, inspired by the image above. These are our suggestions, not instructions from the uploader. This approach to the AI concept has not been tested on a real pumpkin.

From pumpkin to porch

  1. Prep the pumpkin and transfer the pattern

    Pick a pumpkin with a wide, fairly flat front panel so the pie and cream sit level. Cut a lid from the bottom or the back rather than the top, which keeps the stem intact and makes wiring an LED easier. Scrape the inside wall behind the design down to about one inch so light passes cleanly. Tape your stencil on and poke the outlines with a transfer tool or pin so you have a dotted map to follow.

  2. Carve the tiny curling filling details first

    Start with the small curls and dots inside the pie filling while the pumpkin wall is still whole and strong. Use a fine detail saw or a craft knife for these little shapes, cutting slowly and letting the blade do the work. Because they are surrounded by solid pumpkin, they hold their crisp shape well. Getting these done early means you never have to press hard near a weakened wall later.

  3. Pierce the cross-hatched crust edge

    Move to the zigzag pastry edge on the left side of the pie. Cut each notch as a narrow slit so the crust reads as a lattice line rather than one big hole. Keep short bridges of skin between the notches so the crust stays connected and does not tear away. Take your time here since these thin lines give the design its handmade, pie-crust charm.

  4. Open the pie outline and base lines

    Now cut the main outline of the pie wedge and the horizontal lines that define the dish. These are longer, wider strokes, so work in short sections and clear the waste as you go. Leave the narrow gap between the top of the filling and the whipped cream uncut for now, since that thin strip is fragile. Steady the pumpkin against your body or a nonslip mat while you saw.

  5. Cut the whipped-cream swirl last

    Save the swirled mound on top for the end. It has an isolated center island, so support the back of the wall with a fingertip as you make each curved cut to keep the piece from cracking inward. Cut the outer swirl loops first, then release the inner island carefully. Go slow on the tight curves and reposition your hand often rather than forcing a long stroke.

  6. Light it and photograph

    Drop in a battery LED light, warm white or amber, so the glow looks like fresh pie in the oven. Skip real candles since the pierced lines are narrow and heat can scorch them. Set the pumpkin on a table with a few autumn props, dim the room, and shoot slightly off to one side so the lines catch depth. Clean up any fuzzy cut edges with your knife tip before the final photo.

Gather your supplies

Check things off as you get ready.

Work on a stable surface, keep your free hand out of the cutting path, and have an adult handle sharp tools.

Three levels of light

  • Leave intact

    The broad pumpkin skin around the pie and cream stays untouched and dark for contrast.

  • Peel & shade

    Not needed here, though you could shave a faint halo behind the cream for a soft mid glow.

  • Cut through

    Every outline, the crust notches, the filling curls, and the swirl are pierced through for the brightest light.

Learn the carving basics

Before you start cutting

How do I keep the whipped-cream center island from breaking?

That swirl has a free-floating center, so cut it dead last when the rest of the design is already open. Press a fingertip against the back of the wall as you make each curved cut to absorb pressure. Use short, patient strokes rather than one long push.

Will the thin gap between the cream and the crust hold up?

It can if you leave it intact until the very end. Cut everything around it first so the wall stays supported, then finish those two edges last. Keeping that strip at least a quarter inch wide gives it enough strength to survive.

This is a concept image, so how do I get real crust notches this crisp?

On a real pumpkin, treat each zigzag as a narrow slit and leave small skin bridges between the notches so the lattice does not fall apart. A fine detail saw gives cleaner corners than a big knife. If a notch looks too delicate, widen it slightly rather than risk a tear.

Your take belongs here, too.

Changed a detail? Made it simpler? Share a photo of your version and tell the community what worked.

Share your pumpkin

More pumpkins like this

You've reached the end · 8 pumpkins
The Patch Report

Fresh pumpkins, in your inbox.

The best new carvings, ideas worth stealing, and how-tos for carving season. Short, seasonal, and gone by November.

A short email during carving season. Unsubscribe anytime. See our privacy policy.