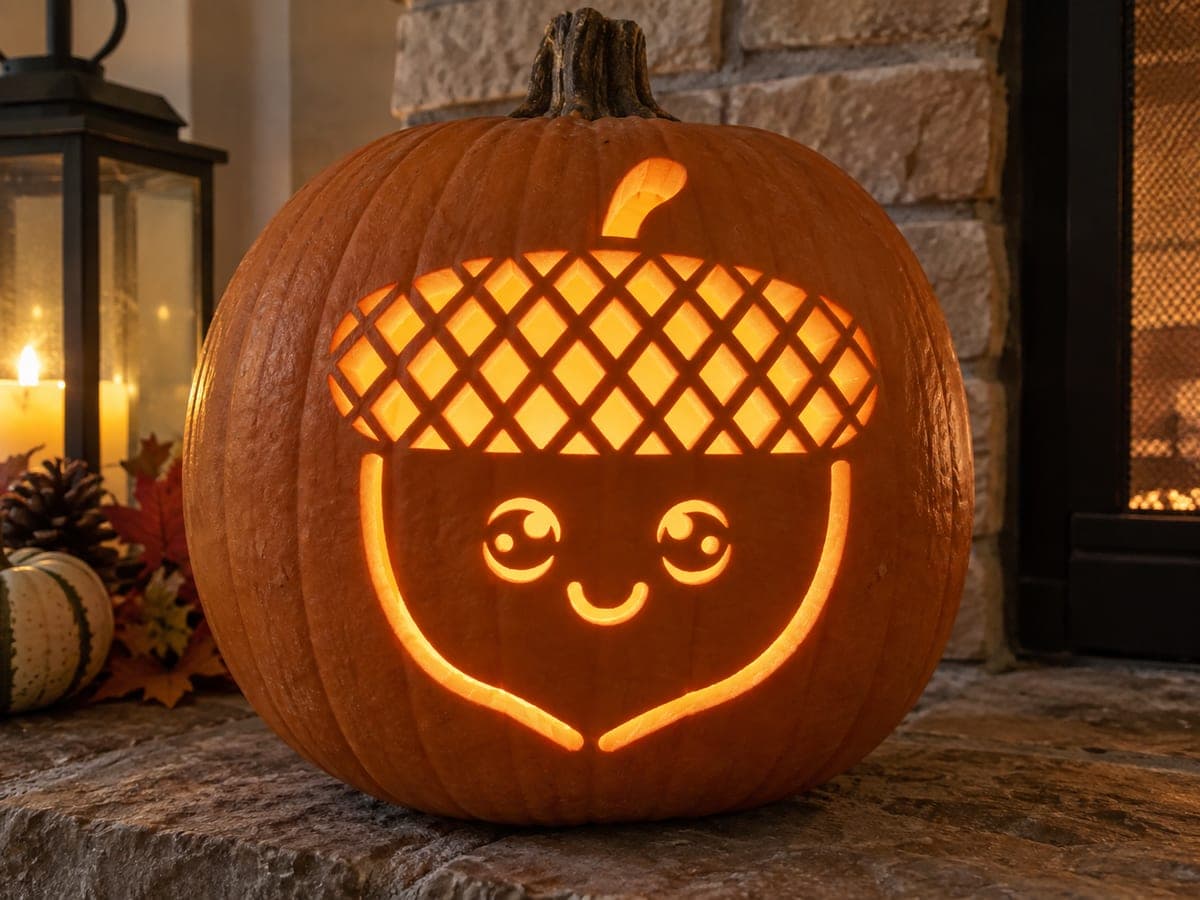
A kawaii acorn fills the pumpkin with a large crosshatch-patterned cap at the top and a round smiling face below, the cap divided into a grid of diamond-shaped openings and the face showing circular eyes with small highlight dots and a curved smile. Both the acorn cap grid and the face interior are cut through in this pumpkin carving idea, making the criss-crossing cap lines the most demanding part of the design. Carve all the diagonal lines in one direction first before cutting the crossing lines, which prevents the thin diamond islands from shifting as you work.
This is an AI-generated concept image: a realistic, carvable design idea rather than a photo of a finished carve. AI concepts are always labeled and sit out the leaderboard and the contest.
The whole face of the pumpkin becomes one big kawaii acorn, with a crosshatched cap up top and a round smiling nut below. The core trick is the grid on the cap, which is a series of diamond openings held together by thin bars, so the plan is to score every diagonal line running one direction first, then cut the crossing lines, which keeps those little islands from wobbling loose. Everything else is friendly and forgiving: two simple eyes, a curved smile, and a clean outline for the nut.
Written by PumpkinCarvingIdeas.com, inspired by the image above. These are our suggestions, not instructions from the uploader. This approach to the AI concept has not been tested on a real pumpkin.
From pumpkin to porch
1
Prep the pumpkin and plan your lights
Since this is a design concept and not a real carved pumpkin, pick a tall pumpkin with a wide, flat front to hold the large acorn. Cut a lid from the back or the bottom so the front stays smooth, then scrape the inside wall behind the design down to about one inch thick. A thinner wall makes the crosshatch far easier to cut cleanly. Plan to light it with a battery LED puck, never a candle, because the many openings pull a lot of air.
2
Transfer the stencil
Tape your acorn pattern flat against the front, clipping darts into the paper so it hugs the curve without creasing. Poke a dotted line along every edge with a transfer tool or a thumbtack: the cap grid, the acorn outline, both eyes, the highlight dots, and the smile. Pull the paper and connect the dots with a washable marker so you can see the full map. Double check that the cap bars line up before you make a single cut.
3
Score the cap grid one direction first
Start with the crosshatch while the surface is still solid and stable. Cut all the diagonal lines running one way first, from top to bottom, then go back and cut the crossing diagonals. Working in this order keeps each thin diamond island supported by uncarved pumpkin until the last moment, so nothing shifts or breaks. Use gentle sawing strokes with a fine detail saw and let the tool do the work.
4
Cut the face features
Move down to the nut and cut the two round eyes, leaving each small highlight dot as an attached island of skin inside the opening. Cut the curved smile as a clean thin channel. Take your time keeping the circles round, since curves read as friendly and lopsided ones look grumpy. Cut the little stem accent at the very top as a small opening too.
5
Clear the openings and clean the edges
Once every line is cut, gently push the diamond waste pieces inward and out, working from the center of the cap outward so the edges stay crisp. Trim any ragged spots by angling your blade slightly from the inside, which widens the back of the cut and lets more light escape. Run your finger around each opening to check for loose bits. If a diamond bar feels fragile, leave a touch more thickness behind it rather than shaving it down.
6
Light it and photograph
Set an LED light inside and test it in a dark room. If the cap looks dim, scrape a little more from the inside wall behind the grid to brighten the glow. Style it on a stone ledge with pinecones and fall leaves for a cozy autumn scene. Snap your photo slightly off to one side so the diamond pattern catches depth and shadow.
Gather your supplies
Check things off as you get ready.
Work on a stable surface, keep your free hand out of the cutting path, and have an adult handle sharp tools.
Three levels of light
Leave intact
The smooth nut body of the acorn and the thin diamond bars of the cap stay as untouched skin so the shapes read dark and solid.
Peel & shade
Shave the small highlight dots inside the eyes down thin for a soft dim glow that keeps them visible against the bright open eyes.
Cut through
The diamond grid on the cap, both eyes, the curved smile, and the little stem accent are cut all the way through for the brightest light.
How do I keep the crosshatch cap from falling apart?
Cut every diagonal in one direction before you touch the crossing lines, so each diamond stays anchored while you work. Keep the wall behind the cap around one inch thick for support, and do not shave the bars any thinner than needed. If one feels weak, leave it a bit chunkier rather than risk losing the whole grid.
What size pumpkin works best for this design?
Choose a taller pumpkin with a broad, even front, because the acorn fills nearly the whole face. A flat surface keeps the grid lines from distorting when you transfer the stencil. Avoid heavily ribbed pumpkins, since the ridges throw off the diamond spacing.
Should I cut the eyes and smile before or after the cap?
Do the cap crosshatch first while the pumpkin surface is at its most stable, then move down to the face. The eyes and smile are simple curved cuts that will not stress the thin bars. Save clearing all the waste pieces for the very end so the surface stays firm throughout.
Your take belongs here, too.
Changed a detail? Made it simpler? Share a photo of your version and tell the community what worked.
 AI
AI



Comments (0)