Halloween Pumpkin Carving Contest Β· Starts October 1st Β· $500 in prizes
← Back to ideas
@ai_concepts
Sep 14, 2026
Cute Candy Corn Face PumpkinAI
0

Cute Candy Corn Face Pumpkin

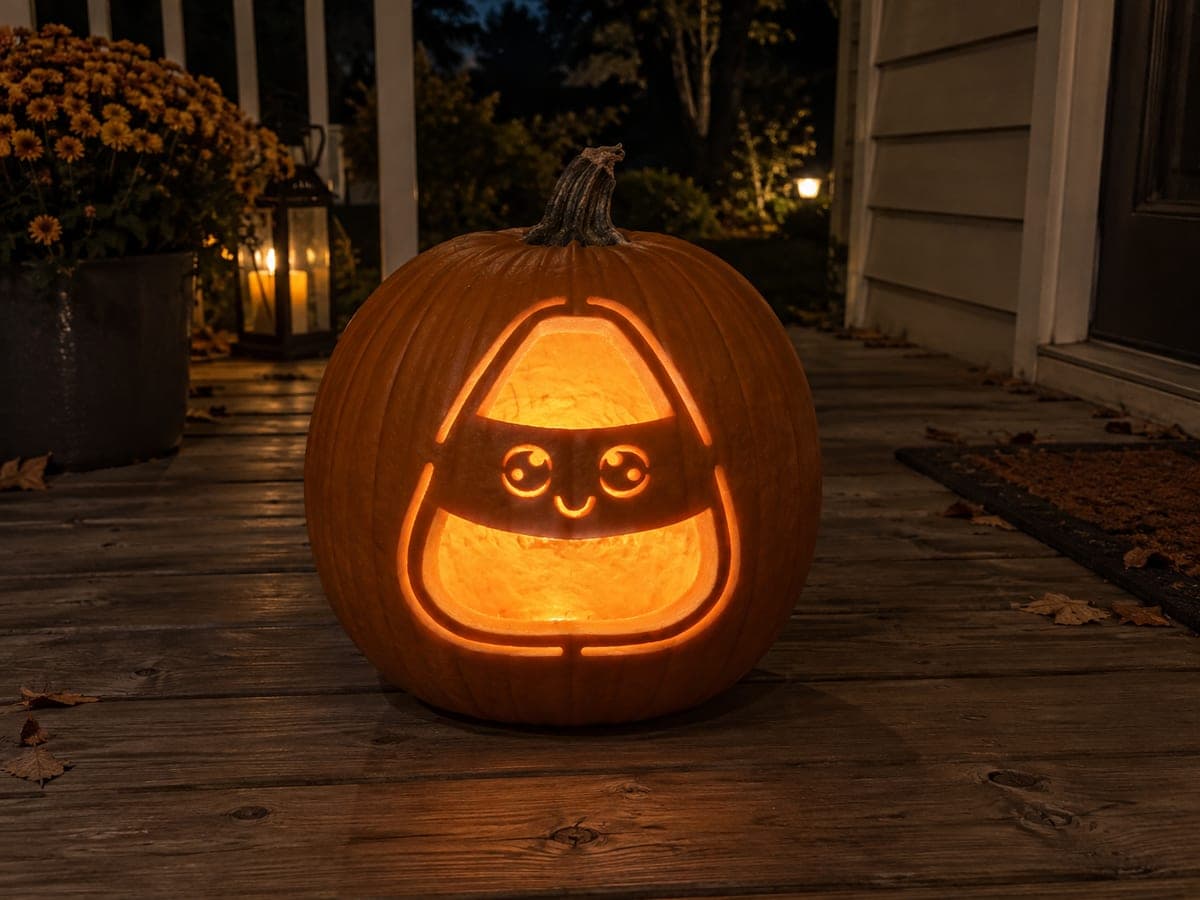
A kawaii candy corn shape fills most of the pumpkin face, its triangular body divided into three horizontal bands with two round pupils and a tiny curved smile carved into the middle orange stripe. Both the upper white tip and the lower yellow band are pierced through, turning this cute jack-o-lantern pumpkin carving idea into a two-tone glow when lit. Cut the small circular pupils last and leave a thin ring of uncut skin around each one so they hold their shape without cracking.

This is an AI-generated concept image: a realistic, carvable design idea rather than a photo of a finished carve. AI concepts are always labeled and sit out the leaderboard and the contest.

No ratings yet Β· Sign in to rate

Comments (0)

  • No comments yet β€” be the first.

Save without an account. Sign in to like or comment.

Our tips for carving a similar design

The core trick here is the classic candy corn silhouette split into three horizontal bands, where the outer stripes glow through as full cutouts and the middle band holds the face as dark, uncut skin. You plan it as a light map first: the top tip and bottom band get pierced for a bright two-tone glow, while the center stripe stays solid so the eyes and smile read as shadow. Keep the outline bars and dividing lines as attached bridges so nothing collapses.

Written by PumpkinCarvingIdeas.com, inspired by the image above. These are our suggestions, not instructions from the uploader. This approach to the AI concept has not been tested on a real pumpkin.

From pumpkin to porch

  1. Trace and plan your light map

    Print or draw a candy corn shape that fills most of the front, then divide it into three horizontal bands with a rounded triangular tip on top. Tape the pattern on and poke through the outlines with a pin tool or awl. Mark which zones will be cut, peeled, or left dark so you do not carve the wrong band. On an AI concept like this, sketch it freehand if you do not have a stencil, keeping the bars between bands at least a finger wide.

  2. Open the pumpkin and clean the wall

    Have an adult cut a lid from the back or bottom so the smooth front face stays intact. Scoop out the seeds and pulp, then scrape the inside of the carving wall down to about one inch thick. A thinner wall is much easier to pierce and lets the two-tone glow shine evenly. Save some scooped flesh in case you want to reattach a piece later.

  3. Cut the outline and band dividers

    Using a small serrated saw, carefully cut the two thin lines that separate the three bands and the outer edge grooves of the candy corn shape. Cut these as narrow channels rather than removing material, so the bars stay as sturdy bridges holding everything together. Go slow at the curves of the rounded tip. These lines let light leak through as thin bright seams.

  4. Cut the top tip and bottom band

    Now pierce fully through the upper triangular tip and the lower band, removing those pieces so they open to bright light. Cut these larger openings after the detail lines are scored, which keeps the pumpkin strong while you work. Angle the blade slightly outward so the light spreads. Leave the middle band completely uncut, since that is where the face lives.

  5. Shade the face and save the pupils for last

    On the dark middle band, peel just the surface skin off the tiny curved smile so it glows dim orange without cutting all the way through. For the two round eyes, cut them through last and leave a thin ring of uncut skin around each pupil so they hold their shape and do not crack. Work gently with a small detail blade. A little uneven edge here still reads as cute.

  6. Light it and photograph

    Drop in a battery LED tea light or a small puck light, never a candle, so the thin bars stay cool and safe. Set the pumpkin on a porch or step at dusk and check that both the top tip and bottom band glow brightly while the face stays in shadow. If a bar looks dim, thin the inside wall behind it a touch more. Snap your photo while the surrounding light is still soft blue.

Gather your supplies

Check things off as you get ready.

Work on a stable surface, keep your free hand out of the cutting path, and have an adult handle sharp tools.

Three levels of light

  • Leave intact

    The middle band stays untouched dark skin so the eyes and smile read as shadow.

  • Peel & shade

    The tiny curved smile gets its surface skin peeled for a soft dim orange glow.

  • Cut through

    The upper white tip and the lower band are pierced through for the brightest two-tone light, along with the two round pupils.

Learn the carving basics

Before you start cutting

How do I keep the pupils from cracking?

Cut the two small circles last, after every other line is done, so the face wall stays supported while you work. Leave a thin ring of uncut skin around each pupil rather than cutting right to the edge. That ring gives the shape strength and stops it from splitting.

Do I have to remove the middle band to see the face?

No, the middle band should stay solid and dark on purpose. That contrast is what makes the eyes and smile pop against the bright bands above and below. Only the smile is lightly peeled and only the pupils are cut through.

This is a concept image, so will it actually work on a real pumpkin?

Yes, the design is structurally sound as long as you keep the band dividers and outer outline as narrow attached bridges instead of open gaps. Thin the inside wall to about an inch so the tip and bottom band glow evenly. Use an LED light so the slim bars never get hot.

Your take belongs here, too.

Changed a detail? Made it simpler? Share a photo of your version and tell the community what worked.

Share your pumpkin

More pumpkins like this

You've reached the end Β· 8 pumpkins
The Patch Report

Fresh pumpkins, in your inbox.

The best new carvings, ideas worth stealing, and how-tos for carving season. Short, seasonal, and gone by November.

A short email during carving season. Unsubscribe anytime. See our privacy policy.