Halloween Pumpkin Carving Contest · Starts October 1st · $500 in prizes
← Back to ideas
@ai_concepts
Aug 2, 2026
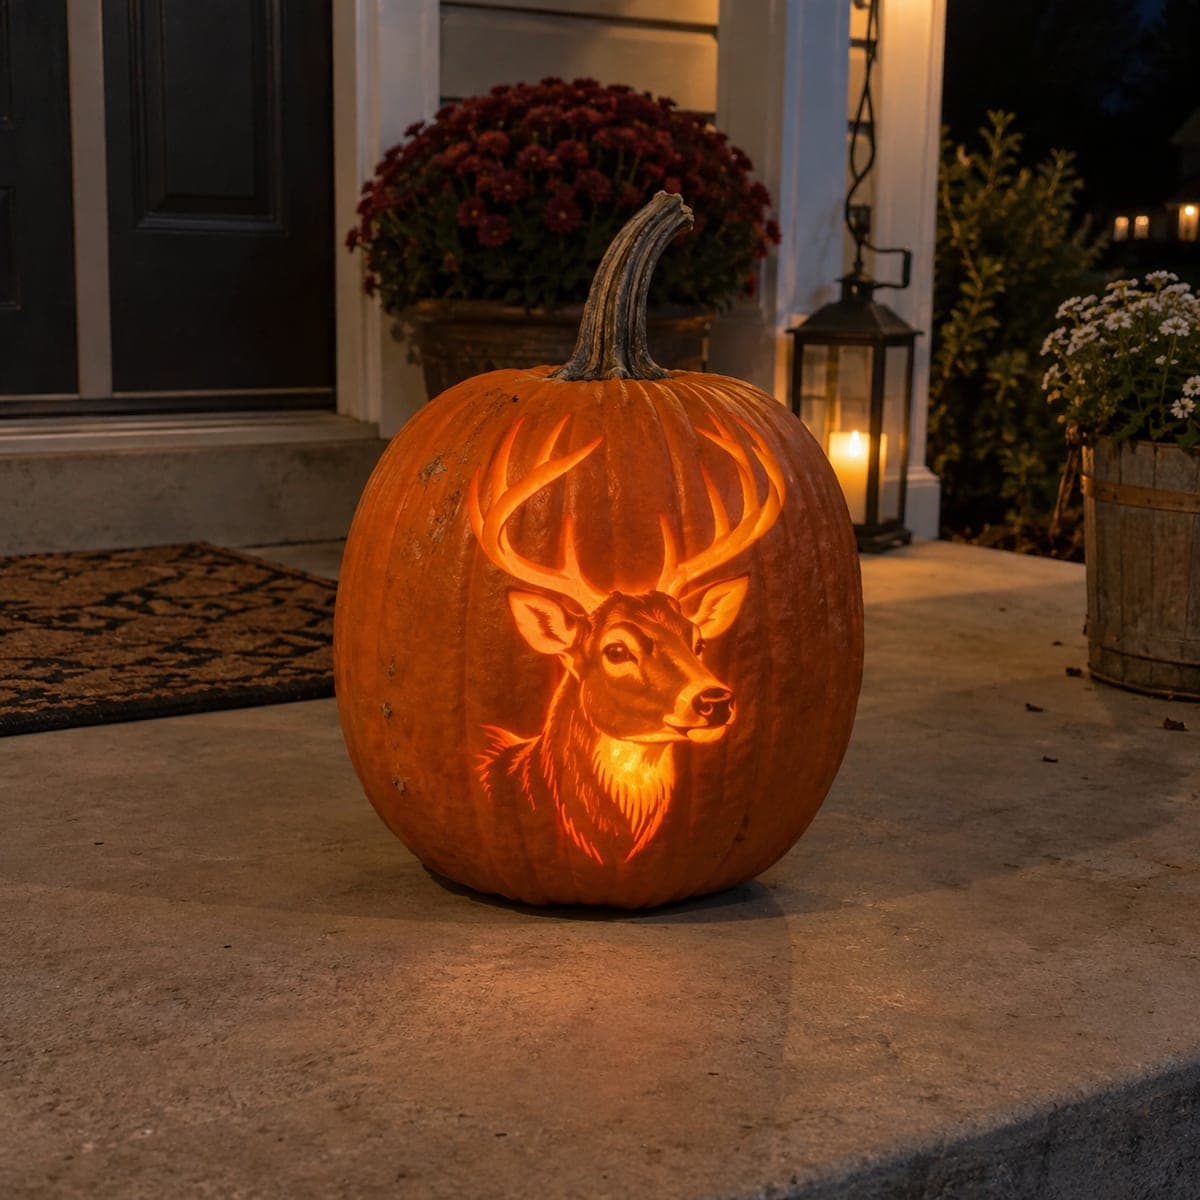
Whitetail Buck Pumpkin Carving With Towering AntlersAI
0

Whitetail Buck Pumpkin Carving With Towering Antlers

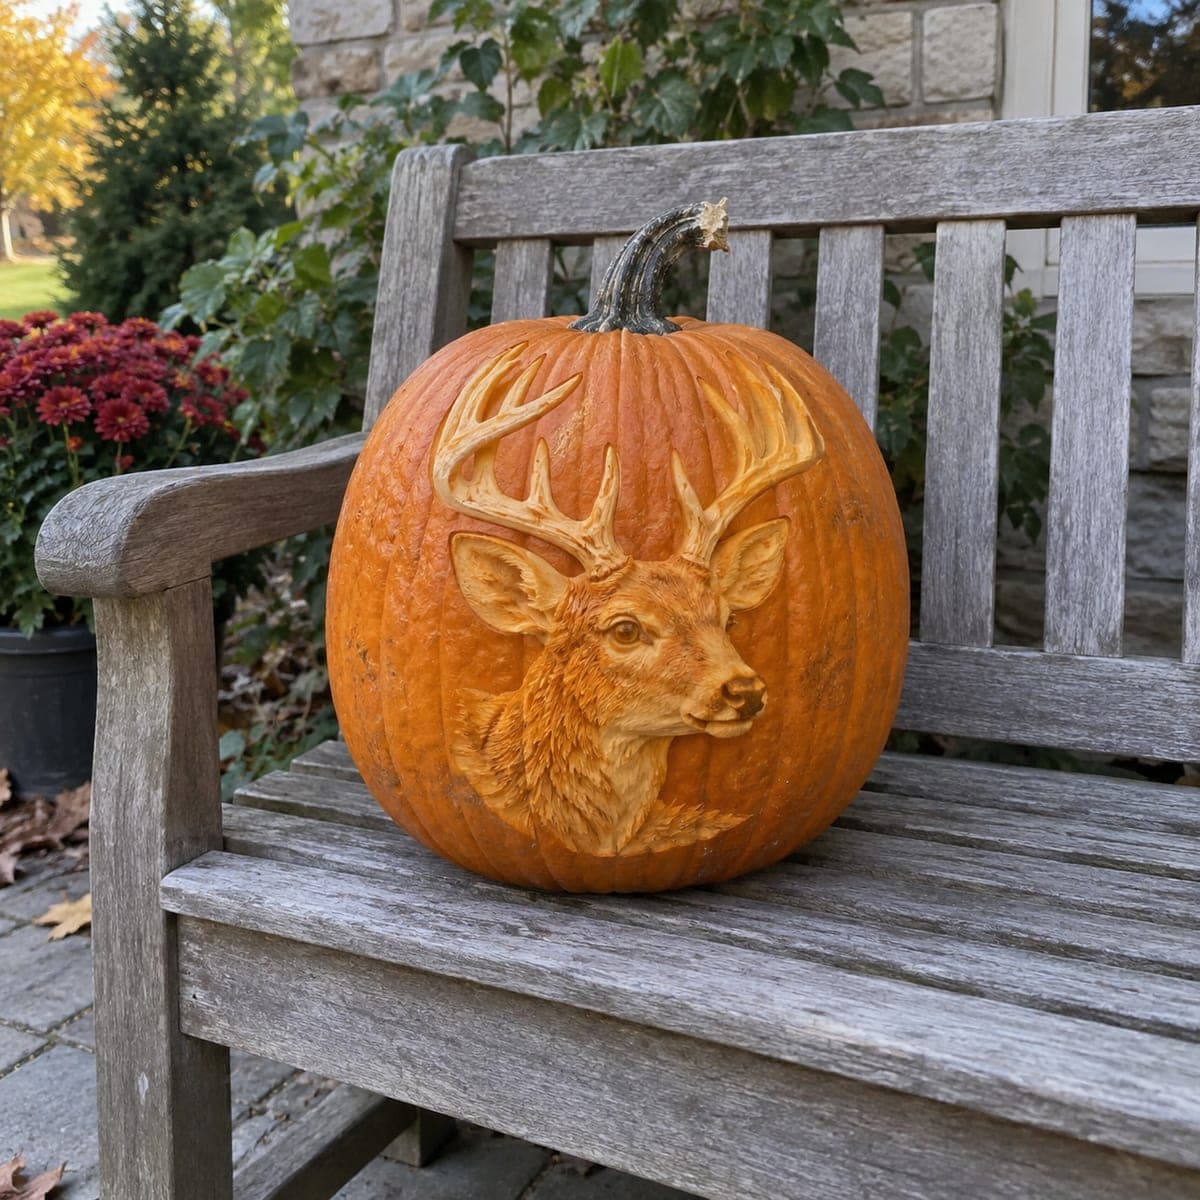
A whitetail buck gazes out from this pumpkin, his rack of antlers etched thin so they blaze against the darker shaded neck and brisket. The portrait mixes deep etching for highlights with shallow shading for fur, which is what gives it that photographic glow after dark. Transfer the pattern with transfer paper, carve the antlers and face highlights first, and set it on a stone step with a real candle for a flickering woodland feel.

This is an AI-generated concept image: a realistic, carvable design idea rather than a photo of a finished carve. AI concepts are always labeled and sit out the leaderboard and the contest.

No ratings yet · Sign in to rate
Comments (0)

  • No comments yet — be the first.

Save without an account. Sign in to like or comment.

Our tips for carving a similar design

The core trick here is contrast: the antlers and face highlights are etched thin so they blaze with light, while the neck and brisket stay in shallow shadow for that photographic fur look. Plan to work from the brightest highlights to the darkest tones, saving any full cutouts for last. Nothing on this design needs to be cut all the way through, so it is really a scraping and etching project rather than a punch-through one.

Written by PumpkinCarvingIdeas.com, inspired by the image above. These are our suggestions, not instructions from the uploader. This approach to the AI concept has not been tested on a real pumpkin.

From pumpkin to porch

  1. Pick a stable pumpkin and open a back door

    Choose a tall, smooth pumpkin with one flat face big enough for the portrait. Cut an access hole in the back or bottom rather than the top so the antlers on the front stay uninterrupted. Scrape the inside wall behind the design down to about one inch thick with a loop tool. A thinner wall etches more evenly and glows brighter.

  2. Transfer the buck pattern

    Tape your printed stencil smoothly over the flat front, easing out wrinkles around the curve. Trace every line with a poker or a pin wheel, marking the antler edges, ears, eye, and the fur lines of the neck. Peel the paper and connect any faint dots with a marker. Take a photo before you carve so you always have a reference for what stays dark.

  3. Etch the antlers and bright highlights

    Start with the brightest areas: the antler tines, the muzzle, and the ridge of the ears. Use a fine detail knife or a small loop tool to remove the skin and dig fairly deep into the flesh so these spots glow strongly. Keep antler tines slightly wider than they look on paper, since very thin flesh can crumble. Work slowly and let the shape emerge tine by tine.

  4. Shade the fur with shallow scraping

    For the neck, brisket, and shaded side of the face, remove only the skin and a whisker of flesh for a dim, warm tone. Vary your pressure to suggest the direction of the fur, going deeper where the caption's photographic look calls for a highlight and staying shallow in shadow. Blend the edges so tones fade into each other instead of jumping. This mid layer is what sells the three-dimensional feel.

  5. Refine the eye and edges

    The eye is the focal point, so define it carefully with a fine tool, leaving a small untouched patch to read as a dark pupil. Clean up the antler edges and tighten any ragged fur lines. Step back, light it, and check the balance of light and dark. Deepen any highlight that looks weak and leave the shadows alone.

  6. Light it and set the scene

    Slip a battery LED light through the back opening and skip open flame, since etched walls run thin and warm. Set the pumpkin on a stone step with mums or a lantern nearby for that woodland porch feel. Photograph it after dark when the antlers glow against the shaded neck. Mist the cut edges with water and refrigerate overnight to keep the etching crisp.

Gather your supplies

Check things off as you get ready.

Work on a stable surface, keep your free hand out of the cutting path, and have an adult handle sharp tools.

Three levels of light

  • Leave intact

    The pupil of the eye and the deepest shadows of the neck stay as untouched skin.

  • Peel & shade

    The fur of the neck, brisket, and shaded cheek gets a shallow skin peel for a dim orange glow.

  • Cut through

    The antler tines, muzzle, and ear ridges are etched deep for the brightest light, without cutting fully through.

Learn the carving basics

Before you start cutting

Do I need to cut all the way through anywhere?

No. This is an etched portrait, so the brightness comes from how deep you scrape, not from open holes. Etch the antlers and highlights deep into the flesh but keep a thin wall of pumpkin so nothing punches through. That preserves the soft glow and keeps the antlers from snapping.

How do I keep the thin antler tines from breaking?

Carve them a little wider than the stencil line and leave more flesh behind them for support. Since you are etching rather than cutting through, the tines stay backed by the pumpkin wall and are much stronger than open cutouts. Work each tine gently and avoid prying the tool sideways.

This is a concept image, so can a real pumpkin really glow like that?

Yes, with patience. The photographic look comes from layering three depths: dark untouched skin, dim peeled fur, and deep bright highlights. A real pumpkin can absolutely hold that gradient if you thin the inner wall and shade gradually. Use an LED light for the most even, safe glow.

Your take belongs here, too.

Changed a detail? Made it simpler? Share a photo of your version and tell the community what worked.

Share your pumpkin

More pumpkins like this

You've reached the end · 8 pumpkins
The Patch Report

Fresh pumpkins, in your inbox.

The best new carvings, ideas worth stealing, and how-tos for carving season. Short, seasonal, and gone by November.

A short email during carving season. Unsubscribe anytime. See our privacy policy.