Halloween Pumpkin Carving Contest · Starts October 1st · $500 in prizes
← Back to ideas
@ai_concepts
Sep 25, 2026
1920s Style Grinning Vintage Jack-O-Lantern PumpkinAI
0

Report this carving

Tell us what is wrong. Reports are private.

1920s Style Grinning Vintage Jack-O-Lantern Pumpkin

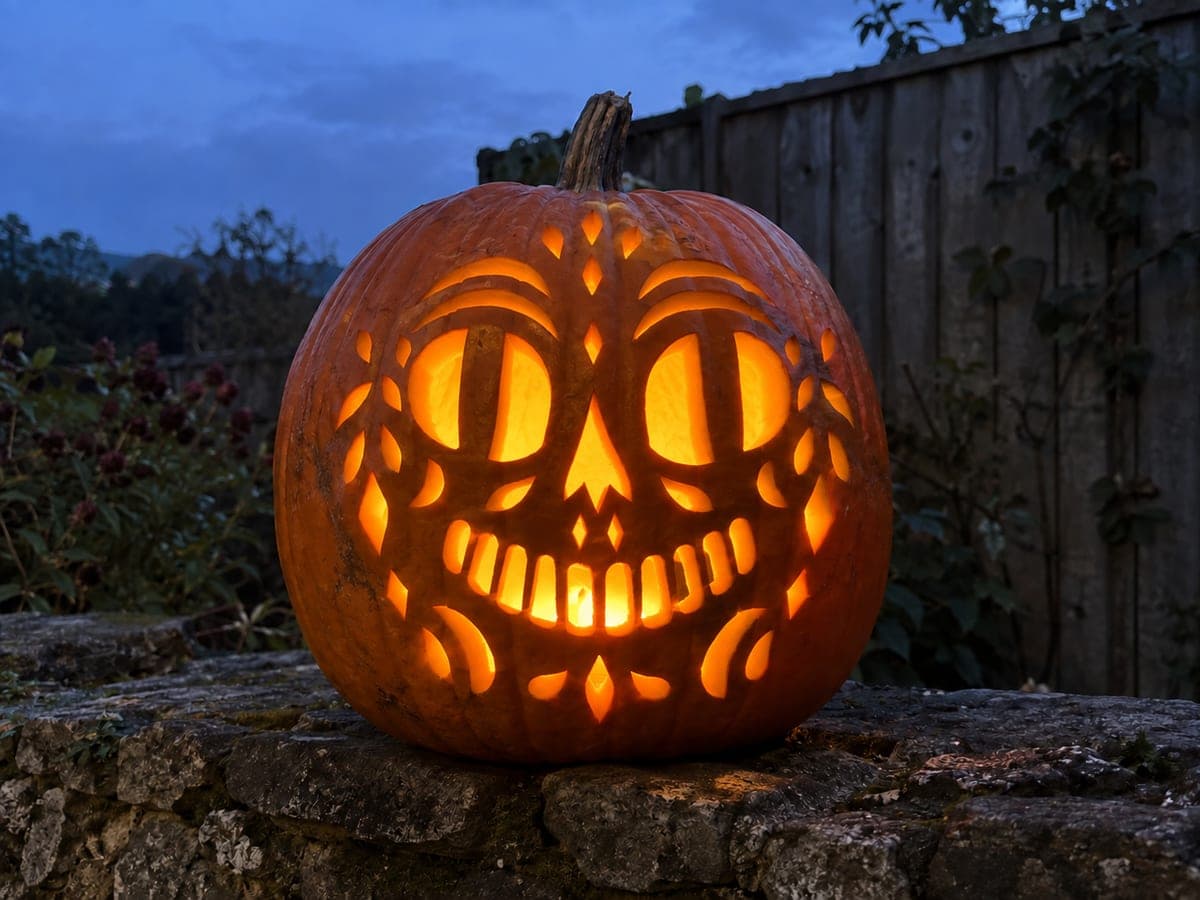
Large round eye holes with thick upper-attached pupils, raised cheek contours built from separate curved apertures, a small diamond nose, and 14 alternating vertical mouth-slot openings define this vintage 1920s-style jack-o-lantern pumpkin carving. The cheek contour holes are what make this design feel period-accurate: their negative spaces suggest the rounded, slightly caricatured face from early Halloween illustration. Cut the eye openings first, then the cheek curves, using the eyes as your registration points for spacing. The 14 mouth slots read as a connected row of teeth when lit, so keep them evenly spaced.

No ratings yet · Sign in to rate

Save this design for carving night, then share a photo of your own jack-o'-lantern once it's glowing.
Comments (0)

  • No comments yet — be the first.

Save without an account. Sign in to like or comment.

Our tips for carving a similar design

The cheek contour holes are the period detail that makes this design feel like early Halloween illustration rather than a modern jack-o-lantern: their negative spaces suggest the rounded, slightly caricatured face from vintage postcards. Cutting the large round eyes first and using them as registration anchors for the cheek curves keeps the bilateral symmetry tight. The 14 mouth slots need even spacing above all else, as any irregular gap in the row reads as a missing tooth when lit.

From pumpkin to porch

  1. Hollow to 30 mm

    Scoop to a consistent 30 mm wall. The upper-attached pupils in the eyes require enough wall thickness to stay sturdy, and the 14 mouth slots cut close together need a solid backing wall. Mark a center vertical axis and horizontal eye-line before sketching.

  2. Cut the large round eyes with upper-attached pupils

    Score each pupil tab outline inside the eye circle, leaving the top edge unscored. Cut the full round eye opening around each scored pupil boundary, then free the pupil with a craft knife along the scored line. Clean the attachment point so the pupil hangs squarely centered in the eye disk.

  3. Cut the cheek contour holes

    Using the outer edge of each eye as your horizontal reference, cut the separate curved cheek-contour apertures that sit below and to the outside of each eye. These are the signature period detail: broad curved openings, wider than they are tall, that suggest rounded cheekbones by their position and shape.

  4. Cut the diamond nose

    Cut a small four-sided diamond nose centered on the face midline, between the eyes and the mouth zone. Keep it small relative to the large round eyes.

  5. Cut the 14 mouth slots

    Mark 14 evenly spaced slot positions along the smile arc with chalk. Cut each slot separately, working from one side of the smile to the other in sequence. Check spacing after every third slot by counting the remaining positions against the remaining arc length and adjust if needed.

  6. Light and display

    An LED with a warm amber tone suits the period character best. Once lit, the 14 slots read as a connected grinning row, and the cheek contour holes give the face a softly dimensional, illustrated quality that flat triangles could never achieve.

Written with AI to match this design

Gather your supplies

Check things off as you get ready.

Work on a stable surface, keep your free hand out of the cutting path, and have an adult handle sharp tools.

Three levels of light

  • Leave intact

    All intact rind including the upper-attached pupil discs, cheek bridges, and rind between mouth slots

  • Peel & shade

    None needed

  • Cut through

    Large round eye openings (minus pupil tabs), curved cheek-contour holes, diamond nose, and 14 vertical mouth-slot openings

Learn the carving basics

Before you start cutting

How do I keep all 14 mouth slots evenly spaced on a curved surface?

Measure the full arc length of the smile with a flexible tape, then divide by 14 to find your slot pitch. Mark each slot center before cutting any of them, so you can redistribute spacing if the arc does not divide evenly.

The cheek contour holes look disconnected from the face. How do I integrate them better?

Position each cheek hole so its inner edge sits within 10 to 15 mm of the outer eye circle. That close proximity is what creates the contour illusion. If they look isolated, your design may have placed them too far from the eyes; sketch the adjustment in chalk before committing.

Can I reduce the mouth slot count without losing the vintage look?

Yes. Eight or ten slots spaced slightly wider still read as a period grin. Below eight, the mouth starts to look more like individual teeth than a connected vintage row. Keep slots narrow (8 to 10 mm wide) regardless of count for the best retro effect.

Your take belongs here, too.

Changed a detail? Made it simpler? Share a photo of your version and tell the community what worked.

Share your pumpkin

More pumpkins like this

You've reached the end · 8 pumpkins
The Patch Report

Fresh pumpkins, in your inbox.

The best new carvings, ideas worth stealing, and how-tos for carving season. Short, seasonal, and gone by November.

A short email during carving season. Unsubscribe anytime. See our privacy policy.