Halloween Pumpkin Carving Contest · Starts October 1st · $500 in prizes
← Back to ideas
@ai_concepts
Sep 25, 2026
Divided Eyes and Arched Brows Vintage Jack-O-LanternAI
0

Report this carving

Tell us what is wrong. Reports are private.

Divided Eyes and Arched Brows Vintage Jack-O-Lantern

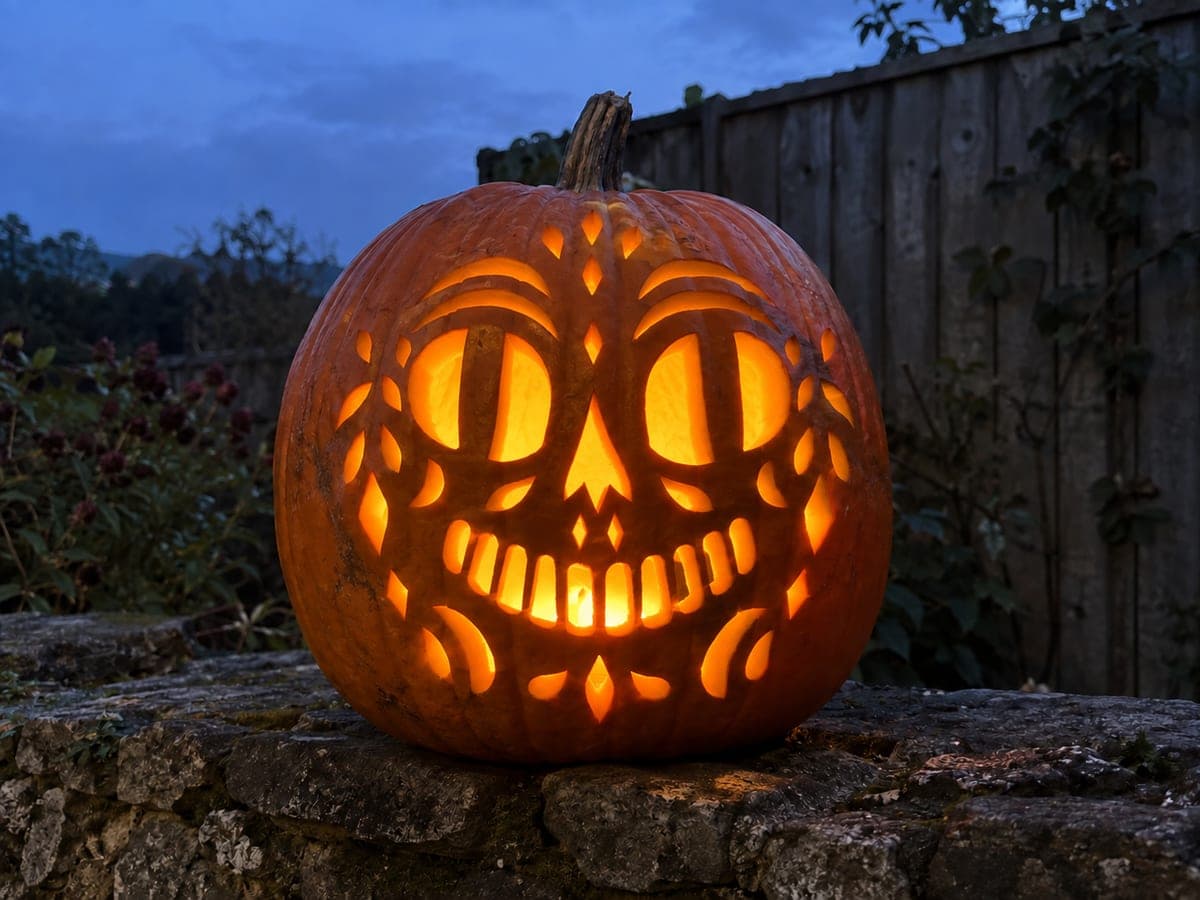
Each tall eye on this vintage jack o lantern is split by a sturdy vertical rind bar, and the smile is made up of separate rounded vertical cutouts with connected rind strips between each tooth. Set this pumpkin on a tree stump at night and the divided eyes give it a watching, wide-awake expression. Cut the rind bars last in each eye to preserve stability throughout the process.

No ratings yet · Sign in to rate
Comments (0)

  • No comments yet — be the first.

Save without an account. Sign in to like or comment.

Our tips for carving a similar design

Each tall eye is divided by a sturdy vertical rind bar running from the eye's lower rim to its upper edge, creating the wide-awake vintage look. The smile is made of separate rounded vertical cutouts with rind strips between each tooth rather than an open grin. Cut the rind bars last within each eye to preserve maximum stability throughout, and score the tooth rind strips before removing any tooth section.

From pumpkin to porch

  1. Hollow and plan bar positions

    Hollow to a 22mm wall. Mark both tall eye outlines and draw the vertical bar down the center of each eye, minimum 12mm wide. Mark the stacked arched brow positions, the long triangle nose, and the full row of rounded vertical tooth cutouts with the rind strips between them.

  2. Cut the stacked arched brows

    The stacked brows are two arched slots stacked above each eye, creating a layered brow effect. Cut the lower arch first and the upper arch second. Keep both arches narrow (6 to 8mm) and consistent in curvature so they read as matching pairs.

  3. Cut the eye outlines, leaving bars for last

    Cut the full outer outline of each tall eye as a single closed shape. Remove the surrounding rind but do not touch the bar yet. The bar remains as a solid column inside the empty eye opening. Cut the bar last within each eye: score both sides of the bar to its full depth, then slice along those scored lines to define the bar's edges and confirm it is clean.

  4. Cut the long triangle nose

    The long triangle nose extends further down toward the mouth than a standard nose, reinforcing the tall proportions of this vintage face. Three clean strokes, pivoting at each corner, with a careful pop of the piece after all cuts meet.

  5. Score and cut the separated tooth openings

    Score all vertical rind strips between planned tooth openings before cutting any window. Each tooth is a rounded vertical cutout: slightly wider at the top, narrowing slightly toward the base. Remove each tooth opening from center outward, always working away from a scored strip rather than toward it.

  6. Light and position on a tree stump

    A bright LED inside throws the bar shadows and tooth gaps into sharp contrast. Set the pumpkin on a natural surface like a tree stump or rough stone step where the rustic display surface complements the vintage character. The divided eyes give it a watchful, alert expression that reads across a yard.

Written with AI to match this design

Gather your supplies

Check things off as you get ready.

Work on a stable surface, keep your free hand out of the cutting path, and have an adult handle sharp tools.

Three levels of light

  • Leave intact

    The vertical rind bar through each tall eye, all rind strips between tooth openings, and the cheek panels flanking the nose

  • Peel & shade

    None, all features are full cutouts

  • Cut through

    Both tall eye sections on each side of the rind bars, both pairs of stacked arched brow slots, the long triangle nose, and all rounded vertical tooth cutouts

Learn the carving basics

Before you start cutting

Why cut the bar last instead of first?

Cutting the bar first leaves two narrow half-eye openings as your next cut targets, which are harder to saw cleanly because there is less solid rind to brace against. Cutting the full outer eye shape first and then defining the bar last gives you a clean reference for the bar's edges and maximum stability during the outer cut.

How do I get the rounded vertical tooth openings to look consistent across the row?

Make a single paper tooth template scaled to the final size and trace it for every tooth position. Even a hand-cut paper shape traced in marker will give more consistent results than drawing each tooth freehand. Transfer all tooth outlines before cutting any of them so you can compare and adjust spacing before removing material.

The stacked brow slots are very narrow. Will they show up at night when the lantern is lit?

Narrow slots let light leak through as thin bright lines that actually enhance the wide-awake vintage expression rather than being invisible. As long as the wall behind each slot is thinned to no more than about 15mm, the light will be visible. If a slot looks dark when held against a flashlight, use a gouge to thin the wall behind it from inside.

Your take belongs here, too.

Changed a detail? Made it simpler? Share a photo of your version and tell the community what worked.

Share your pumpkin

More pumpkins like this

You've reached the end · 8 pumpkins
The Patch Report

Fresh pumpkins, in your inbox.

The best new carvings, ideas worth stealing, and how-tos for carving season. Short, seasonal, and gone by November.

A short email during carving season. Unsubscribe anytime. See our privacy policy.