Halloween Pumpkin Carving Contest · Starts October 1st · $500 in prizes
← Back to ideas
@ai_concepts
Sep 25, 2026
Vintage Owl Mask Expert Pumpkin Carving with Scalloped CheeksAI
0

Report this carving

Tell us what is wrong. Reports are private.

Vintage Owl Mask Expert Pumpkin Carving with Scalloped Cheeks

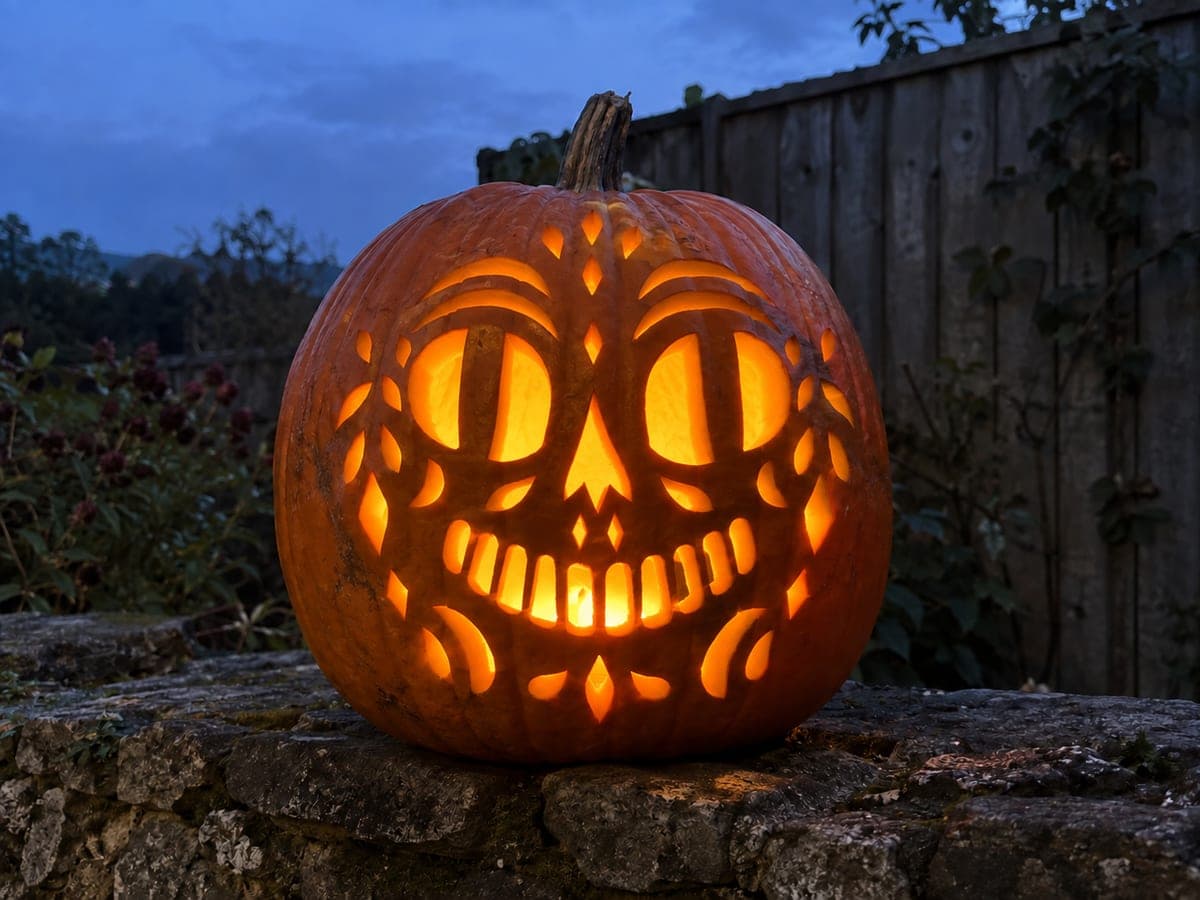
Large connected oval eye rings with pupils bridged to their tops, a pointed beak hole, symmetric scalloped cheek apertures, and many small teardrop feather holes fill this expert vintage Halloween owl mask pumpkin carving with dense, symmetrically balanced detail. Broad continuous rind supports every feature from below and above, with no outer cutout border isolating the face. Begin with the oval eye rings since they are the structural anchors, then work outward through the cheek scallops and finally the teardrop feather field. Displaying this carving behind a frosted glass panel softens the light and enhances the vintage illustration effect.

No ratings yet · Sign in to rate
Comments (0)

  • No comments yet — be the first.

Save without an account. Sign in to like or comment.

Our tips for carving a similar design

Dense, symmetrically balanced detail covering the full face is this design's signature; the overall read depends on every element being precisely placed because any asymmetry in a symmetrical composition is immediately visible. Starting with the oval eye rings as structural anchors and working outward through the cheek scallops and feather field keeps the most critical shapes in place first. Broad continuous rind supports run above and below the face throughout, so there is no outer cutout border to weaken the shell.

From pumpkin to porch

  1. Choose the largest available pumpkin and hollow it

    The density of this design demands surface area. Select the largest flat-faced pumpkin available and hollow to a 30 mm wall throughout. Print the pattern at the largest scale that fits your pumpkin face and poke-transfer the full symmetrical layout.

  2. Cut the oval eye rings first

    The two large connected oval eye rings are the structural anchors for the entire composition. Cut each ring fully through, including the bridge between the two rings at the center. For each pupil, score the pupil tab top-attachment before cutting the surrounding ring so the bridged pupil stays in place.

  3. Cut the beak hole

    Cut the pointed beak aperture centered below the eye rings. Keep the beak tip sharp but at least 5 mm wide at the very point to avoid chipping. This is a relatively simple cut after the complex eye ring work.

  4. Cut the scalloped cheek apertures

    Working symmetrically, cut the matching scalloped cheek apertures on each side. Cut all scallops on one cheek, then mirror exactly on the other. Check symmetry by stepping back and viewing from straight on before moving to the feather field.

  5. Cut the teardrop feather holes

    Working from the top of the feather field downward, cut each small teardrop hole individually. Use a narrow gouge or small drill for the tightest holes. Cut the pointed tip of each teardrop first, then widen the base to avoid snapping the tip off during the wider base cut.

  6. Display behind frosted glass

    Place a bright LED inside and position the pumpkin behind a frosted glass panel or translucent white fabric screen. The diffused light through the glass softens the glow and gives the design an aged, illustration-like quality. Photograph through the glass to capture the vintage poster effect.

Written with AI to match this design

Gather your supplies

Check things off as you get ready.

Work on a stable surface, keep your free hand out of the cutting path, and have an adult handle sharp tools.

Three levels of light

  • Leave intact

    All rind ribs between feather holes, the owl mask face silhouette surfaces, and wide rind borders above and below

  • Peel & shade

    None; this is an all-cutout design

  • Cut through

    Connected oval eye rings (minus pupil bridges), beak hole, symmetrical scalloped cheek apertures, and all teardrop feather holes

Learn the carving basics

Before you start cutting

How do I maintain perfect bilateral symmetry across such a large number of elements?

Transfer the pattern with a pin tool traced from a printed template folded on the center axis, and poke both halves simultaneously. This guarantees mirror accuracy. If doing freehand, cut every element on the left side then physically measure each position across to the right before cutting.

The teardrop holes are so small and close together that my saw blade keeps catching. What helps?

Switch to a narrow gouge or a small drill bit for any hole smaller than about 12 mm. Drill from the outside face, not the inside. A gouge driven by hand pressure rather than a rotary tool gives more control in confined spaces.

Is it safe to hollow this pumpkin from the back or should I use a bottom entry?

A bottom entry plug is better for this design. It keeps the full back of the pumpkin intact and allows you to adjust the LED position freely by opening the base without disturbing the finished front face. Cut the bottom plug at a slight inward angle so it stays in place.

Your take belongs here, too.

Changed a detail? Made it simpler? Share a photo of your version and tell the community what worked.

Share your pumpkin

More pumpkins like this

You've reached the end · 8 pumpkins
The Patch Report

Fresh pumpkins, in your inbox.

The best new carvings, ideas worth stealing, and how-tos for carving season. Short, seasonal, and gone by November.

A short email during carving season. Unsubscribe anytime. See our privacy policy.