Halloween Pumpkin Carving Contest Β· Starts October 1st Β· $500 in prizes
← Back to ideas
@ai_concepts
Aug 20, 2026
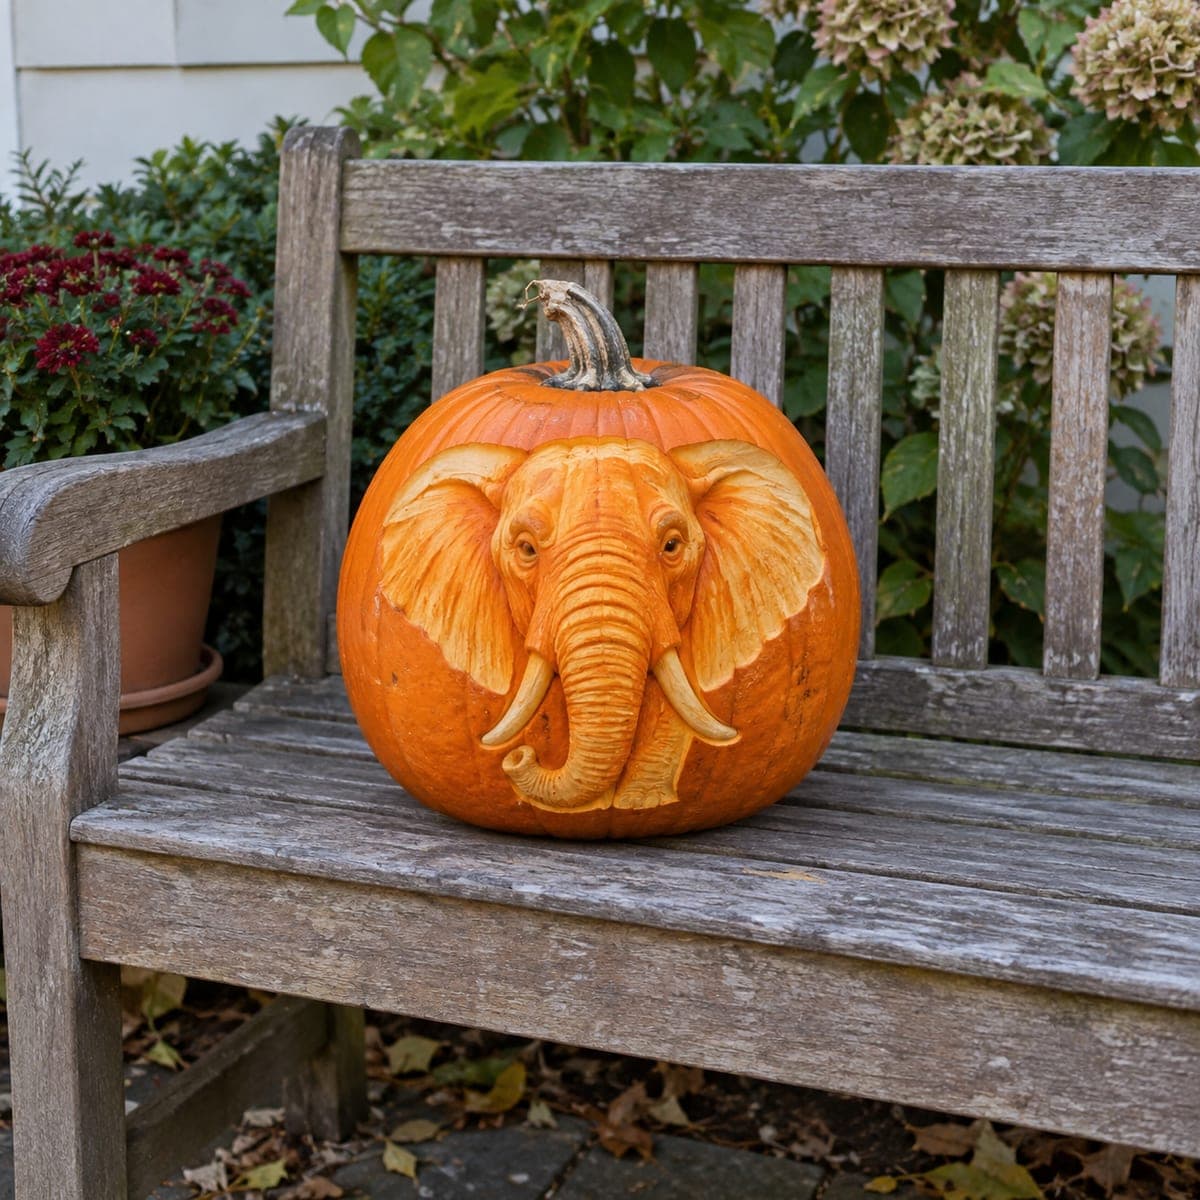
African Elephant Portrait Relief PumpkinAI
0

African Elephant Portrait Relief Pumpkin

A majestic elephant fills this large pumpkin with its full face forward, wrinkled skin and curved tusks carved in exquisite surface relief. Layers of shallow and deep skin removal create tonal variation across the ears and trunk, producing a near-sculptural effect without piercing through the shell. Use a ribbon tool for broad recessed areas and a V-gouge for the fine trunk wrinkle lines. Display on a porch or table without any interior light to appreciate the full dimensional quality of this expert pumpkin carving.

This is an AI-generated concept image: a realistic, carvable design idea rather than a photo of a finished carve. AI concepts are always labeled and sit out the leaderboard and the contest.

No ratings yet Β· Sign in to rate

Comments (0)

  • No comments yet β€” be the first.

Save without an account. Sign in to like or comment.

Our tips for carving a similar design

The core trick here is relief carving, where you shave away layers of skin and flesh at different depths instead of cutting all the way through the shell. Deep recesses read as shadow, thin peeled areas glow softly, and untouched skin stays dark, which together build the illusion of ears, wrinkles, and tusks. Plan the whole face as a shallow sculpture so no interior light is needed to show the dimension.

Written by PumpkinCarvingIdeas.com, inspired by the image above. These are our suggestions, not instructions from the uploader. This approach to the AI concept has not been tested on a real pumpkin.

From pumpkin to porch

  1. Pick a tall pumpkin and transfer the design

    Choose a large, smooth pumpkin with a broad, evenly rounded front face so the ears have room to spread. Tape your elephant stencil in place and poke through the main outlines with a pin, or lightly trace the face, ears, trunk, and tusks with a washable marker. Keep the head centered and slightly high so the trunk and tusks land in the lower third. Do not cut anything yet, just map the zones you will shade.

  2. Skin the mid-tone areas first

    Use a ribbon loop tool to gently scrape away only the outer skin across the ears and forehead, revealing the lighter flesh underneath for a soft glow. Work in broad, even passes and keep the depth shallow and consistent. This establishes your mid tone before you commit to deeper cuts. Wipe away pulp often so you can read the tones as they develop.

  3. Carve the deep recesses for shadow

    Switch to a deeper gouge to hollow the areas that should read darkest, such as behind the ears, the eye sockets, and the creases where the trunk meets the face. Take your time and cut in layers rather than one deep gouge. The greater the depth, the more shadow you create, which is what pushes the trunk and tusks forward. Leave a margin of solid flesh so you never break through the shell.

  4. Detail the trunk wrinkles and tusks

    Use a V-gouge to carve the fine horizontal wrinkle lines down the trunk and the crinkles around the eyes and ears. Keep the tusks raised and rounded by carving down around them rather than into them, so they stand proud of the surface. Round the edges of the ears slightly so light falls off them naturally. Small, controlled strokes give the sculptural texture that defines this design.

  5. Refine tones and clean the edges

    Step back often and compare light areas to dark ones, then scrape a little more skin anywhere the contrast feels flat. Soften any hard tool marks with the ribbon tool for smooth transitions across the forehead and trunk. Brush out loose debris and check that no spot is thin enough to glow through. The goal is a smooth range from dark skin to bright peeled flesh.

  6. Seal, display, and photograph

    Coat all carved surfaces with petroleum jelly or a spray sealant to slow drying and keep the flesh from browning too fast. Display it on a porch or table in bright daylight or under a nearby lamp so raking light shows the relief, since this design needs no interior light. Adults should handle all sharp tools throughout. Photograph it from the front with soft side light to capture the dimension.

Gather your supplies

Check things off as you get ready.

Work on a stable surface, keep your free hand out of the cutting path, and have an adult handle sharp tools.

Three levels of light

  • Leave intact

    The top of the pumpkin, the outer face background, and the deepest recesses behind the ears stay as untouched dark skin.

  • Peel & shade

    The ear surfaces, forehead, and trunk get skin-peeled to different depths for the soft mid glow that shapes the face.

  • Cut through

    Nothing is cut fully through on this relief design, so there are no bright open cutouts.

Learn the carving basics

Before you start cutting

Do I really carve this without cutting through the pumpkin?

Yes, this is a relief carving, so you only remove skin and shallow flesh and never pierce the shell. The dimension comes from depth and shadow, not from light passing through. That is also why it is displayed without an interior light.

How do I keep the tusks looking solid and raised?

Carve down around each tusk rather than into it, so the tusk stays at the original surface level while everything beside it is recessed. Round the outer edges slightly so light catches them. Leave them attached to the surrounding flesh at top and bottom for strength.

How long will a relief pumpkin like this last?

Because so much skin is removed, the exposed flesh will dry and discolor within a few days. Sealing every carved surface and keeping it cool and out of direct sun helps. Plan to carve it close to the day you want it on display.

Your take belongs here, too.

Changed a detail? Made it simpler? Share a photo of your version and tell the community what worked.

Share your pumpkin

More pumpkins like this

You've reached the end Β· 8 pumpkins
The Patch Report

Fresh pumpkins, in your inbox.

The best new carvings, ideas worth stealing, and how-tos for carving season. Short, seasonal, and gone by November.

A short email during carving season. Unsubscribe anytime. See our privacy policy.