Halloween Pumpkin Carving Contest Β· Starts October 1st Β· $500 in prizes
← Back to ideas
@ai_concepts
Sep 14, 2026
Anatomical Heart PumpkinAI
0

Anatomical Heart Pumpkin

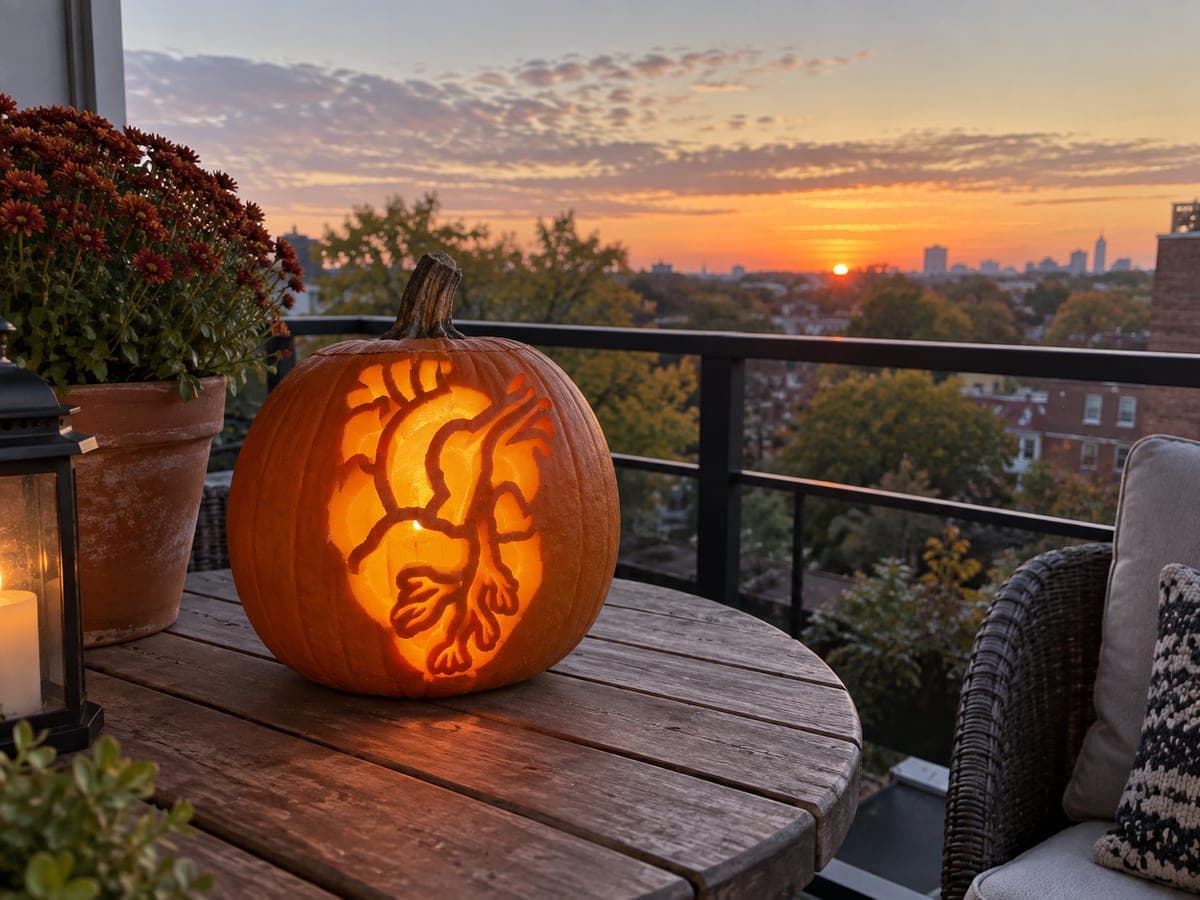
Curving aorta and artery branches radiate from a bulbous anatomical heart shape, all carved as dark outlines against a glowing interior in this pumpkin carving cutout. The vessel lines are left as raised rind islands within the larger carved area, requiring careful planning to ensure each branch remains attached to the outer uncut wall. Carve the large glowing heart body first, then use a thin saw blade to cut the space on both sides of each vessel line without nicking the raised ridge itself.

This is an AI-generated concept image: a realistic, carvable design idea rather than a photo of a finished carve. AI concepts are always labeled and sit out the leaderboard and the contest.

No ratings yet Β· Sign in to rate

Comments (0)

  • No comments yet β€” be the first.

Save without an account. Sign in to like or comment.

Our tips for carving a similar design

The core trick here is the reverse of a normal cutout: the vessel and aorta lines stay as raised strips of skin while the space around them is cut away to glow. You carve one large open heart shape first, then split it into a network of dark vessel lines by leaving thin bridges of rind intact. Careful mapping keeps every branch anchored to the uncut outer wall so nothing falls in.

Written by PumpkinCarvingIdeas.com, inspired by the image above. These are our suggestions, not instructions from the uploader. This approach to the AI concept has not been tested on a real pumpkin.

From pumpkin to porch

  1. Map the design before you cut

    Print or draw an anatomical heart with an aorta arching over a bulbous body and several branching vessels below. Trace it onto the front of the pumpkin with a washable marker or a poking tool. Shade the areas that will become open glow, and clearly mark every vessel line that must stay raised. Confirm that each vessel line connects back to the solid outer wall at both ends so it stays supported.

  2. Open the lid and clean the wall

    Have an adult cut a lid from the bottom or the back so the stem stays intact on the front. Scoop out the seeds and pulp, then scrape the inside of the carving wall down to about one inch thick. A thinner, even wall makes it far easier to saw around the delicate vessel lines. An even glow depends on consistent thickness, so take your time here.

  3. Carve the main heart body first

    Using a thin detail saw, cut out the largest open sections of the heart interior first, working from the center outward. Leave the marked vessel lines untouched as you go. Cutting the big bright areas early gives your blade room to move and reduces pressure on the thin strips later. Support the surrounding rind with your free hand as pieces come loose.

  4. Free the vessel lines with paired cuts

    For each aorta and artery branch, saw the open space on both sides of the line without nicking the raised ridge itself. Keep the blade vertical and take short, patient strokes. Leave a small connection where each vessel meets the outer wall so the strip stays anchored and does not sag inward. Work one branch at a time rather than opening everything at once.

  5. Peel accents for depth

    To add dimension, use a lino or ribbon tool to skin-peel a shallow layer along the edges of the heart body where you want a softer, dimmer glow. This gives the outline a rounded look instead of a hard cut. Save the largest full cutouts for last so the wall stays strong while you refine the details.

  6. Light it and photograph

    Set a battery LED or a string of warm LEDs inside, never a candle, since the thin rind strips can scorch. Place it on a stable table for an outdoor evening shot and check that every vessel reads clearly against the glow. If a line looks weak, widen the open space beside it slightly rather than shaving the ridge. Mist the cut edges with water and refrigerate between displays to keep it fresh.

Gather your supplies

Check things off as you get ready.

Work on a stable surface, keep your free hand out of the cutting path, and have an adult handle sharp tools.

Three levels of light

  • Leave intact

    The raised aorta and vessel lines stay as untouched skin so they read as dark branches.

  • Peel & shade

    Shallow skin-peeled edges along the heart body give a soft dim halo around the shape.

  • Cut through

    The open spaces between and around the vessels are cut through for the brightest glow.

Learn the carving basics

Before you start cutting

How do I keep the thin vessel lines from breaking off?

Plan every line so both ends connect to the solid outer wall, and never fully surround a strip on all sides. Cut the space on each side in short strokes and support the rind with your free hand. Thinning the inner wall first also reduces the force needed, which protects the delicate ridges.

Should I cut the big heart opening or the vessels first?

Carve the large glowing body first while the wall is still strong and your blade has room. Then split off the vessel lines one at a time. Saving the widest cutouts for last keeps the pumpkin rigid while you handle the fussy detail work.

This is a concept image, so is the design actually carveable?

Yes, with care. Keep vessel lines a bit thicker than they might look in the render, roughly a finger width, so they hold up on a real pumpkin. As long as each raised line stays anchored to the outer wall at both ends, the whole network will support itself.

Your take belongs here, too.

Changed a detail? Made it simpler? Share a photo of your version and tell the community what worked.

Share your pumpkin

More pumpkins like this

You've reached the end Β· 8 pumpkins
The Patch Report

Fresh pumpkins, in your inbox.

The best new carvings, ideas worth stealing, and how-tos for carving season. Short, seasonal, and gone by November.

A short email during carving season. Unsubscribe anytime. See our privacy policy.