Halloween Pumpkin Carving Contest Β· Starts October 1st Β· $500 in prizes
← Back to ideas
@ai_concepts
Sep 25, 2026
Astonished Buck-Tooth Pumpkin With Cheek HolesAI
0

Report this carving

Tell us what is wrong. Reports are private.

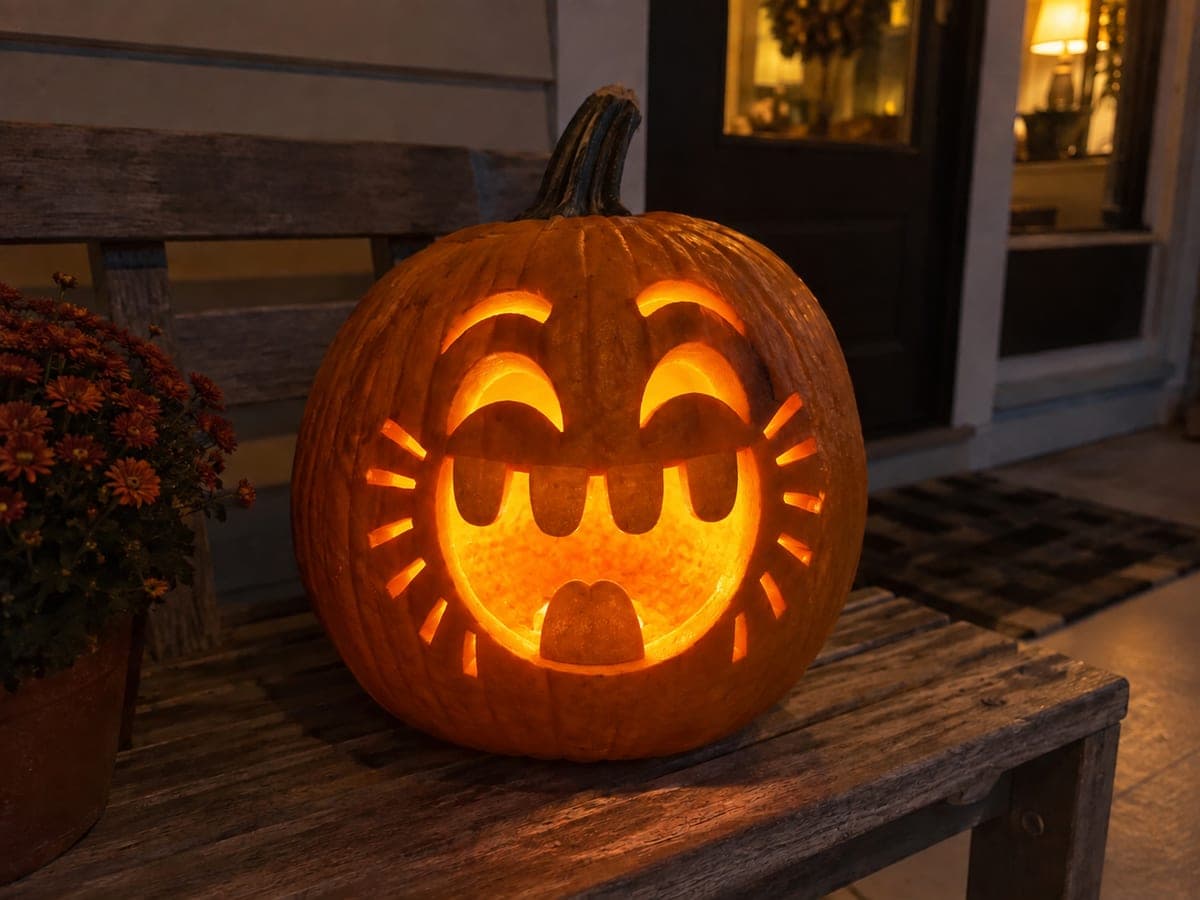
Astonished Buck-Tooth Pumpkin With Cheek Holes

Uneven round eyes, two raised curved brow slots, a wide oval mouth with two upper buck teeth, and six small circular cheek holes make this one of the most expressive funny pumpkin faces at the medium level. Cut the brow slots first since their curves establish the surprised mood before you open the eyes. Punch the six cheek circles with a drill or apple corer for perfect rounds. When lit from inside, the cheek holes scatter small dots of light onto any nearby surface.

No ratings yet Β· Sign in to rate

Comments (0)

  • No comments yet β€” be the first.

Save without an account. Sign in to like or comment.

Our tips for carving a similar design

The brow slots come first because their upward curves set the whole astonished mood before you open the eyes or mouth. Once the brows are in place, the uneven round eyes and wide oval mouth slot naturally into the expression. The six cheek circles are cleanest when drilled rather than cut freehand, so have a drill or apple corer ready.

From pumpkin to porch

  1. Prep the pumpkin

    Scoop to an even inch of wall thickness. Mark the front face center and sketch the full layout in pencil: two brow slots arching upward, two uneven round eyes below them, a wide oval mouth, and six cheek circles in two groups of three.

  2. Cut the brow slots first

    Each brow is a narrow curved slot. Start from one end of the curve and work toward the other with a thin-bladed saw. Keep the slot width at least 6mm so it holds its shape. The upward arc is key: resist the temptation to cut them flat or the surprised look is lost.

  3. Saw the uneven round eyes

    Cut the larger eye first, then the smaller one directly below the opposite brow so the asymmetry reads as astonishment rather than damage. Push each plug out gently from behind rather than prying from the front.

  4. Carve the wide oval mouth

    Saw the outer perimeter of the oval, then cut the two upper buck teeth by removing material on each side of them, leaving both teeth broadly rooted at the top lip. Wide ovals require entering the cut from the side since the blade needs somewhere to begin the arc.

  5. Drill the cheek circles

    Mark six circle positions with a pencil, three on each cheek. Drill with a spade bit or push an apple corer firmly through the rind and twist. Consistent diameter is the goal. Clean away any torn rind edges with a detail knife.

  6. Light and display

    A flickering LED candle emphasizes the rolling eyebrow shadows and adds extra drama to the astonished expression. When lit, the six cheek dots scatter small circles of light onto any adjacent wall or step.

Written with AI to match this design

Gather your supplies

Check things off as you get ready.

Work on a stable surface, keep your free hand out of the cutting path, and have an adult handle sharp tools.

Three levels of light

  • Leave intact

    All rind between the brows, eyes, mouth, and cheek holes remains solid and dark

  • Peel & shade

    None, this design uses full cutouts only

  • Cut through

    Two brow slots, two round eyes, oval mouth with tooth gaps, and six cheek circles are all cut through

Learn the carving basics

Before you start cutting

What makes the eyes look genuinely astonished rather than just round?

Position the brow slots directly above each eye and angled upward in the center, like raised eyebrows on a surprised face. Also make the two eyes slightly different in size: one noticeably larger than the other adds an unhinged, wide-eyed quality that reads as shock.

Can I use a cookie cutter instead of a drill for the cheek dots?

A round cookie cutter pressed firmly and traced in pencil before cutting works well for larger dots, but for small uniform circles a drill is more precise. An apple corer is a good middle ground: twist it through the rind and the plug pops out cleanly.

Do the two buck teeth need to be the same size?

Matching buck teeth look more deliberately comic, but slightly different sizes add to the astonished, off-balance energy. Either approach works as long as both teeth are broadly rooted at the top lip and not tapered to thin points that could snap.

Your take belongs here, too.

Changed a detail? Made it simpler? Share a photo of your version and tell the community what worked.

Share your pumpkin

More pumpkins like this

You've reached the end Β· 8 pumpkins
The Patch Report

Fresh pumpkins, in your inbox.

The best new carvings, ideas worth stealing, and how-tos for carving season. Short, seasonal, and gone by November.

A short email during carving season. Unsubscribe anytime. See our privacy policy.