@pumpkin_pilot
Sep 5, 2026
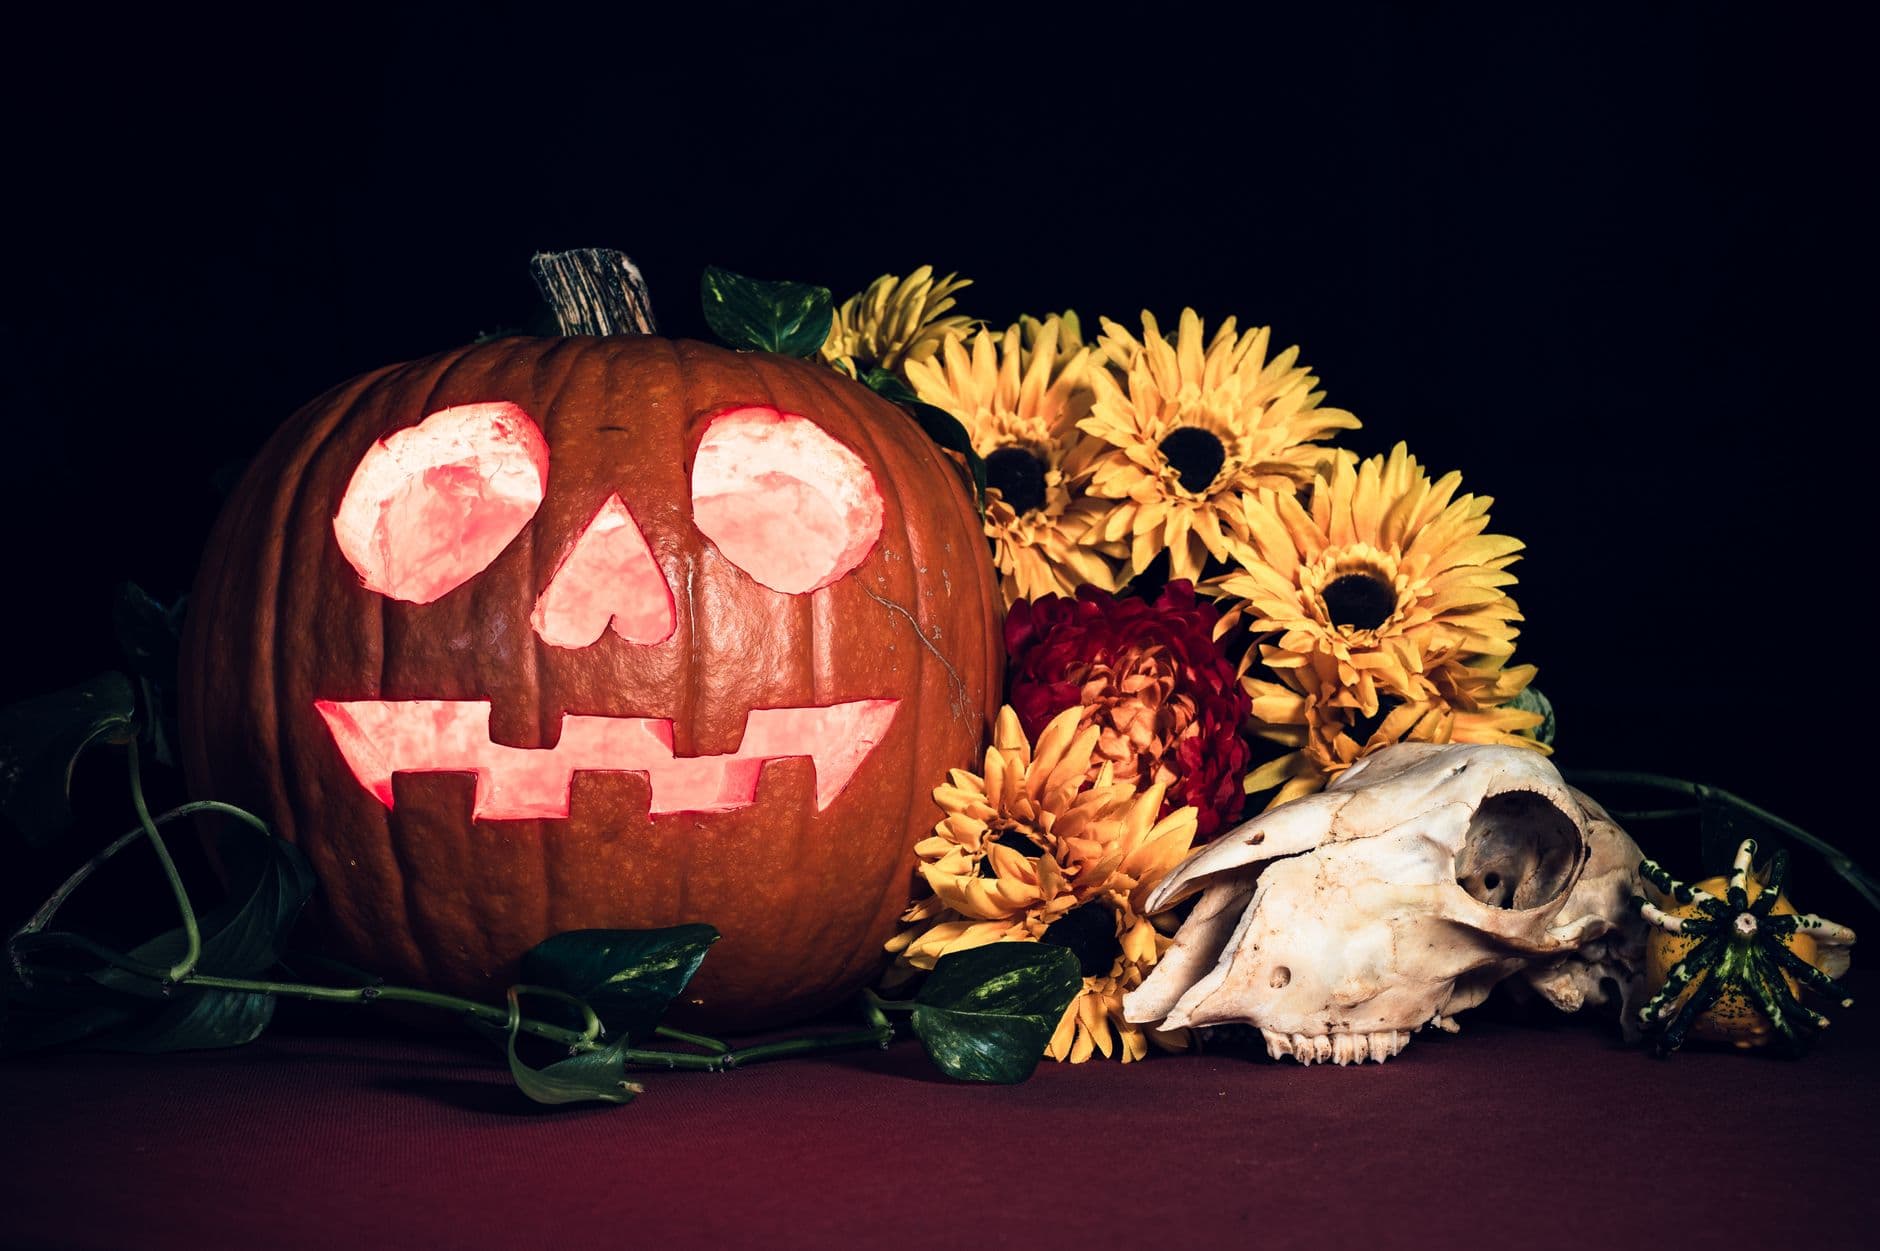
Autumn altar
A skull-nosed jack glowing coral-pink among sunflowers, mums, and a real animal skull. Equal parts harvest and haunt.
No ratings yet · Sign in to rate
A skull-nosed jack glowing coral-pink among sunflowers, mums, and a real animal skull. Equal parts harvest and haunt.
The core trick here is a simple, confident jack-o'-lantern face lit with a coral-pink LED, then staged among sunflowers, mums, and props for a still-life mood. Keep the cutouts bold and clean so the light reads well, and save the styling for after the carving is done. The color and the surrounding flowers do most of the dramatic work.
Written by PumpkinCarvingIdeas.com, inspired by @pumpkin_pilot's photo above. These are our suggestions, not instructions from the uploader, and this approach hasn't been tested on their exact carve.
Choose a medium pumpkin with a broad, smooth front face and a flat enough base to sit still. Cut a lid from the top at an angle so it cannot fall inside, or cut a hatch in the back for easier lighting later. Scoop the insides and scrape the front wall down to about one inch thick. A thinner wall carves cleanly and lets the light shine through evenly.
Sketch or tape on a face with two large teardrop-shaped eyes, an inverted heart or triangle nose, and a wide grin with a few square teeth. Keep the shapes generous and rounded so they are forgiving to cut. Mark the teeth gaps clearly so you leave solid bridges between them. Poke along the outlines with a pin or awl to transfer the pattern onto the skin.
Have an adult handle the sharp tools. Start with the nose and the narrow gaps between the teeth, cutting the smallest openings before the big ones so the surface stays firm. Use a small carving saw and gentle, straight strokes, letting the blade do the work. Push each piece inward or outward to pop it free without tearing the edges.
Move on to the large teardrop eyes and the full grin, saving these bigger openings for last. Keep the teeth attached at both top and bottom so they stay strong. Trim any ragged edges from the inside with a paring knife for a crisp outline. Test-fit your light to check the openings glow the way you want.
Drop in a battery LED, ideally a color-changing or warm pink one to match that coral tone. Skip real candles, since they scorch the rind and are a fire risk near dried flowers. If you want a softer halo around the cutouts, scrape the inner wall thinner near each opening so more light bleeds through. Line the interior with a little foil to bounce the color forward.
Set the pumpkin on a dark cloth and tuck sunflowers, mums, and trailing vines around one side. Add a skull, gourds, or other harvest props for the still-life feel, keeping delicate flowers clear of the light source. Shoot in a dim room so the coral glow pops against the dark background. Turn off overhead lights and let the face be the brightest thing in frame.
Check things off as you get ready.
Work on a stable surface, keep your free hand out of the cutting path, and have an adult handle sharp tools.
The ridged pumpkin body and stem stay untouched and dark, framing the glowing face.
Scrape the inner wall thinner just around each cutout for a soft coral halo at the edges.
The teardrop eyes, heart nose, and toothy grin are cut fully through for the brightest coral light.
Use a colored LED, either a pink puck light or a color-changing one set to a warm rose tone. Lining the inside with foil helps bounce and brighten the color. Test it in a dark room and adjust the shade until it reads coral rather than red.
They can, so keep each tooth attached at both the top and bottom of the grin rather than dangling free. Leave the gaps between teeth small and the teeth themselves fairly chunky. Carving these narrow gaps before the big mouth opening keeps the surface stable while you work.
Yes, as long as you use a battery LED and never an open flame. Dried and faux flowers ignite easily, so keep them clear of any heat source. Arrange the display only after the light is in place and confirmed cool to the touch.
Changed a detail? Made it simpler? Share a photo of your version and tell the community what worked.
The best new carvings, ideas worth stealing, and how-tos for carving season. Short, seasonal, and gone by November.






Comments (0)