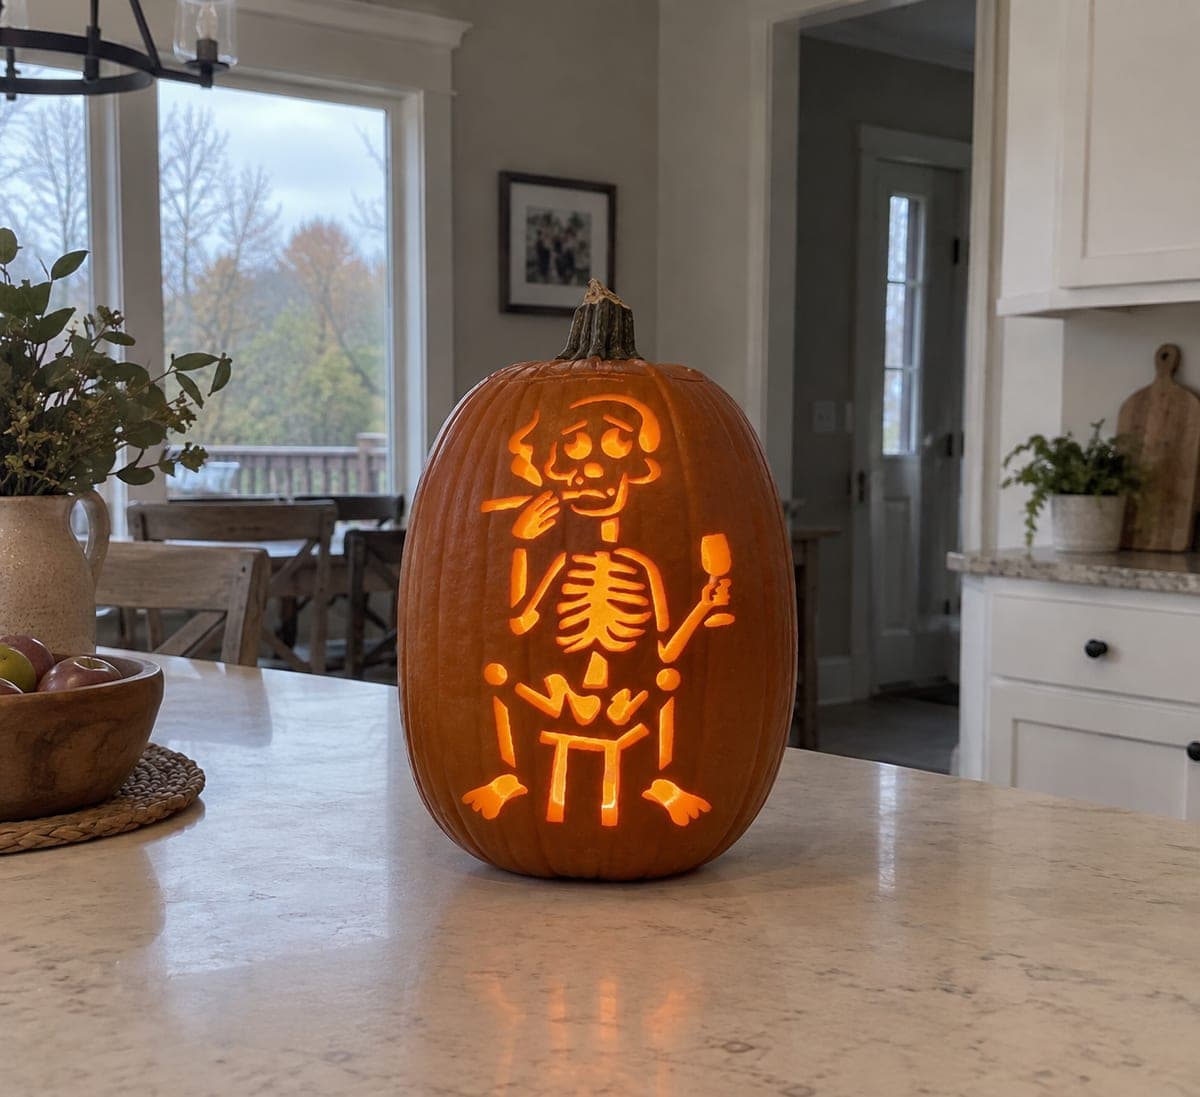
A skeleton sits upright with one arm raised and its free hand holding what appears to be a wine glass, legs dangling below a simple hip joint, ribcage open and glowing. The lively pose makes this a funny Halloween pumpkin carving idea that looks great backlit on a kitchen counter or porch rail. Carve the raised arm and glass separately before connecting them to the shoulder so the narrow glass stem does not flex and snap mid-cut.
This is an AI-generated concept image: a realistic, carvable design idea rather than a photo of a finished carve. AI concepts are always labeled and sit out the leaderboard and the contest.
The core trick here is a full-cutout skeleton with a raised arm and a delicate wine glass held in the free hand. Because the glass stem is so thin, you plan the arm and glass as their own units, carve them first, then connect them to the shoulder so nothing flexes and snaps. Everything else, the grinning skull, open ribcage, and dangling legs, is a series of narrow cutouts held together by small bridges of skin.
Written by PumpkinCarvingIdeas.com, inspired by the image above. These are our suggestions, not instructions from the uploader. This approach to the AI concept has not been tested on a real pumpkin.
From pumpkin to porch
1
Prep and transfer the pose
Pick a tall, evenly shaped pumpkin so the seated figure has room from stem to base. Cut a lid from the bottom instead of the top so the stem stays intact and the pumpkin sits flat, then scrape the front wall to about one inch thick. Tape your printed pattern flat and poke the outlines with a pin or transfer tool. Mark which sections are full cutouts and which stay as skin so you do not lose track mid-carve.
2
Start with the skull
Carve the eye sockets, nose triangle, and grin first while the pumpkin wall is still solid and strong. Keep small skin bridges between the teeth so they read as separate bones and do not collapse into one big hole. Work with a fine detail saw and light pressure, letting the blade do the work. Save the raised hand near the chin for after the arm is planned so you keep the connection sturdy.
3
Open the ribcage and spine
Cut each rib as its own curved slot, leaving a solid strip down the center for the spine. Alternate sides and take breaks so the wall does not weaken all at once. The gaps between ribs are what glow, so keep them clean and even. Leave the outer body edge as skin so the skeleton shape stays framed and supported.
4
Carve the raised arm and wine glass separately
This is the make-or-break part. Cut the raised arm bones and the glass bowl and stem as their own small shapes before joining them to the shoulder, so the narrow stem is never the last fragile thing under your blade. Leave a thin skin bridge where the stem meets the hand and where the arm meets the shoulder so nothing flexes free. Go slow with a fine blade and support the surrounding skin with your other hand.
5
Finish the hips, legs, and feet
Cut the simple hip joint and the two dangling leg bones, keeping a gap between them so each leg reads clearly. Carve the feet last as the largest openings near the base, since big cutouts weaken the wall most. Clean up every edge with a small knife, beveling slightly inward so light spreads. Dry-fit a battery LED to check the balance of glow before you call it done.
6
Light it and photograph
Set a bright battery LED or two inside through the bottom opening, never a candle, since the thin bridges dry out fast. Place the pumpkin on a counter or porch rail and shoot in a dim room so the ribcage and glass really pop. Rub a little petroleum jelly on cut edges to slow browning. If edges soften after a day, refresh them with a quick trim.
Gather your supplies
Check things off as you get ready.
Work on a stable surface, keep your free hand out of the cutting path, and have an adult handle sharp tools.
Three levels of light
Leave intact
The outer body outline and the frame around the skeleton stay as untouched skin so the figure reads against a dark border.
Peel & shade
Skin-peel the skull surface and shaded arm areas for a dim orange glow that suggests bone rather than a stark hole.
Cut through
Full cutouts for the eye sockets, rib gaps, spine slots, the wine glass, and the leg and foot openings give the brightest light.
Carve the glass and raised arm as their own shapes before you connect them to the shoulder, so the thin stem is never the final fragile cut. Leave a small skin bridge where the stem meets the hand. Use a fine blade and support the surrounding skin with your free hand as you work.
Since this is a concept image, can a real pumpkin hold all these thin bones?
Yes, if you keep the wall about one inch thick and leave small bridges between the ribs, teeth, and glass parts. The picture is an AI concept, so treat the thinnest details as the parts most in need of support. Carve big openings like the feet last so the surface stays strong while you do the fine work.
Should I cut the lid from the top or bottom?
Cut it from the bottom for this design. That keeps the nice stem intact and lets the pumpkin sit flat and stable on a counter or rail. It also makes it easy to set the pumpkin down over an LED light.
Your take belongs here, too.
Changed a detail? Made it simpler? Share a photo of your version and tell the community what worked.
 AI
AI

Comments (0)