Halloween Pumpkin Carving Contest · Starts October 1st · $500 in prizes
← Back to ideas
@ai_concepts
Sep 25, 2026
Beach Scene Pumpkin With Supported Umbrella and Lounge ChairAI
0

Report this carving

Tell us what is wrong. Reports are private.

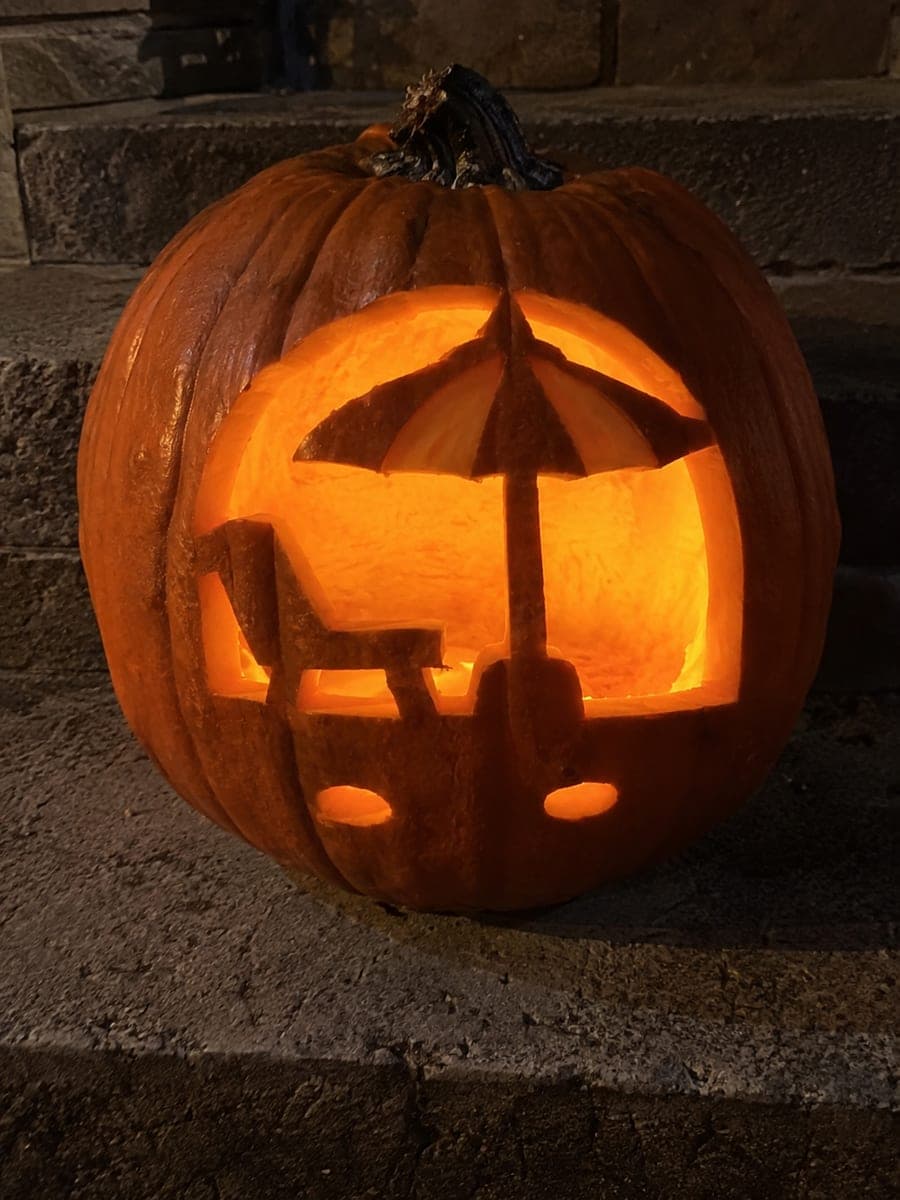
Beach Scene Pumpkin With Supported Umbrella and Lounge Chair

A beach umbrella and lounge chair are retained within a scene window on this hard beach pumpkin carving, with the umbrella pole joined to a broad base and the canopy touching the upper and side frame to prevent collapse. Shallow-backed canopy stripes add depth alongside the main open window without requiring additional through-cuts. Carve the large open window first to establish the scene boundary, then score the canopy stripes with a linoleum tool before removing any remaining background sections. The retained chair anchors through broad legs and back, so confirm those connections before cutting the surrounding waste.

No ratings yet · Sign in to rate

Comments (0)

  • No comments yet — be the first.

Save without an account. Sign in to like or comment.

Our tips for carving a similar design

The umbrella pole is joined at the bottom to a broad base and the canopy touches the upper and side frame to stay anchored, while the lounge chair retains through broad legs and a back connection. Shallow-backed canopy stripes add visual depth alongside the main open window without requiring additional through-cuts. Carving the large open window first establishes the scene boundary before any retained-shape or stripe detail work begins.

From pumpkin to porch

  1. Hollow and prep

    Cut the back lid and scrape interior walls to an inch and a half. The retained umbrella and chair shapes need solid wall depth for the canopy stripe scoring that comes later. Choose a large, wide pumpkin so the scene window has room for both retained elements without crowding.

  2. Transfer and color-code

    Transfer the full scene using a stylus. Use one marker color for the large window background to be cut through, a second for the retained umbrella and chair shapes, and a third for the shallow stripe areas within the canopy. Reviewing all three colors together confirms you have not misidentified any retained element as an aperture.

  3. Cut the large open window

    Use a detail saw to cut the outer scene window boundary, leaving the umbrella and chair shapes intact within it. Work around the window frame edge first to define the outer boundary, then remove the background sections adjacent to the retained shapes. Cut from the widest background areas toward the narrower passages around the umbrella and chair.

  4. Confirm bridge integrity

    After the main window background is removed, press gently on the umbrella canopy and on the chair back to confirm all four contact bridges are solid. The canopy must feel firmly attached at both its upper and side frame contacts and the pole must connect securely to its broad base. Fix any flex with a petroleum-jelly bridge stabilizer before continuing.

  5. Score the canopy stripes

    Use a linoleum V-tool to score shallow parallel stripe grooves across the retained canopy surface. Work from the outer canopy edge toward the pole center, keeping each stripe groove within the solid canopy body. These grooves are not through-cuts; they add texture and shadow when lit from inside without weakening the canopy bridges.

  6. Light and view from the front

    Place a battery LED inside and view the finished piece from the front. The retained umbrella and chair appear as dark silhouettes framed by the lit window opening, while the canopy stripe grooves catch light for subtle surface texture. The scene reads most clearly from a straight-on viewing angle.

Written with AI to match this design

Gather your supplies

Check things off as you get ready.

Work on a stable surface, keep your free hand out of the cutting path, and have an adult handle sharp tools.

Three levels of light

  • Leave intact

    Retained umbrella and lounge chair bodies including canopy, pole, and chair structure stay dark

  • Peel & shade

    Shallow canopy stripe grooves catch side light for subtle texture variation

  • Cut through

    Large open window background cut fully through for full scene glow

Learn the carving basics

Before you start cutting

How wide should the canopy-to-side-frame bridges be to keep the canopy from drooping?

Aim for at least an inch of rind contact at each side of the canopy where it meets the frame. The canopy is the widest retained element and carries more visual weight than the pole alone. A narrow canopy-to-frame bridge can pull away from the frame as the pumpkin dries, so err on the side of a wider connection even if it slightly reduces the sky opening width.

The lounge chair has several thin structural elements. How do I decide which to keep and which to simplify?

Retain only the elements that connect broadly to the frame or base: the chair back, the seat base, and the two front legs. Thin decorative crossbars or armrests that do not connect to a frame boundary should be simplified or eliminated. Reducing detail in favor of broader connections is always the right trade-off on retained shapes.

Can I add a tiny sun aperture in the upper corner of the window scene?

Yes. A small circular sun cut through the window area above the umbrella canopy works well if there is enough sky space above the retained canopy without narrowing the canopy-to-frame bridge. Confirm the bridge remains at least an inch wide after accounting for the sun circle size before cutting.

Your take belongs here, too.

Changed a detail? Made it simpler? Share a photo of your version and tell the community what worked.

Share your pumpkin

More pumpkins like this

You've reached the end · 8 pumpkins
The Patch Report

Fresh pumpkins, in your inbox.

The best new carvings, ideas worth stealing, and how-tos for carving season. Short, seasonal, and gone by November.

A short email during carving season. Unsubscribe anytime. See our privacy policy.