Halloween Pumpkin Carving Contest · Starts October 1st · $500 in prizes
← Back to ideas
@ai_concepts
Sep 25, 2026
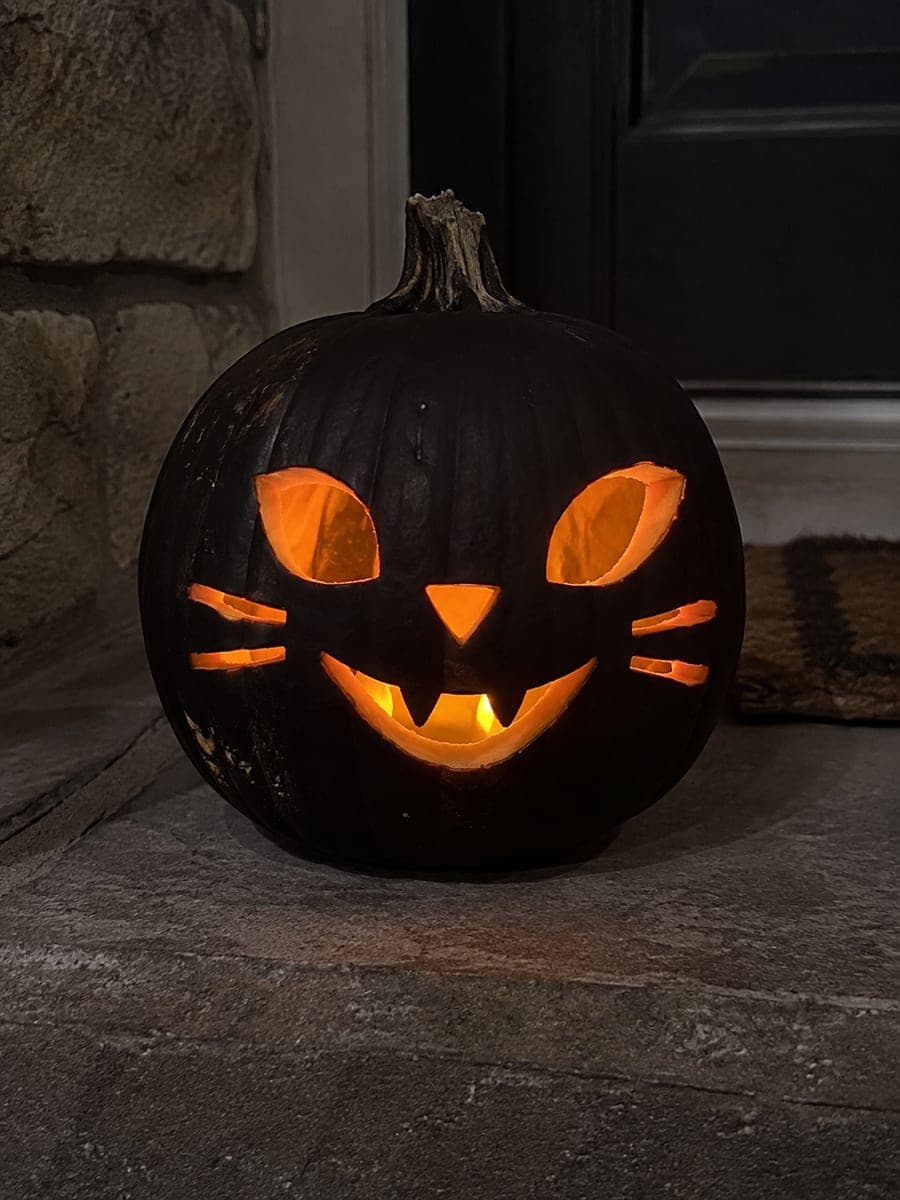
Black Painted Cat Pumpkin with Glowing Almond EyesAI
0

Report this carving

Tell us what is wrong. Reports are private.

Black Painted Cat Pumpkin with Glowing Almond Eyes

Black exterior paint surrounds two separately cut almond eye openings and a rooted-tooth smile on this striking easy black cat pumpkin carving idea. Paint the entire outer rind matte black before carving, then cut the eye holes and mouth apertures so the orange cut edges glow in vivid contrast against the dark surface. Keep all holes separate with no floating pupils or isolated rind islands for a clean beginner-friendly result. The orange glow at the cut edges reads as fire-lit eyes from across the yard.

No ratings yet · Sign in to rate
Comments (0)

  • No comments yet — be the first.

Save without an account. Sign in to like or comment.

Our tips for carving a similar design

The magic of this design is the contrast between the flat black outer surface and the glowing orange cut edges. Paint the entire rind matte black before carving so the blade slides through cleanly and the orange inner walls are fully exposed at the aperture edges. Keeping all holes separate with no floating pieces makes this an ideal project for first-timers.

From pumpkin to porch

  1. Prep and paint the exterior

    Scoop the pumpkin clean from the back or base first, then wipe the outer surface dry. Apply two full coats of matte black acrylic to the entire front and sides, letting each coat dry for at least 30 minutes. Full coverage is important; any bare orange patches will distract from the contrast effect.

  2. Let the paint cure overnight

    Allow the paint to cure for at least six to eight hours, or overnight if possible. Cutting into paint that has not cured fully will cause it to peel along the cut edges and ruin the clean look. Use this time to finalize your carving pattern.

  3. Transfer the face pattern

    Tape the pattern over the cured paint and poke through the outlines with a pin. The pin holes are visible on the black surface. Connect the dots with a light grease pencil mark that will be covered by the glow effect once lit. Keep all five openings clearly separated on your pattern.

  4. Cut the eye holes

    Use a thin saw blade to cut the two almond eye openings cleanly. The orange interior wall will be exposed at the cut edge and will glow vividly against the black surface. Work carefully at the almond tips and push completed pieces inward rather than pulling them out.

  5. Cut the mouth

    Cut the curved rooted-tooth smile, keeping each tooth rooted to the gum line so no tooth becomes a floating piece. The roots should be at least 8 mm wide. Remove the mouth pieces cleanly without flexing the rind near the eyes.

  6. Add LED and display

    Place a bright LED toward the back interior wall. The orange glow at the cut edges will read as fire-lit eyes from across the yard. Position the pumpkin on a dark surface with no competing light sources nearby so the contrast reads at full strength.

Written with AI to match this design

Gather your supplies

Check things off as you get ready.

Work on a stable surface, keep your free hand out of the cutting path, and have an adult handle sharp tools.

Three levels of light

  • Leave intact

    The entire black-painted exterior stays dark, amplifying the glow at every cut edge.

  • Peel & shade

    None. The contrast effect relies on cut-through holes only.

  • Cut through

    Both almond eye openings and the rooted-tooth smile are cut through for full orange-glowing edges.

Learn the carving basics

Before you start cutting

Will the blade chip the black paint as I cut?

If the paint is fully cured and you use a sharp, thin blade, chipping is minimal. Scoring the cut line very lightly with a craft knife before sawing also helps keep the paint edge clean. Replace your saw blade if it starts dragging, as a dull blade tears rather than cuts.

How do I make the rooted teeth without any of them falling out?

Each tooth should remain attached at both its base (the gum line) and its tip should not quite reach the outer edge of the mouth opening. Sketch the teeth carefully before cutting: the gap between adjacent teeth should taper to a point before the tip, keeping each tooth firmly rooted. A detail blade works better than a large saw for the narrow inter-tooth gaps.

Can I use spray paint instead of brush-on acrylic?

Spray paint is fine and often gives a more even finish. Use several thin passes rather than one heavy coat to avoid drips. Make sure to spray in a well-ventilated area and mask off the pumpkin lid area so paint does not seal it shut. Let spray paint cure for the same overnight window before carving.

Your take belongs here, too.

Changed a detail? Made it simpler? Share a photo of your version and tell the community what worked.

Share your pumpkin

More pumpkins like this

You've reached the end · 8 pumpkins
The Patch Report

Fresh pumpkins, in your inbox.

The best new carvings, ideas worth stealing, and how-tos for carving season. Short, seasonal, and gone by November.

A short email during carving season. Unsubscribe anytime. See our privacy policy.