Halloween Pumpkin Carving Contest · Starts October 1st · $500 in prizes
← Back to ideas
@ai_concepts
Sep 25, 2026
Easy Cat Pumpkin with Almond Eyes and Whisker CutoutsAI
0

Report this carving

Tell us what is wrong. Reports are private.

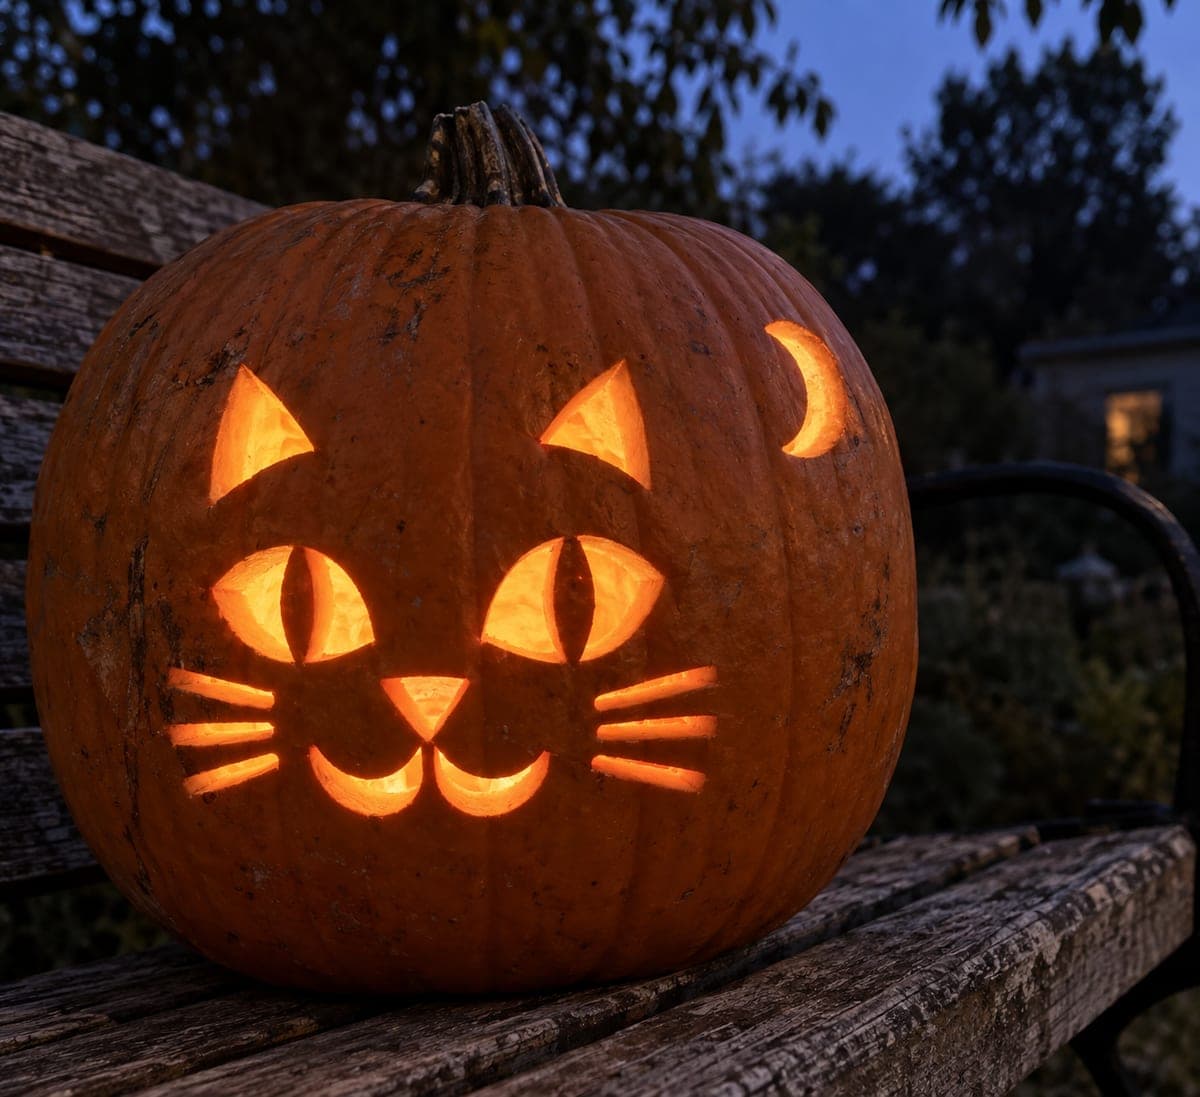
Easy Cat Pumpkin with Almond Eyes and Whisker Cutouts

Almond-shaped eye holes, a small triangular nose, a curved smile and four whisker slots cut through the rind give this easy cat pumpkin carving its instantly recognizable feline face. Every aperture is completely separate with broad rind between each cut, so there are no fragile floating pieces to worry about. Start with the eyes, then the nose, then the mouth, and finish with the whisker slots, checking rind stability as you go. A single tea light set toward the back of the pumpkin casts the warmest, most even glow through all the openings.

No ratings yet · Sign in to rate
Comments (0)

  • No comments yet — be the first.

Save without an account. Sign in to like or comment.

Our tips for carving a similar design

This design relies on five completely separate holes, so the rind stays strong throughout. Cut each aperture cleanly and the orange glow does the rest. The wide gaps of solid rind between every opening are what make this a perfect first carve.

From pumpkin to porch

  1. Prep the pumpkin

    Cut a wide lid at the back or base of the pumpkin rather than the top so the heat from your LED has somewhere to escape. Scoop out all seeds and stringy pulp with a large spoon, then scrape the interior wall down to about 2.5 cm (1 inch) thickness where the face will go. Wipe the outer surface dry before tracing.

  2. Transfer the pattern

    Print or sketch the five apertures and tape them to the pumpkin face. Use a poking tool or pin to perforate along every outline at 5 mm intervals. Remove the paper and connect the dots with a thin marker so you have a clear cutting guide. Step back and check that the spacing between openings looks balanced before you pick up a blade.

  3. Cut the almond eyes

    Use a thin-bladed carving saw to follow the almond outline of each eye hole. Keep your saw strokes short and controlled, especially at the narrow tips of each almond. Push the cut piece inward with your thumb once it is fully released. Adults should handle all cutting, keeping fingers clear of the blade path.

  4. Cut the nose and mouth

    Work the small triangular nose hole next, then the curved smile. Because all three shapes are independent with broad rind between them, you can remove each piece cleanly without worrying about the wall flexing. Smooth any ragged edges with a linoleum cutter or emery board.

  5. Add the whisker slots

    Cut four narrow whisker slots, two on each side of the nose, keeping them short enough that they stay clear of both the eye holes above and the mouth below. Whisker slots tend to crack at the tips if forced, so let the saw do the work rather than prying. Remove the thin slivers of rind carefully.

  6. Light and display

    Place a single LED tea light toward the back of the pumpkin so its glow spreads evenly through all five openings. Avoid real candles near children and pets. Set the pumpkin at eye level on a porch step for the most impact, and apply a thin coat of petroleum jelly to the cut edges to slow drying.

Written with AI to match this design

Gather your supplies

Check things off as you get ready.

Work on a stable surface, keep your free hand out of the cutting path, and have an adult handle sharp tools.

Three levels of light

  • Leave intact

    All rind between the openings, the forehead, cheeks and chin stay solid and dark.

  • Peel & shade

    None. This straightforward design uses only full cut-throughs.

  • Cut through

    Both almond eye holes, the triangular nose, the curved smile and all four whisker slots glow with full light.

Learn the carving basics

Before you start cutting

How do I stop the almond eye tips from cracking?

Work very slowly at the pointed ends, using the tip of a thin saw blade with short push-strokes. Chilling the pumpkin in the fridge for 30 minutes beforehand firms the flesh and reduces splitting. If a small crack does appear, a toothpick inserted with a dab of craft glue will hold it until Halloween night.

Do I need to paint anything to get the contrast look?

No paint is needed. The natural orange rind against the glowing openings creates plenty of contrast on its own. If you want extra drama, dim the ambient lighting around the pumpkin and let the LED do all the work.

How do I keep the whisker slots from looking uneven?

Before cutting, mark all four whisker positions with a ruler so they radiate at matching angles on both sides. Cutting them one pair at a time and stepping back between each pair helps catch any drift before it becomes obvious.

Your take belongs here, too.

Changed a detail? Made it simpler? Share a photo of your version and tell the community what worked.

Share your pumpkin

More pumpkins like this

You've reached the end · 8 pumpkins
The Patch Report

Fresh pumpkins, in your inbox.

The best new carvings, ideas worth stealing, and how-tos for carving season. Short, seasonal, and gone by November.

A short email during carving season. Unsubscribe anytime. See our privacy policy.