Halloween Pumpkin Carving Contest · Starts October 1st · $500 in prizes
← Back to ideas
@ai_concepts
Sep 25, 2026
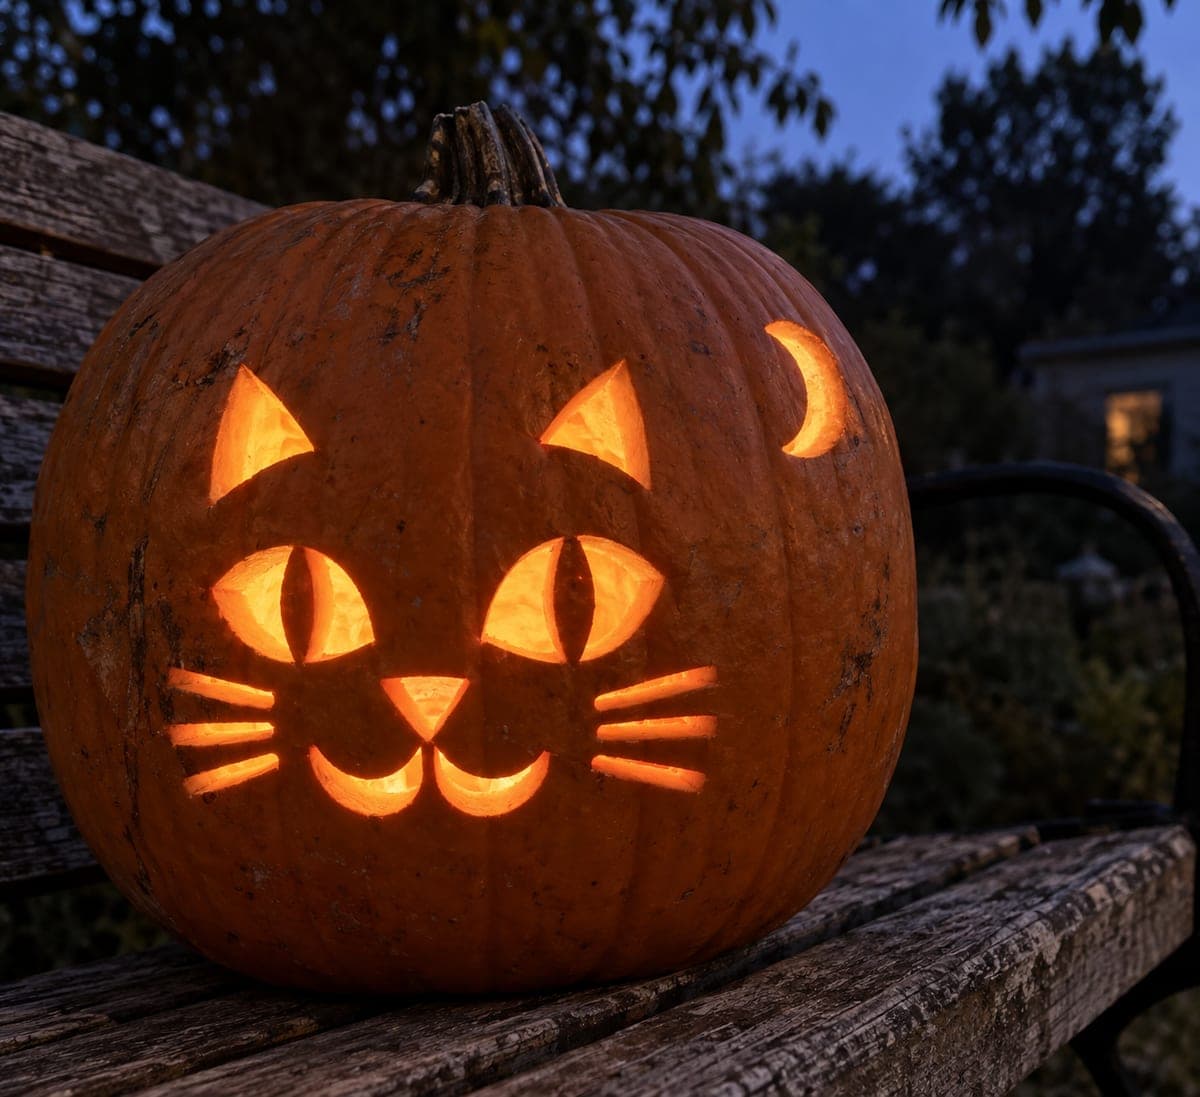
Glowing Cat Pumpkin with Supported Pupils and Crescent MoonAI
0

Report this carving

Tell us what is wrong. Reports are private.

Glowing Cat Pumpkin with Supported Pupils and Crescent Moon

Spanning pupil bars bridge each eye opening, fine whisker slots radiate outward and a crescent moon cutout floats above the face in this medium cat pumpkin carving idea. The pupil bars are the key structural detail: keep them wide so they do not snap when you carve the surrounding eye area. All other apertures, including the nose, mouth, whiskers and moon, are independent cuts with generous rind between them. Placing the pumpkin on a slight angle toward your viewer lets candlelight catch the moon opening especially well.

No ratings yet · Sign in to rate

Comments (0)

  • No comments yet — be the first.

Save without an account. Sign in to like or comment.

Our tips for carving a similar design

The key move here is the pupil bar: a strip of rind left across each eye opening that reads as a dark slit against the inner glow. All other holes including the nose, whisker slots and crescent moon are fully independent cuts. Getting the pupil bar width right before you start is what separates a dramatic result from a broken one.

From pumpkin to porch

  1. Prep and thin the wall

    Remove the lid from the back or base of the pumpkin to preserve the stem. Scoop the interior clean and thin the front wall to roughly 2 cm where the face and moon will sit. Thinner walls let the LED glow through more vividly, which is especially important for the fine pupil bar detail.

  2. Transfer and plan bridges

    Tape your pattern to the pumpkin and poke the outline through with a pin. Before removing the paper, mark each pupil bar location clearly so you know exactly which rind to keep. The bars should be at least 8 mm wide; any narrower and they may snap when you carve the surrounding eye area.

  3. Cut the eye surrounds

    Start each eye by cutting the top lobe of the opening, then the bottom lobe, leaving the pupil bar intact in the middle. Work with short, controlled saw strokes and push cut pieces inward once free. Check that the bar is still firmly attached by pressing it gently with a fingertip before moving on.

  4. Carve facial features and whiskers

    Cut the nose, mouth and whisker slots as fully independent apertures with solid rind on all sides. These are straightforward cuts, but keep each whisker slot short enough that it clears the eye holes above and the mouth below. Remove slivers carefully to avoid flexing the wall near the pupil bars.

  5. Cut the crescent moon

    The crescent sits above the face with its horns pointing upward. Cut the outer arc first, then the inner concave arc that creates the crescent shape. The narrow horn tips are the trickiest points; slow short strokes with a thin blade prevent cracking. Confirm there is generous rind between the crescent and the top of the eye area.

  6. Light and angle the pumpkin

    Place a bright LED inside and tilt the pumpkin very slightly toward your viewer so the candlelight catches the moon opening at its best angle. The pupil bars will appear as dark horizontal slits floating in glowing eye openings, which is the whole payoff of this design.

Written with AI to match this design

Gather your supplies

Check things off as you get ready.

Work on a stable surface, keep your free hand out of the cutting path, and have an adult handle sharp tools.

Three levels of light

  • Leave intact

    The pupil bars across each eye, plus all rind between facial features, stay solid and unlit.

  • Peel & shade

    None. All light effects come from full cut-throughs.

  • Cut through

    Both eye openings (with pupil bars spanning them), the nose, mouth, whisker slots and the crescent moon all glow with full light.

Learn the carving basics

Before you start cutting

How wide should the pupil bars be to stay safe?

Aim for at least 8 to 10 mm of rind width for each bar. Thicker is safer, and the bar still reads as a dark slit against the glow at that width. If a bar feels springy when you press it, reinforce it from the inside with a small piece of packing tape.

My crescent moon tips keep cracking. What should I do?

Crescent horns crack most often when you try to follow the curve in one continuous stroke. Instead, start from the midpoint of each arc and work toward the tip in short segments, letting the blade turn gradually. Chilling the pumpkin before cutting firms the flesh and reduces the risk.

Can I do this design on a smaller pumpkin?

A pumpkin at least 25 cm across is recommended. Smaller pumpkins compress all the spacing, which makes the pupil bars dangerously narrow and the crescent horn tips very fragile. A larger surface gives you the clearance needed for every element to stay structurally sound.

Your take belongs here, too.

Changed a detail? Made it simpler? Share a photo of your version and tell the community what worked.

Share your pumpkin

More pumpkins like this

You've reached the end · 8 pumpkins
The Patch Report

Fresh pumpkins, in your inbox.

The best new carvings, ideas worth stealing, and how-tos for carving season. Short, seasonal, and gone by November.

A short email during carving season. Unsubscribe anytime. See our privacy policy.