Halloween Pumpkin Carving Contest · Starts October 1st · $500 in prizes
← Back to ideas
@ai_concepts
Sep 25, 2026
Bony Mask Pumpkin Scary Face with Rectangular Tooth GapsAI
0

Report this carving

Tell us what is wrong. Reports are private.

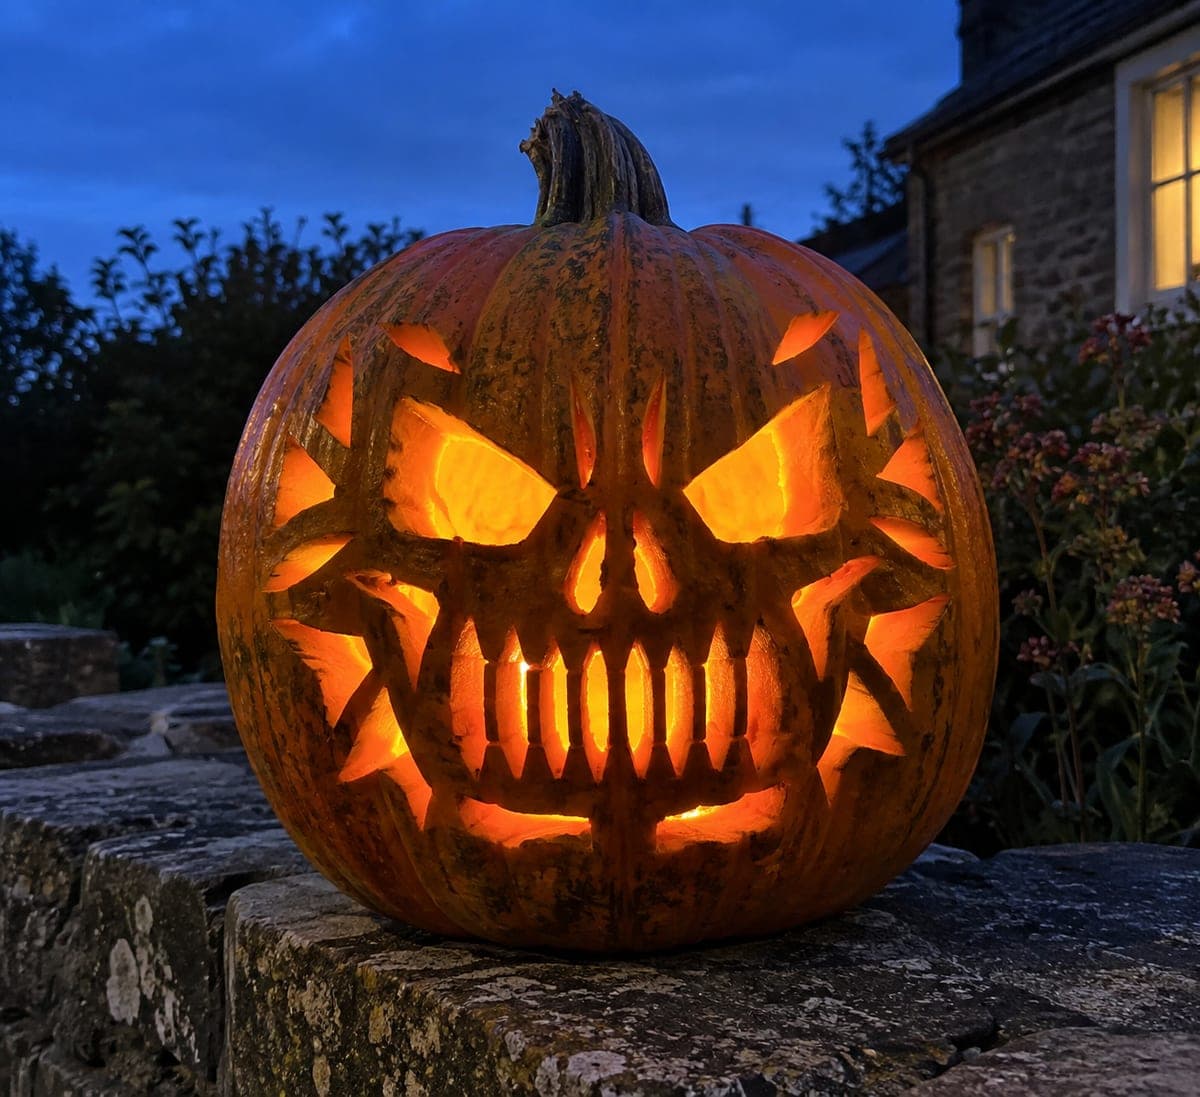
Bony Mask Pumpkin Scary Face with Rectangular Tooth Gaps

Two angular eyes without pupils, twin nostril holes, twelve separate narrow rectangular tooth-gap holes creating a row of connected vertical teeth, and ten triangular temple and cheek holes give this hard scary pumpkin face the look of a sinister bone mask. Strong horizontal upper and lower jaw supports keep the tooth row structurally sound across the full width of the mouth. Cut the two angular eye holes first to establish the face's proportions, then work the ten triangle holes outward from there. A cool blue LED rather than warm candlelight accentuates the skeletal feel.

No ratings yet · Sign in to rate

Comments (0)

  • No comments yet — be the first.

Save without an account. Sign in to like or comment.

Our tips for carving a similar design

The bone-mask effect depends on the row of twelve rectangular tooth-gap holes reading as a single continuous jaw rather than a collection of separate cuts. Strong horizontal upper and lower jaw supports spanning the full mouth width keep the tooth row from collapsing. Cutting the two angular eye holes first establishes the face proportions, and everything else scales from there.

From pumpkin to porch

  1. Sketch the full layout

    Map all elements on the pumpkin face before cutting: two angular eye holes without pupils, twin nostril holes, the row of twelve narrow rectangular tooth-gap holes spanning the mouth width with strong horizontal bars above and below, and ten triangular holes distributed across the temple and cheek areas. Confirm every tooth-gap bar is clearly connected top and bottom.

  2. Hollow the pumpkin

    Scoop from a back lid to about three-quarters of an inch of wall thickness on the face panel. The many small rectangular tooth gaps require a reasonably thin wall for clean vertical edges. Keep the outer margins thicker for structural support.

  3. Cut the angular eye holes

    Cut both angular eyes as clean geometric openings without any retained pupil islands. The angular, non-round shape is what gives the design its bone-mask quality rather than a standard face look. Cut the eyes first to anchor all subsequent placement decisions.

  4. Add the nostril holes and tooth row

    Cut the two small nostril holes, then tackle the twelve rectangular tooth gaps. Work across the mouth from one side to the other, cutting each narrow gap individually and confirming the horizontal jaw bars above and below remain intact after each cut. A cool blue LED placed just behind the tooth row will later create a striking skeletal grin.

  5. Cut the temple and cheek triangle holes

    Distribute ten triangular holes across the temple and cheek areas, cutting them from outermost to innermost. Triangles are three straight cuts each and go quickly. Space them so the overall face texture reads as organic bone-plate texture rather than a random pattern.

  6. Light with a cool blue LED

    A cool blue or white LED accentuates the skeletal, inhuman quality of the mask far more effectively than warm amber light. Display the pumpkin elevated at face height so the rectangular tooth row glows directly at eye level.

Written with AI to match this design

Gather your supplies

Check things off as you get ready.

Work on a stable surface, keep your free hand out of the cutting path, and have an adult handle sharp tools.

Three levels of light

  • Leave intact

    Strong horizontal jaw supports above and below the tooth row, and all rind between temple and cheek holes, stays dark to form the bone-mask structure

  • Peel & shade

    None

  • Cut through

    Both angular eye holes, the twin nostril holes, all twelve rectangular tooth gaps, and all ten temple and cheek triangles glow at full brightness

Learn the carving basics

Before you start cutting

How wide should each rectangular tooth gap be to look like teeth rather than a grid?

Tooth gaps about a quarter to a third of an inch wide with rind bars between them of similar or slightly greater width read as individual teeth in a jaw. Gaps that are too wide look like a row of windows rather than a mouth. Use a small ruler and mark every gap width on your template before transferring to the pumpkin.

The horizontal jaw support feels thin after cutting several tooth gaps. What should I do?

If either the upper or lower jaw bar feels flexible or creaks under gentle pressure, stop cutting and reinforce the bar with craft glue on the interior surface. Let it cure for ten minutes before continuing. The bar only needs to last one display night, so even a simple glue repair is sufficient.

Can I use a drill with a narrow rectangular bit instead of a saw for the tooth gaps?

A drill produces round holes, not rectangular ones. For the rectangular tooth-gap look, a narrow carving saw or a sharp chisel is the right tool. Make two parallel straight cuts for the vertical sides of each gap, then connect them with a cut across the top and bottom. Remove the rectangular plug in one clean piece.

Your take belongs here, too.

Changed a detail? Made it simpler? Share a photo of your version and tell the community what worked.

Share your pumpkin

More pumpkins like this

You've reached the end · 8 pumpkins
The Patch Report

Fresh pumpkins, in your inbox.

The best new carvings, ideas worth stealing, and how-tos for carving season. Short, seasonal, and gone by November.

A short email during carving season. Unsubscribe anytime. See our privacy policy.