@cider_sam
Sep 5, 2026

Candlelit silhouette
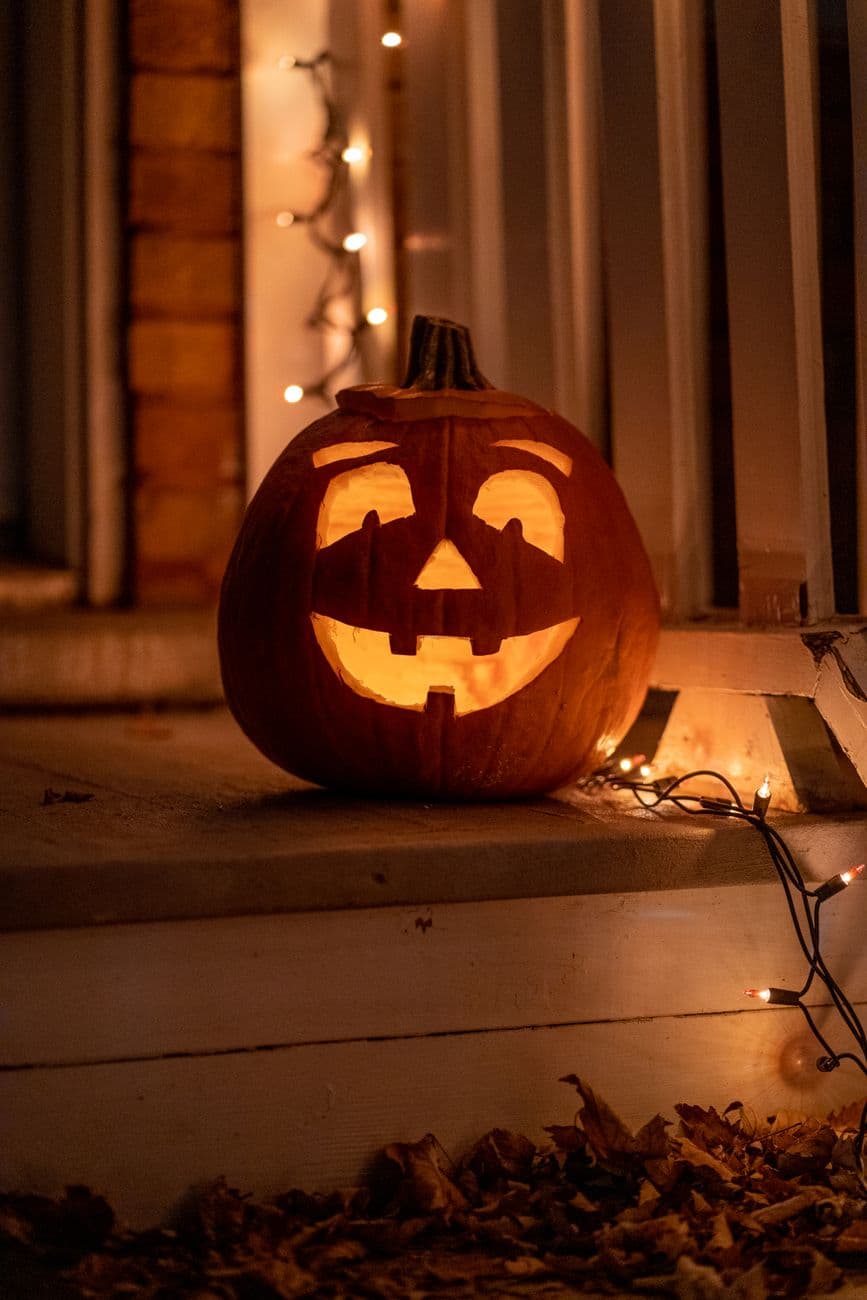
A zigzag-toothed jack in silhouette, backlit by a string of garden candles. The face is all embers.
No ratings yet · Sign in to rate
A zigzag-toothed jack in silhouette, backlit by a string of garden candles. The face is all embers.
The whole charm here is a simple set of clean cutouts glowing against a dark, untouched skin. You carve two triangle eyes, a small triangle nose, and a wide zigzag mouth, then let a warm LED do the rest. The trick is keeping every cut crisp and leaving the rest of the pumpkin fully intact so the lit shapes read as bright embers in silhouette.
Written by PumpkinCarvingIdeas.com, inspired by @cider_sam's photo above. These are our suggestions, not instructions from the uploader, and this approach hasn't been tested on their exact carve.
Choose a round, smooth pumpkin with a flat side facing out so your design sits nicely. Wipe it down and let it dry. Sketch two triangle eyes, a small triangle nose, and a zigzag mouth with a marker or a pencil. Keep the shapes spaced apart so the walls between them stay strong.
An adult should cut the opening. For this look, cutting a hole in the back keeps the front clean, or you can cut a traditional lid at the top around the stem. Angle the blade inward so the lid or panel rests on a ledge instead of falling in. Set the piece aside.
Scrape out the seeds and pulp with a sturdy spoon or a scoop. Thin the inside of the carving wall to about one inch where the face will be, which makes cutting much easier. A thinner wall also lets more light push through the openings. Save some seeds for roasting if you like.
Tape your sketch down or trace it on, then start with the smaller shapes. Cut the two triangle eyes and the small nose with a fine carving saw, using gentle back-and-forth strokes rather than force. Push each cut piece inward and out to release it. Take your time on the points so the triangles stay sharp.
Save the wide mouth for last since it is the biggest opening and weakens the face. Follow your zigzag line slowly, treating each tooth as its own small angled cut. Keep the peaks connected to the pumpkin so the grin holds its shape. Clean up any ragged edges with the tip of your tool.
Drop in a battery LED or a couple of tea light LEDs for a warm flicker, never an open flame. Set the pumpkin outside after dark, low to the ground so the glow reads as embers. String some safe garden lights behind it for that soft bokeh backdrop. Shoot from the front with your phone exposure lowered to keep the silhouette moody.
Check things off as you get ready.
Work on a stable surface, keep your free hand out of the cutting path, and have an adult handle sharp tools.
The entire body, stem, and background of the pumpkin stay as untouched dark skin, holding the silhouette.
Optional: lightly shave a thin halo just around the mouth edges if you want a soft glow ring, though the classic look skips this.
The two triangle eyes, the small triangle nose, and the full zigzag mouth are cut clean through for the brightest ember glow.
Cut the mouth last so the face stays rigid while you work the smaller shapes. Make each tooth a clean angled cut and leave the peaks firmly attached to the pumpkin wall. If a wall feels thin, widen the gap slightly rather than forcing the blade.
Thin the inside front wall to about one inch so light passes through easily. Use a warm-toned LED rather than a cool white one to get that orange ember color. Shooting in real darkness with a lowered exposure also makes the lit shapes pop.
Both work for this design. A back hole keeps the front face totally clean and hides the light source, which suits the silhouette look. A top lid is the classic choice and makes swapping the LED easy, so pick whichever feels simpler to you.
Changed a detail? Made it simpler? Share a photo of your version and tell the community what worked.
The best new carvings, ideas worth stealing, and how-tos for carving season. Short, seasonal, and gone by November.




Comments (0)