Halloween Pumpkin Carving Contest · Starts October 1st · $500 in prizes
← Back to ideas
@ai_concepts
Sep 7, 2026
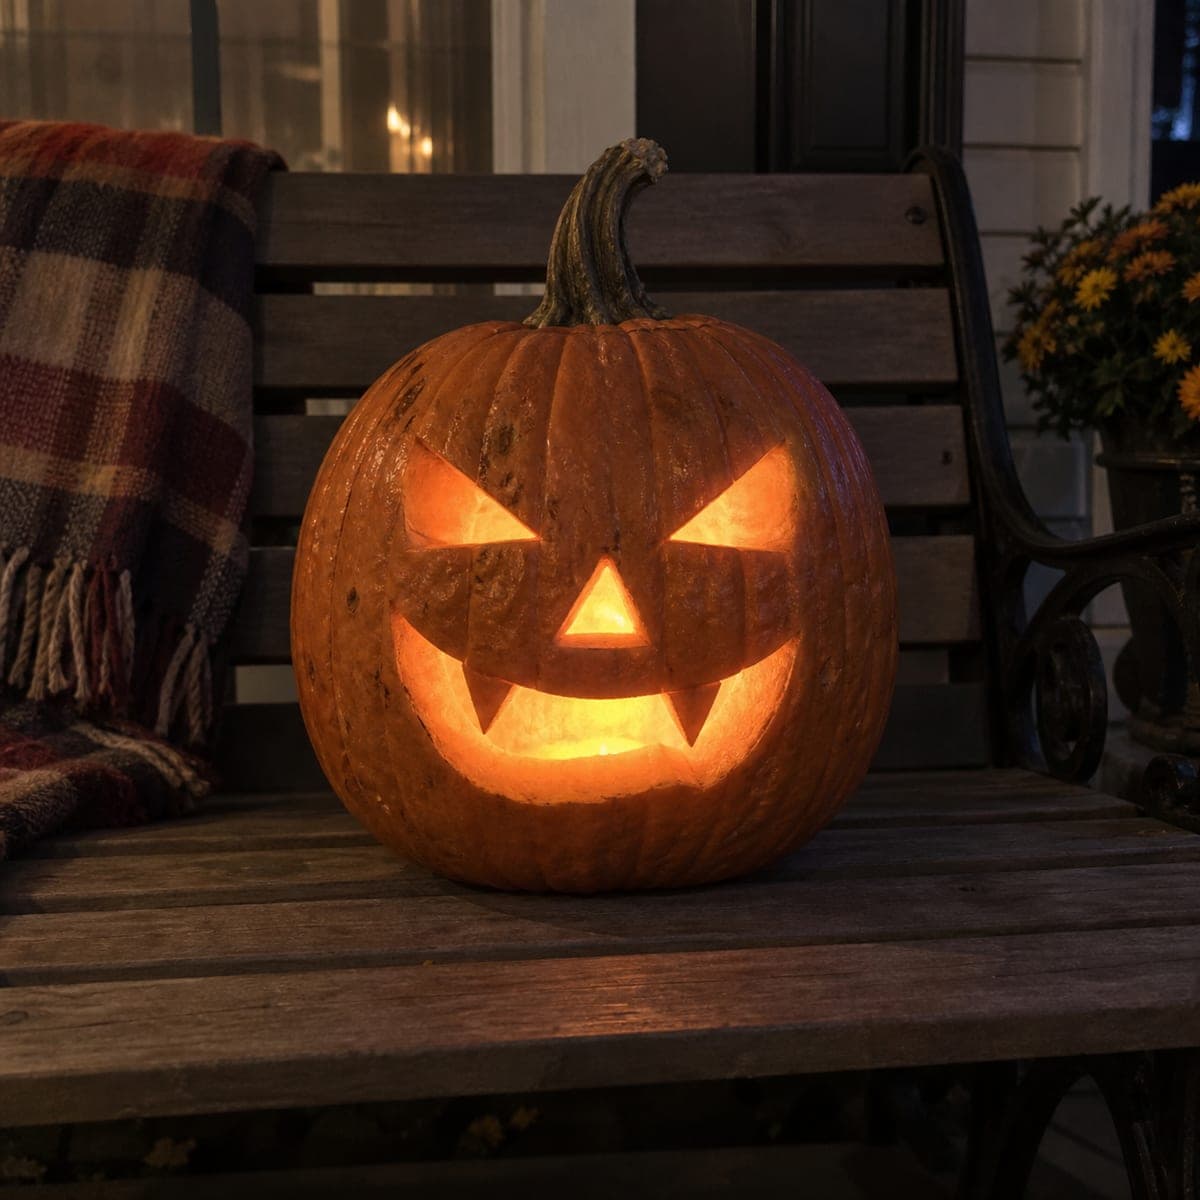
Wicked Grinning Jack-O-Lantern With Jagged TeethAI
0

Wicked Grinning Jack-O-Lantern With Jagged Teeth

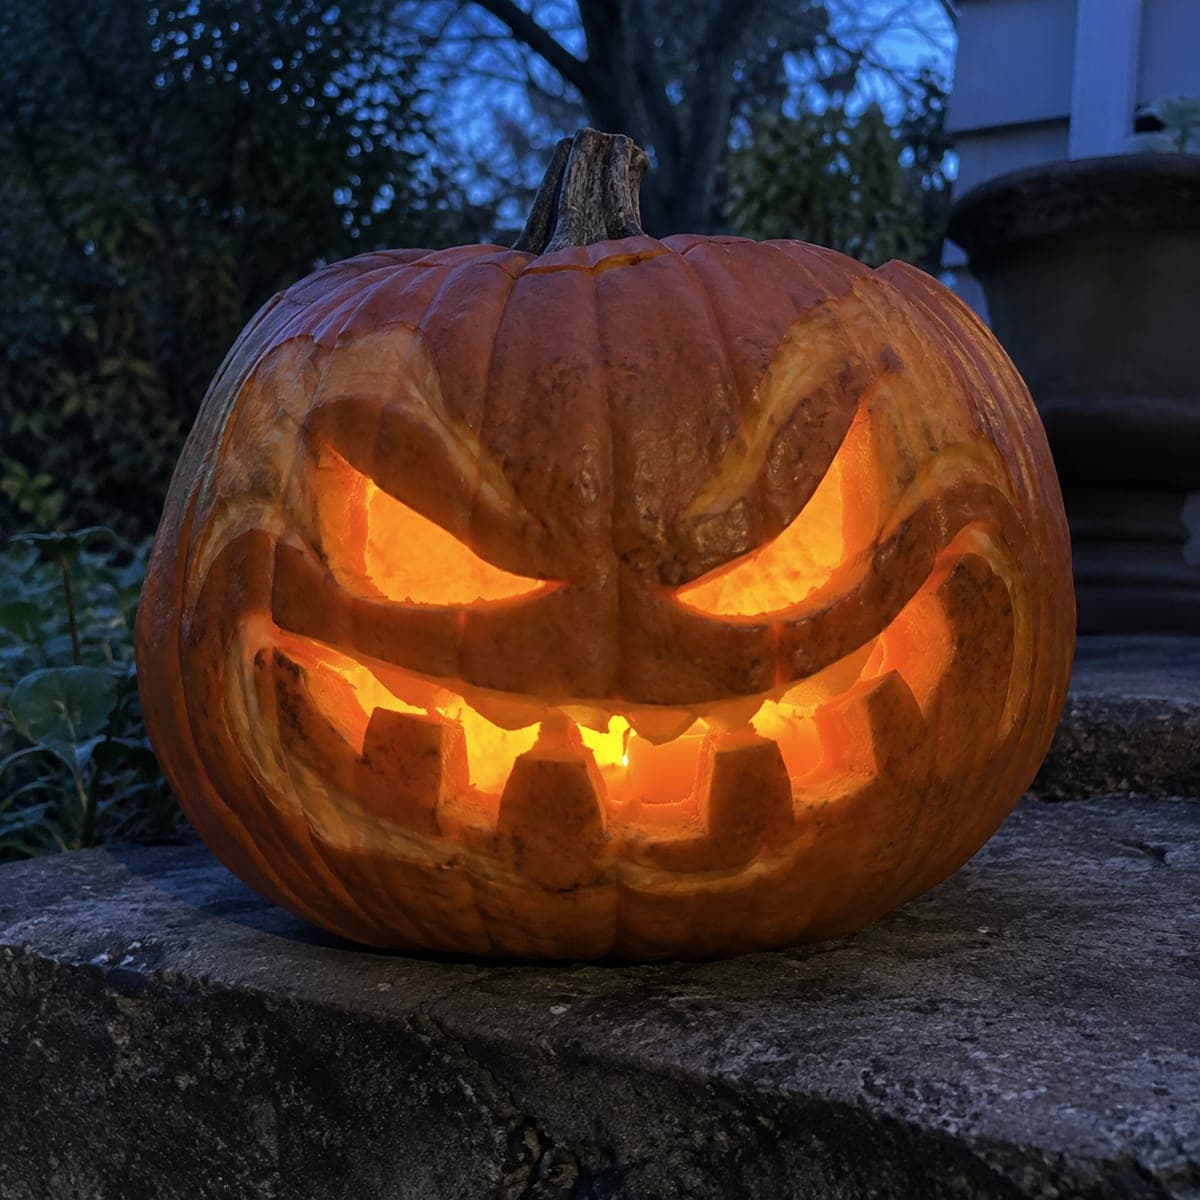
Slanted, furrowed eyes and a wide crooked grin full of blocky teeth give this jack-o-lantern classic menace, with peeled skin above each eye adding scowling eyebrows. The eyes and mouth are cut clean through while the brow ridges are only skinned, a simple two-depth trick that adds a lot of character. Cut the mouth last and leave every tooth attached at top or bottom for strength. Real candlelight flickering behind the teeth makes the sneer come alive at dusk.

This is an AI-generated concept image: a realistic, carvable design idea rather than a photo of a finished carve. AI concepts are always labeled and sit out the leaderboard and the contest.

No ratings yet · Sign in to rate
Comments (0)

  • No comments yet — be the first.

Save without an account. Sign in to like or comment.

Our tips for carving a similar design

The trick here is a simple two-depth carve: the slanted eyes and wide grin are cut clean through for bright light, while the scowling brow ridges above the eyes are only skinned for a dim glow. That contrast between skinned eyebrows and cut-through eyes is what gives the face its mean, three-dimensional character. Plan the blocky teeth so each one stays anchored top or bottom, and save the big mouth opening for last.

Written by PumpkinCarvingIdeas.com, inspired by the image above. These are our suggestions, not instructions from the uploader. This approach to the AI concept has not been tested on a real pumpkin.

From pumpkin to porch

  1. Prep the pumpkin and lid

    Pick a rounded pumpkin with a smooth front and a sturdy stem. Cut a lid from the top at an angle so it will not fall in, or open a hatch in the back if you want a cleaner front. Scoop out the seeds and stringy pulp, then thin the front wall you plan to carve down to about one inch. A thinner wall makes cutting and skinning much easier and lets more light through.

  2. Transfer the face

    Sketch or tape on a stencil with slanted eyes, angled brow ridges, and a wide crooked grin full of blocky teeth. Poke the outlines with a pin tool or trace them with a washable marker. Mark clearly which shapes get cut through, the eyes and mouth, and which only get skinned, the two eyebrow ridges. Keeping the plan visible now prevents mistakes later.

  3. Skin the scowling eyebrows

    Using a shallow gouge or a lino-style tool, remove only the outer skin along each brow ridge above the eyes. Peel down to the pale flesh but do not cut through the wall. This shallow area will glow a soft dim orange and read as a heavy, angry brow. Keep the peeled edges crisp so the scowl looks deliberate.

  4. Cut the eyes

    Switch to a fine carving saw and cut the two slanted, furrowed eyes clean through. Cut on the waste side of your lines and let the blade do the work with gentle strokes. Push the cut pieces out from the inside to avoid chipping the front. The sharp angled points at the inner corners are what make the glare, so take your time there.

  5. Carve the grin last

    Save the wide mouth for last since it is the biggest opening and weakens the wall most. Cut around the outer grin line first, then carve the gaps between the blocky teeth, leaving every tooth attached at either its top or bottom. Do not free a tooth on all sides or it will snap or fall in. Work slowly along the crooked shape so the sneer stays even.

  6. Light it and photograph at dusk

    Drop in a battery LED, ideally a flicker candle, rather than an open flame for safety. Set the pumpkin at eye level and shoot at dusk when the sky is still deep blue, as in the reference look. The cut eyes and mouth will blaze while the skinned brows glow softly, giving that living sneer. A dab of petroleum jelly on cut edges helps slow drying if you carve early.

Gather your supplies

Check things off as you get ready.

Work on a stable surface, keep your free hand out of the cutting path, and have an adult handle sharp tools.

Three levels of light

  • Leave intact

    The whole outer face and the ridged pumpkin skin stay untouched and dark.

  • Peel & shade

    The two angled brow ridges above the eyes are skinned to a dim orange scowl.

  • Cut through

    The slanted eyes and the wide crooked grin with blocky teeth are cut through for the brightest light.

Learn the carving basics

Before you start cutting

How do I keep the blocky teeth from breaking?

Leave every tooth attached at either its top or its bottom, never carving all four sides. Cut the gaps between teeth rather than the teeth themselves, and keep the wall around them about one inch thick. Cutting the mouth last also keeps the face rigid while you do the more delicate work.

What is the two-depth trick and why does it matter?

Two-depth means some shapes are cut clean through while others are only skinned to the pale flesh. Here the eyes and mouth go all the way through for bright light, and the eyebrows are just skinned for a dim glow. That difference in brightness makes the brow look heavy and gives the face real depth instead of flat cutouts.

Since this is an AI concept, will a real pumpkin look the same?

The reference is an AI concept, so no real pumpkin exists, but the design carves cleanly in real life. Keep the tooth points and inner eye corners a bit thicker than they appear in the image so nothing snaps. A real LED will give a similar warm flicker without the fire risk of a candle.

Your take belongs here, too.

Changed a detail? Made it simpler? Share a photo of your version and tell the community what worked.

Share your pumpkin

More pumpkins like this

You've reached the end · 8 pumpkins
The Patch Report

Fresh pumpkins, in your inbox.

The best new carvings, ideas worth stealing, and how-tos for carving season. Short, seasonal, and gone by November.

A short email during carving season. Unsubscribe anytime. See our privacy policy.