Halloween Pumpkin Carving Contest · Starts October 1st · $500 in prizes
← Back to ideas
@ai_concepts
Jul 16, 2026
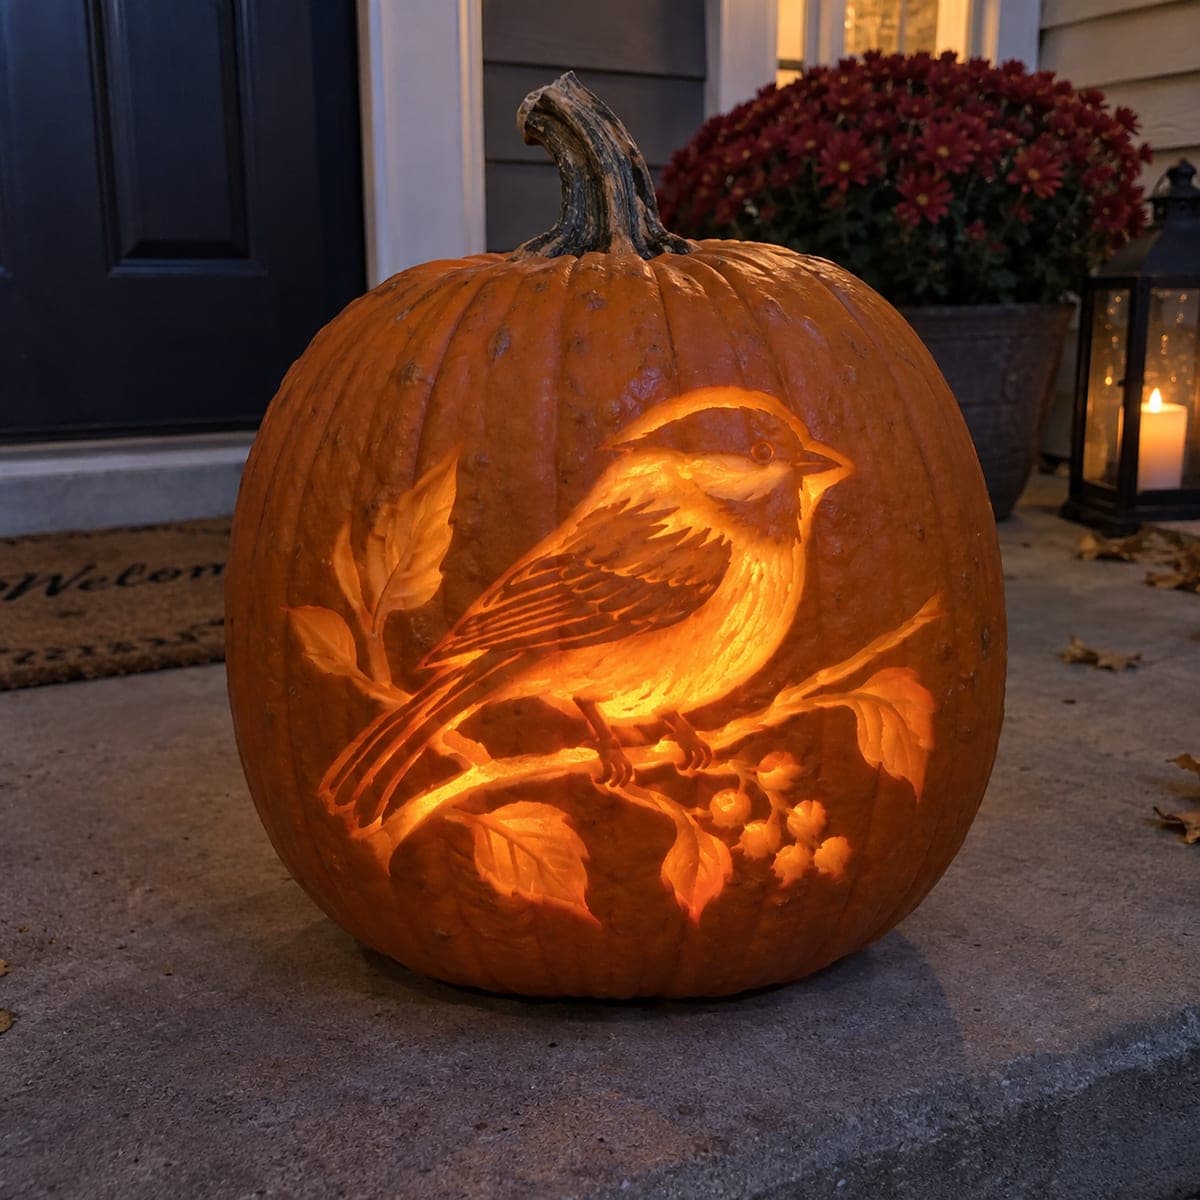
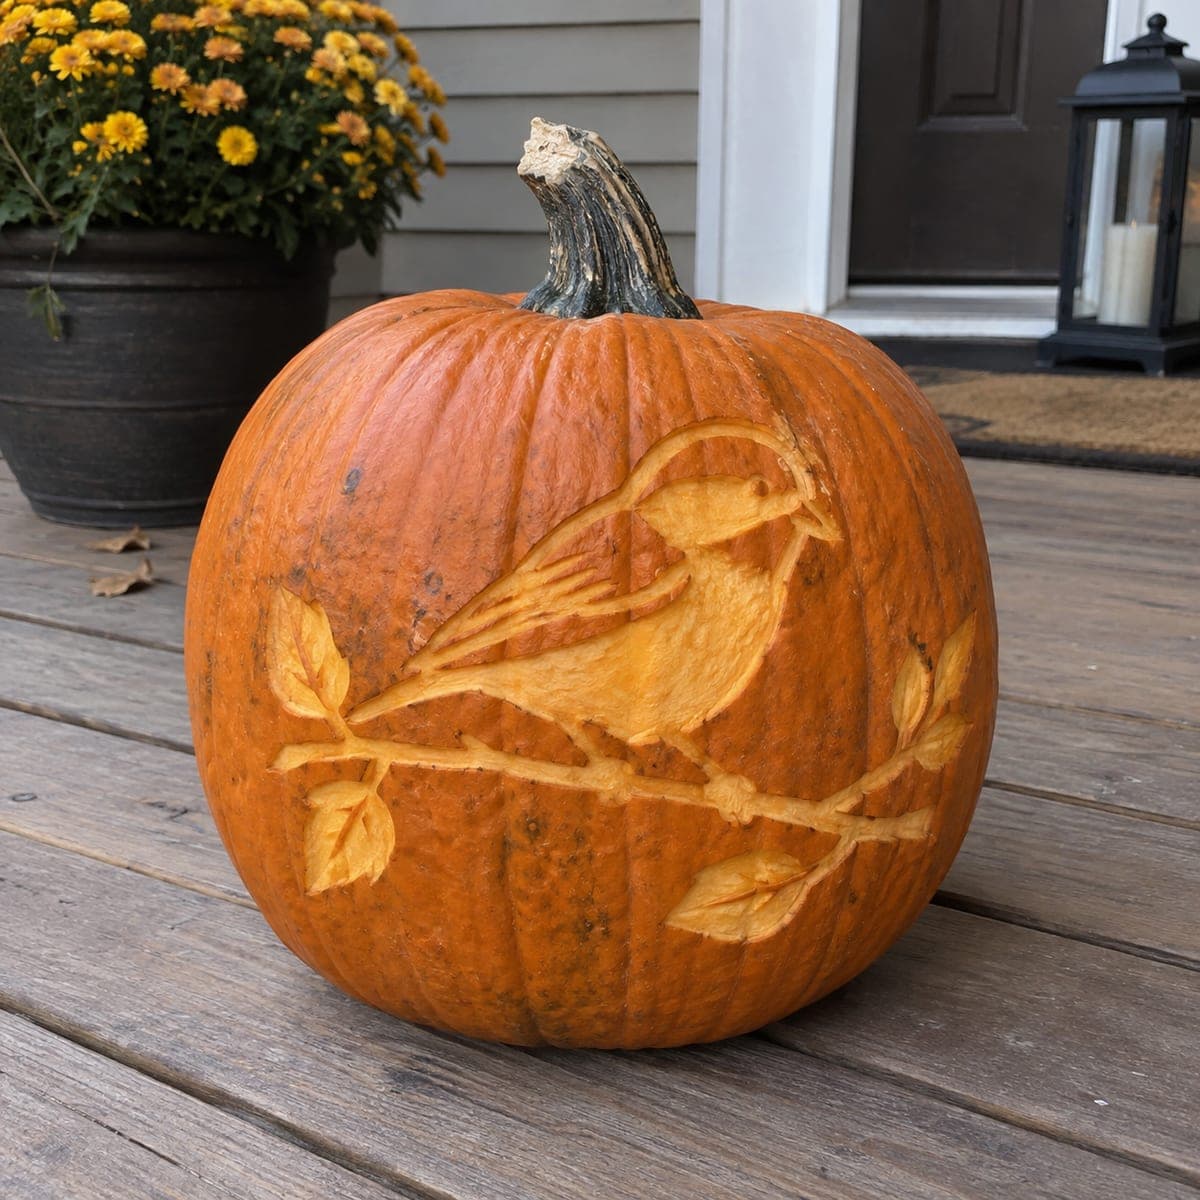
Chickadee on Berry Branch Shaded PumpkinAI
0

Chickadee on Berry Branch Shaded Pumpkin

A black-capped chickadee perches on a berry branch, its cap, wings, and surrounding leaves all etched in rich shading that glows from a candle inside the pumpkin. The berries are left as small rounded bumps of unpeeled skin, adding texture against the more deeply etched background. Carve the fine line details of the wing feathers with a V-gouge tool and leave the belly area shallower to mimic the bird's pale plumage. This nature pumpkin carving idea is a beautiful choice for bird-watchers and autumn nature lovers.

This is an AI-generated concept image: a realistic, carvable design idea rather than a photo of a finished carve. AI concepts are always labeled and sit out the leaderboard and the contest.

No ratings yet · Sign in to rate
Comments (0)

  • No comments yet — be the first.

Save without an account. Sign in to like or comment.

Our tips for carving a similar design

The heart of this design is relief shading, where you scrape away the skin at different depths so the light passes through in shades of orange rather than as open cutouts. The chickadee, its branch, and the leaves are all etched into the surface, with the bird's pale belly left shallow and the dark cap and wings scooped deeper. The berries stay as untouched rounded bumps of skin so they read as dark texture against the glowing background.

Written by PumpkinCarvingIdeas.com, inspired by the image above. These are our suggestions, not instructions from the uploader. This approach to the AI concept has not been tested on a real pumpkin.

From pumpkin to porch

  1. Prep the pumpkin and cut a base opening

    Pick a tall pumpkin with a smooth, blemish-free face for the bird. Cut a hole in the bottom rather than the top so the design stays clean and the pumpkin sits flat. Scoop the inside wall behind the design down to about one inch thick so light glows evenly through the shaded areas. A thin, even wall is what makes relief shading work, so take your time scraping.

  2. Transfer the pattern

    Print the chickadee, branch, leaves, and berry cluster at a size that fills the front. Tape it snug over the curve and poke the outlines and key feather lines with a pin or transfer tool. Mark which zones are cap, wing, belly, leaf, and berry so you remember the depth plan later. Peel the paper and connect any faint dots with a washable marker.

  3. Establish the shading map

    With a ribbon loop or shading tool, gently remove the outer skin from the background and the bird's body first. Leave the pale belly shallowest so it glows brightest, take the wings and dark cap deeper for stronger contrast, and leave the berries as untouched bumps of skin. Work in thin passes and check the depth against a light often, since you can always remove more but cannot put it back.

  4. Cut the fine feather and leaf lines

    Switch to a V-gouge for the crisp line detail. Pull short, consistent strokes to suggest wing feathers, tail bars, and the veins in the leaves. Keep the tool moving away from your holding hand and let the pumpkin turn instead of twisting your wrist. These grooves catch the most light and give the bird its lifelike texture.

  5. Deepen accents and refine contrast

    Step back, light it, and study where the design reads flat. Scoop the cap and the shadow under the wing a touch deeper for punch, and soften any hard edges on the belly so it fades gently. Clean stray marker lines with a damp cloth. Small adjustments here are what separate a good shaded pumpkin from a great one.

  6. Light it and photograph

    Place a battery LED tea light or a small puck light inside, since an open flame can scorch the thin shaded wall and is a fire risk. Warm white LEDs give the closest match to a candle glow. Set the pumpkin on a porch step at dusk and shoot from straight on to catch the full range of shading. Mist the cut surfaces with water and refrigerate overnight to keep it fresh longer.

Gather your supplies

Check things off as you get ready.

Work on a stable surface, keep your free hand out of the cutting path, and have an adult handle sharp tools.

Three levels of light

  • Leave intact

    The berry cluster and the darkest edges of the cap and wing stay as untouched skin for deep shadow.

  • Peel & shade

    The bird's body, the branch, and the leaves are skin-peeled to different depths for a soft mid glow, with the pale belly left shallowest and brightest.

  • Cut through

    This design uses no full cutouts, so keep the thin feather and vein grooves as your brightest lines rather than opening any holes.

Learn the carving basics

Before you start cutting

Do I need to cut any holes all the way through?

No, this is a full relief shading design, so the light comes through thinned skin rather than open cutouts. Focus on removing skin at varied depths and keeping the back wall thin and even. If you want a brighter accent somewhere, thin that spot more instead of piercing through.

How do I keep the berries looking dark against a glowing background?

Leave the berries as raised, untouched bumps of skin while you scrape the area around them lower. Because the surrounding surface is thinner, it glows more, and the full-thickness berries stay dark and pop out with texture. Round their edges slightly so they read as small spheres.

This looks hard. How do I get smooth shading transitions?

Work in many light passes rather than digging deep quickly, and check the wall against a light after each pass. Blend the border between the pale belly and the darker wing gradually so there is no hard step. Rotate the pumpkin and keep your loop tool sharp for clean, even scraping.

Your take belongs here, too.

Changed a detail? Made it simpler? Share a photo of your version and tell the community what worked.

Share your pumpkin

More pumpkins like this

You've reached the end · 8 pumpkins
The Patch Report

Fresh pumpkins, in your inbox.

The best new carvings, ideas worth stealing, and how-tos for carving season. Short, seasonal, and gone by November.

A short email during carving season. Unsubscribe anytime. See our privacy policy.